Authentic Injera (Ethiopian Flatbread)
This post may contain affiliate links. See my disclosure policy.
An authentic Injera recipe, the famous Ethiopian flatbread that’s so perfect for scooping up your favorite Ethiopian dishes and mopping up all of those flavorful juices and sauces. This recipe doesn’t take shortcuts but uses the traditional method for achieving the richest flavor. Whether you choose to use all teff or a combination of flour types, we’ll take you through the process step-by-step to ensure your success!
What is Injera?
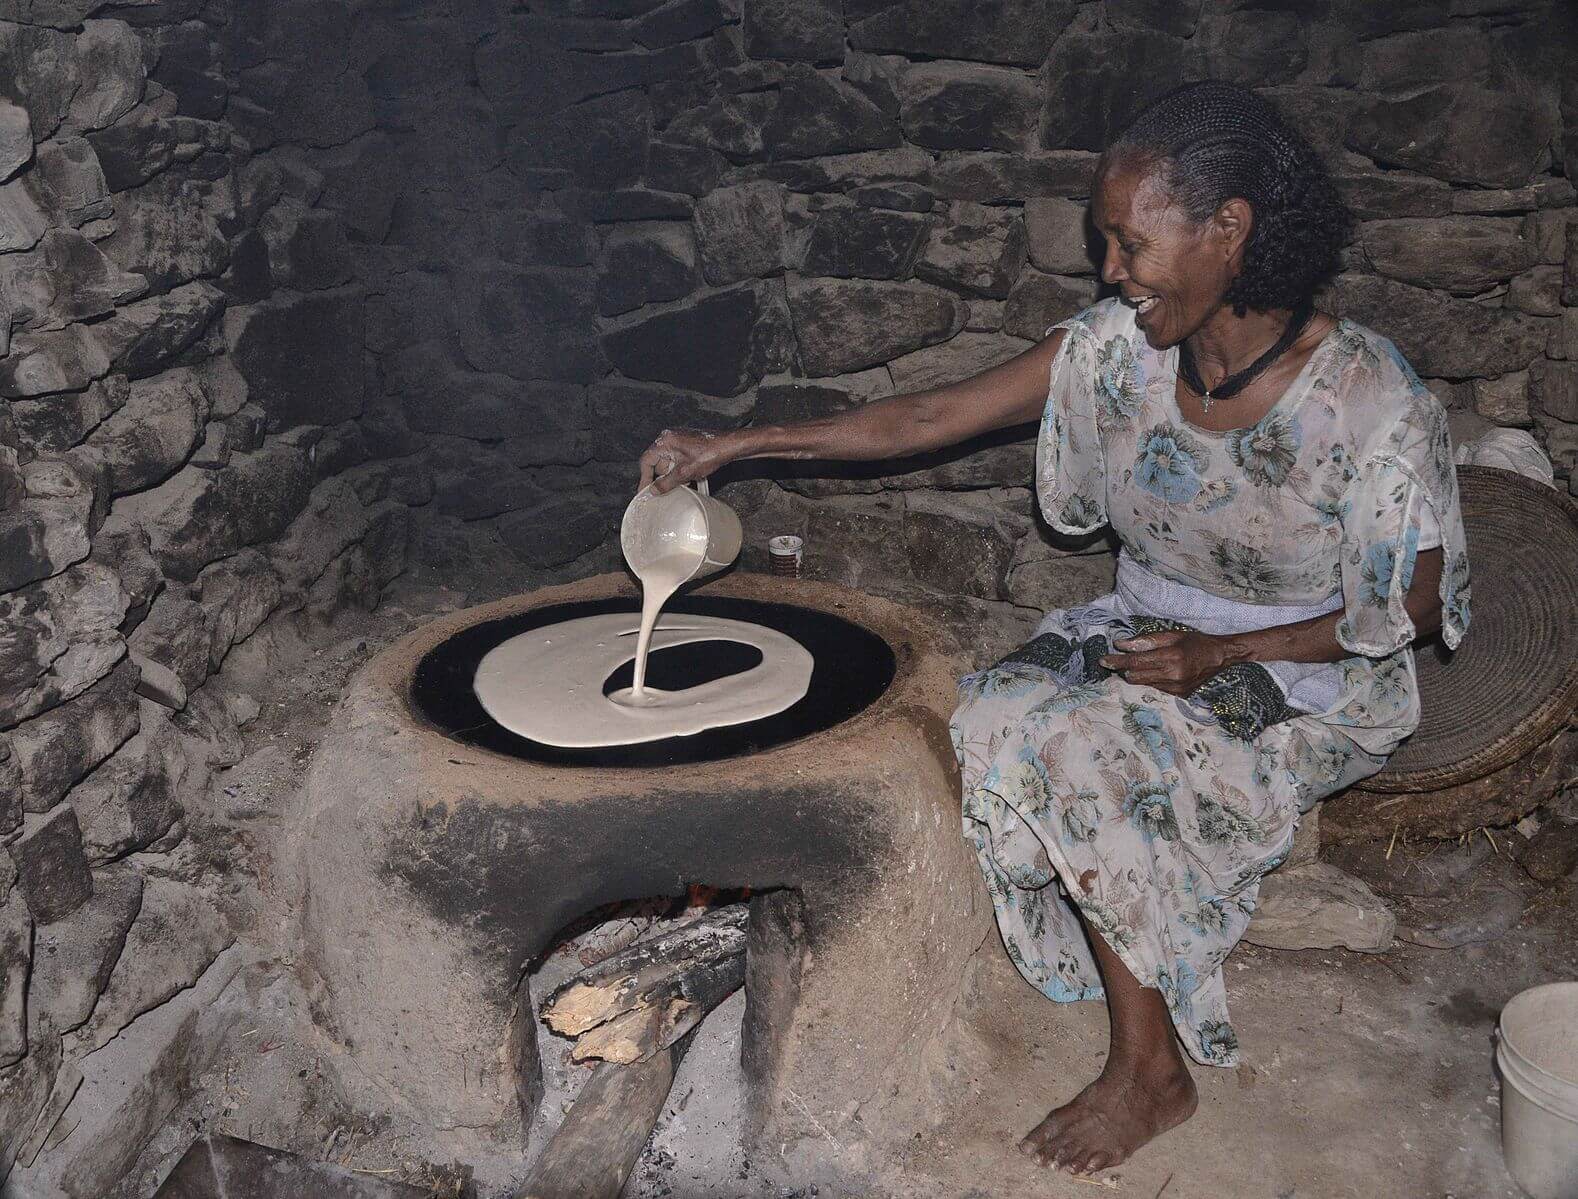
If you’ve ever been to an Ethiopian restaurant – certainly if you’ve ever set foot in Ethiopia – you will have heard of injera. It’s a sourdough flatbread unlike any other sourdough. It starts out looking like a crepe but then develops a unique porous and slightly spongy texture. The thin batter is poured onto the cooking surface, traditionally a clay plate over a fire though now more commonly a specialized electric injera stove, and the bottom remains smooth while the top develops lots of pores which makes it ideal for scooping up stews and sauces.
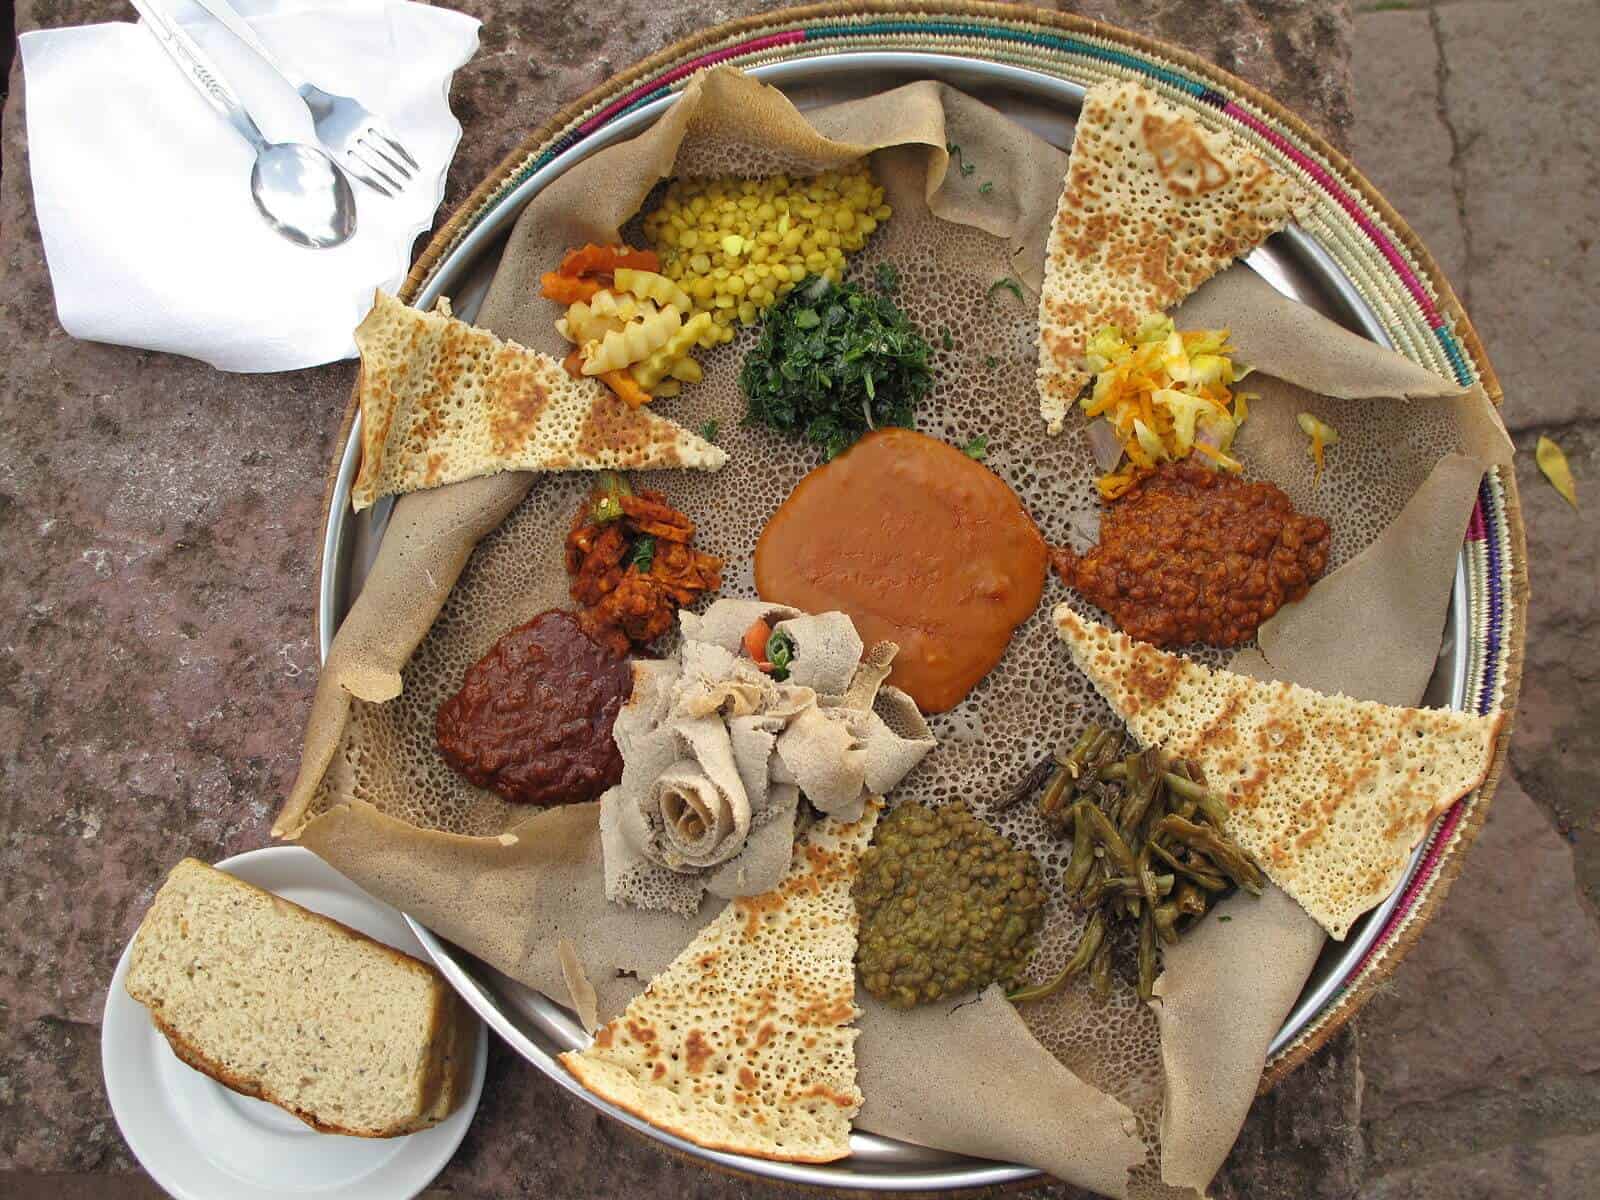
And that’s exactly how injera is used, as an eating utensil. And as a plate. And often in place of the tablecloth. A variety of stews, vegetables and/or salads are placed on a large piece of injera and guests use their right hands to tear portions of the injera which are used for gripping the food. The porous texture of the injera makes it ideal for soaking up the juices.
What is Teff?
Injera is traditionally made out of teff flour, the world’s tiniest grain and also one of the earliest domesticated plants having originated in Ethiopia and Eritrea (where injera is also widely consumed) between 4000 and 1000 BC. Its production is limited to only areas with adequate rainfall though so it’s relatively expensive for most African households. As such, many will replace some of the teff content with other flours like barley or wheat. For those who can afford it, injera made entirely of teff flour has the higher demand.
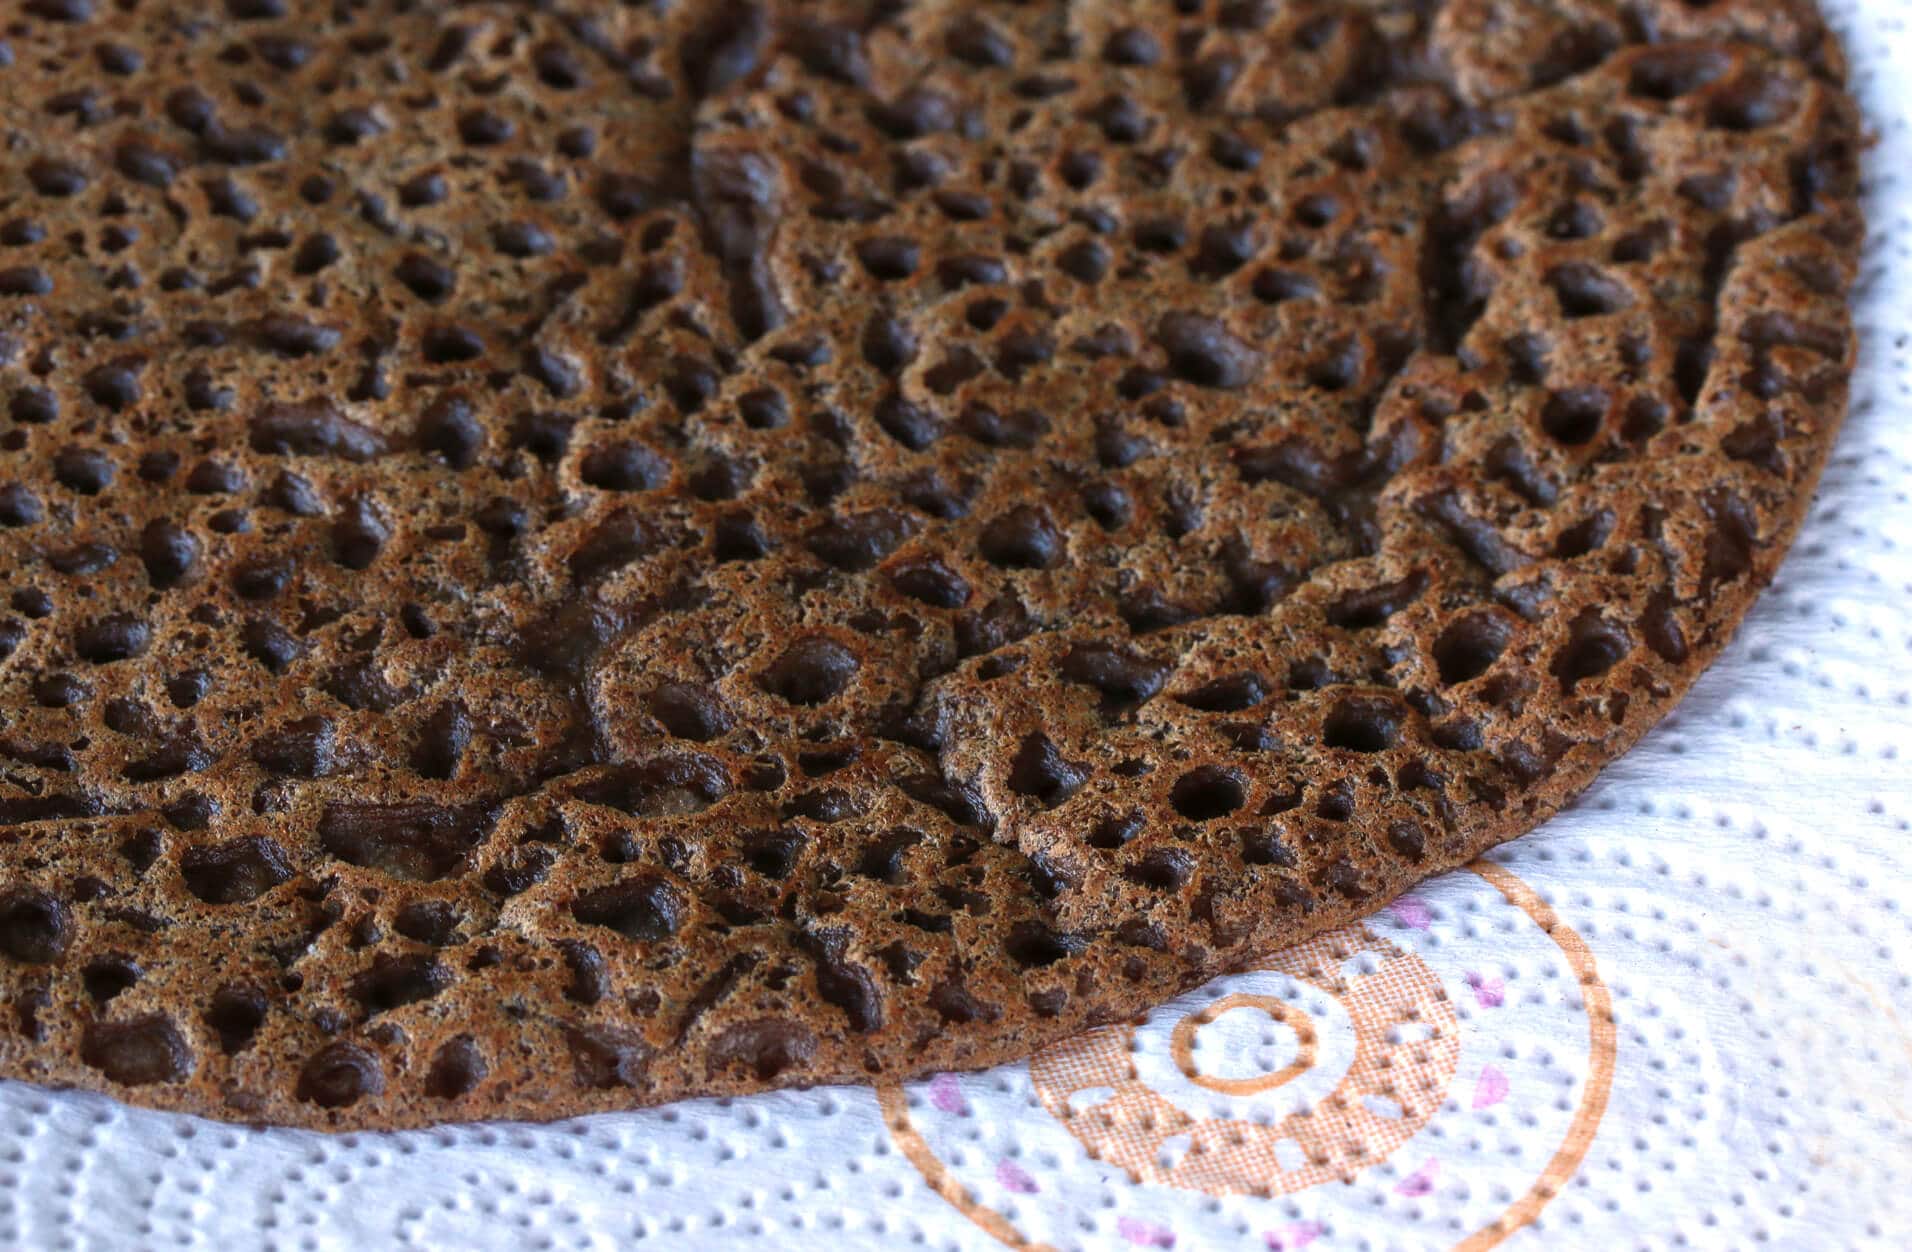
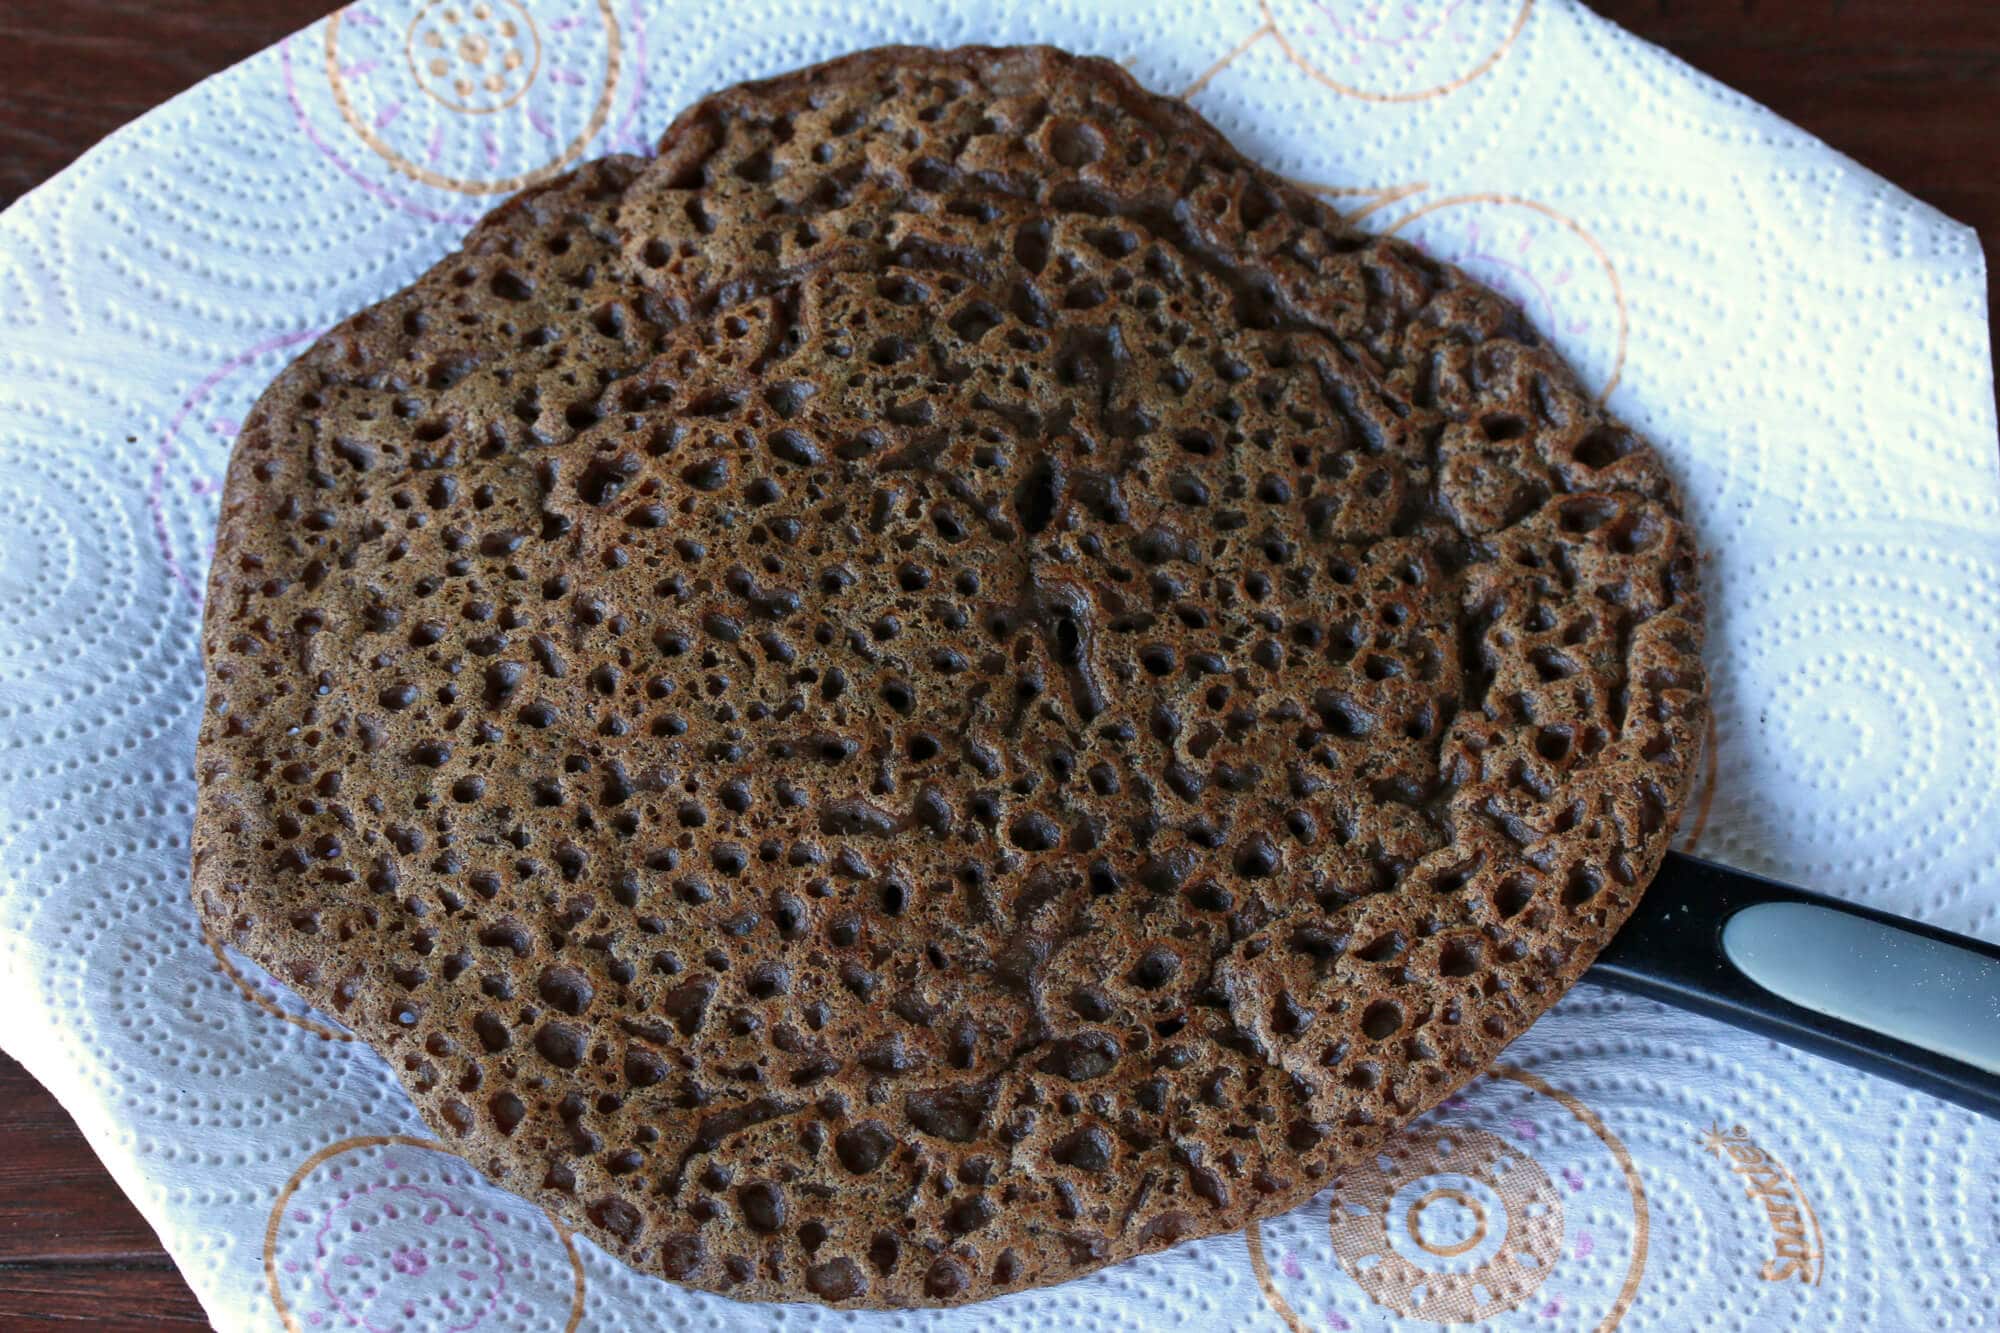
There are different varieties of teff ranging from white/ivory to red to dark brown. In Ethiopia white is generally preferred and will also produce a 100% teff injera that is a lighter in color than what is shown in the first photo and preparation photos. I’m using 100% dark teff flour which produces a very dark injera with a deeper flavor.
The challenge is that if you’re looking for a specific type of teff and like to grind your own grains, most manufacturers don’t differentiate the teff type on their package labeling. It’s mostly an aesthetic preference though and for most baking I do with teff it really doesn’t matter either way. With the injera it will make a difference in the color though if that’s an important factor to you. On Amazon you can purchase both Ivory Teff and Brown Teff.
Traditionally a clay plate, a mitad, placed over a fire is used for making injera. More commonly now specialized electric injera stoves are used. But unless you’re making injera constantly, a simple non-stick pan on the stovetop will do the job.
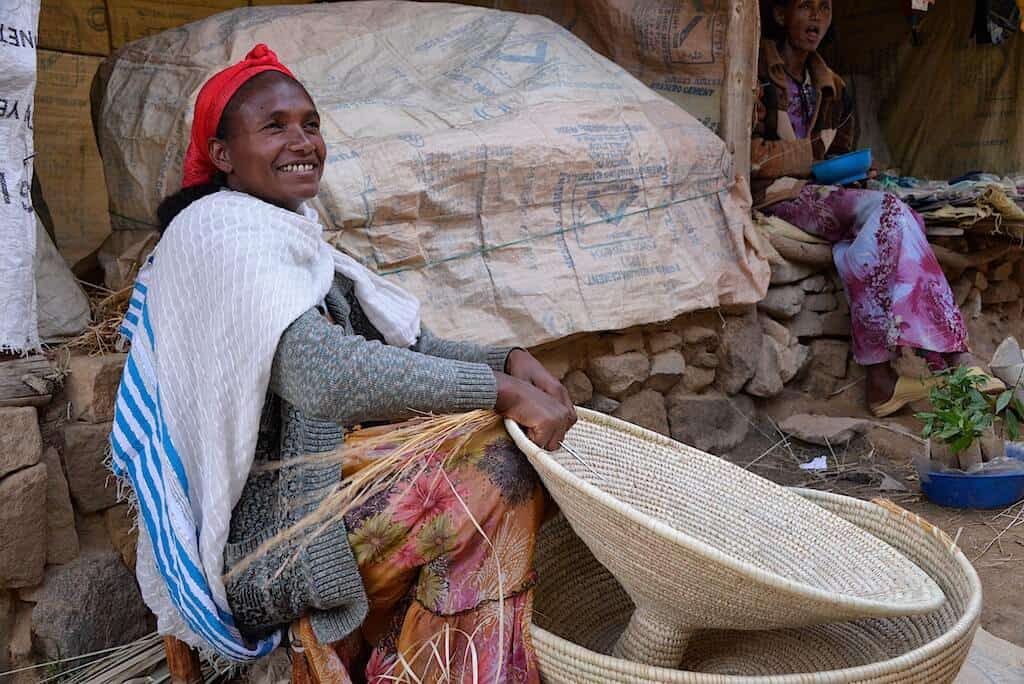
A special woven basket, called a mesab, in which the freshly made injera are placed.
What to Serve With Injera
Injera is the traditional accompaniment to Doro Wat, Ethiopia’s famous spicy chicken stew, and together these constitute the national dish of Ethiopia. Injera is likewise commonly served with Sega Wat, the delicious beef version of Doro Wat as well as Misir Wat, a popular vegetarian dish made with red lentils. Injera is a great “neutral” and versatile side to serve with any of your favorite Ethiopian dishes.
Authentic Injera Recipe
Let’s get started!
And I don’t mean short-cut, one-day, cutting corners injera. I mean the real deal – authentic injera.
IMPORTANT NOTE before we begin: Both the texture and color of the injera will vary greatly depending on what kind of teff you use (dark or ivory) and whether or not you’re combining it with other flours. Gluten-based flours (e.g. wheat and barley) will yield a much different texture than 100% teff. In the pictures and recipe below I’m using 100% dark teff, something you will not find in restaurants and will look different than what most are accustomed to, but is traditional to Ethiopian home cooking.

You can buy pre-ground teff flour or grind your own. I like to grind my own grains because 1) the flour has far more nutrition because it’s fresher and the oils haven’t oxidized and 2) I have more control over the texture of the flour.
I use and LOVE my German-made KoMo Classic Grain Mill. It comes with a 15-year warranty. It’s a stone-grinding mill and you can grind grains as finely or as coarsely as you like. It’s an awesome piece of machinery and it’s just downright gorgeous!
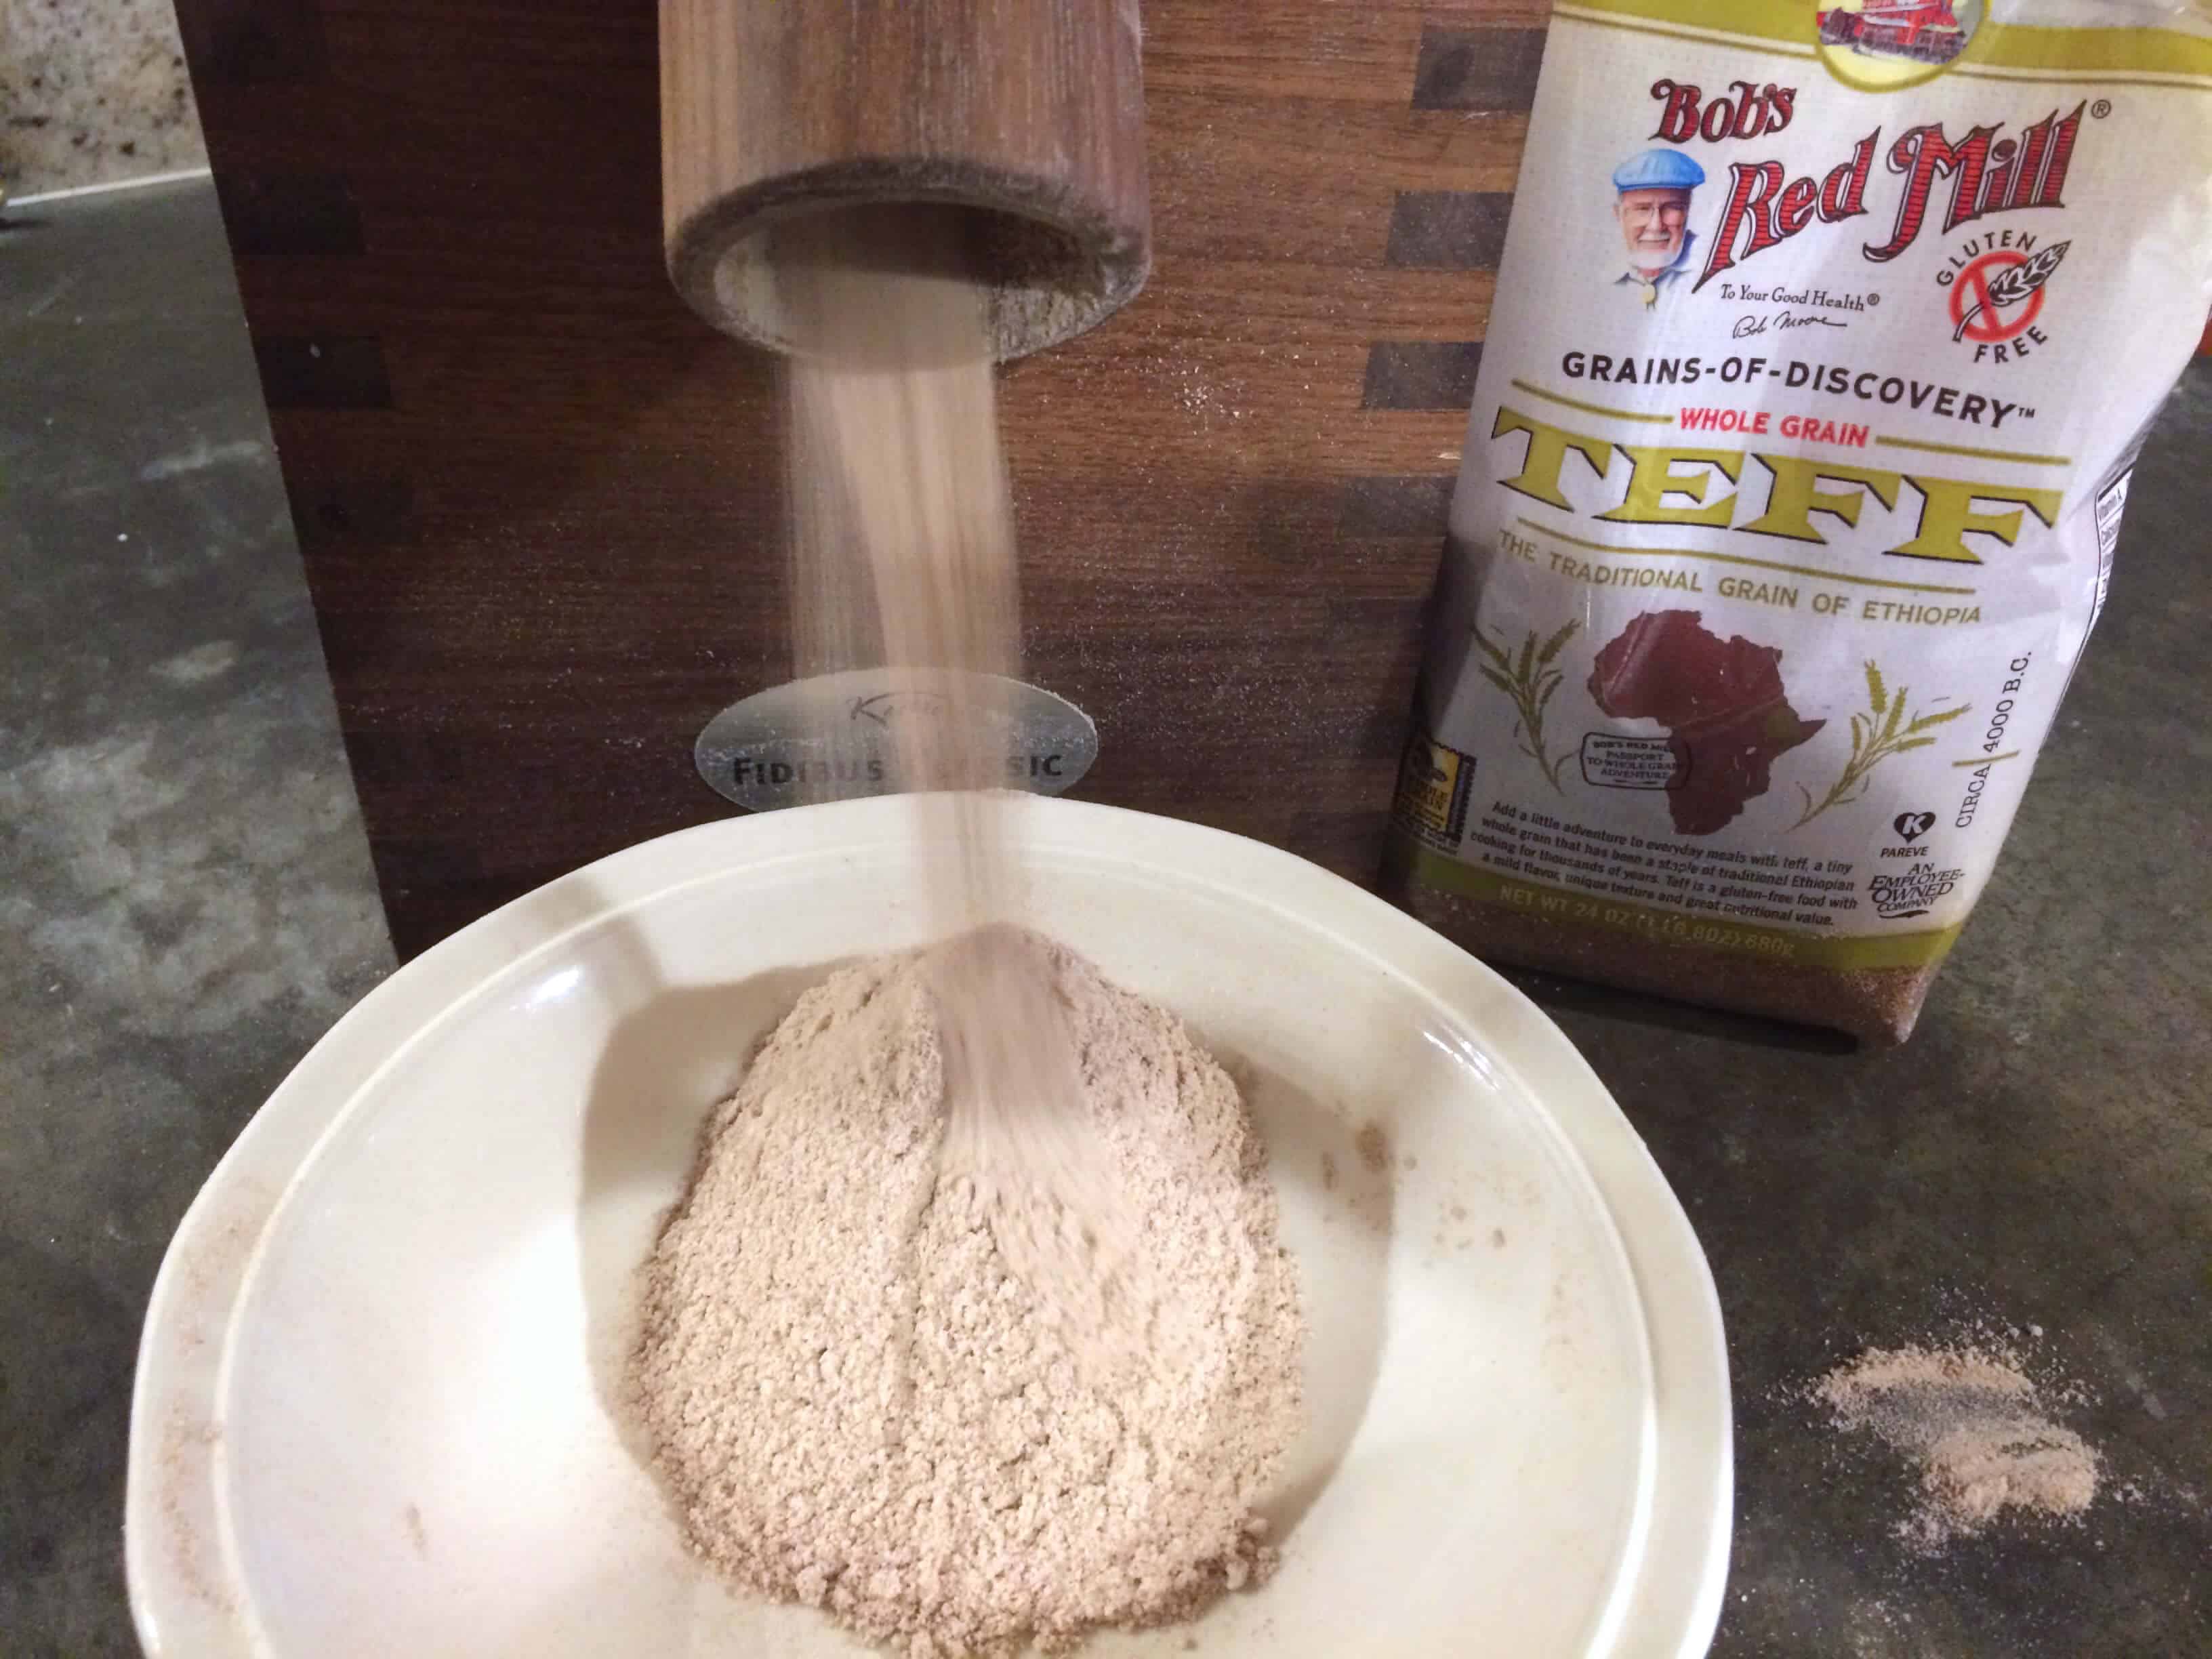
Whether you’re grinding your own flour or using pre-ground, you’ll need 2 cups of flour. I’m using all teff flour, and mine happens to be dark teff flour which will produce a very dark injera with a deeper flavor.
As mentioned above, using 100% teff flour is traditionally considered the most desirable (it also happens to be naturally gluten-free), but you can substitute part of it with other flours such as wheat or barley.
However, if you’re new to making injera I recommend substituting a portion of teff with barley or wheat flour as 100% is more challenging to work with.
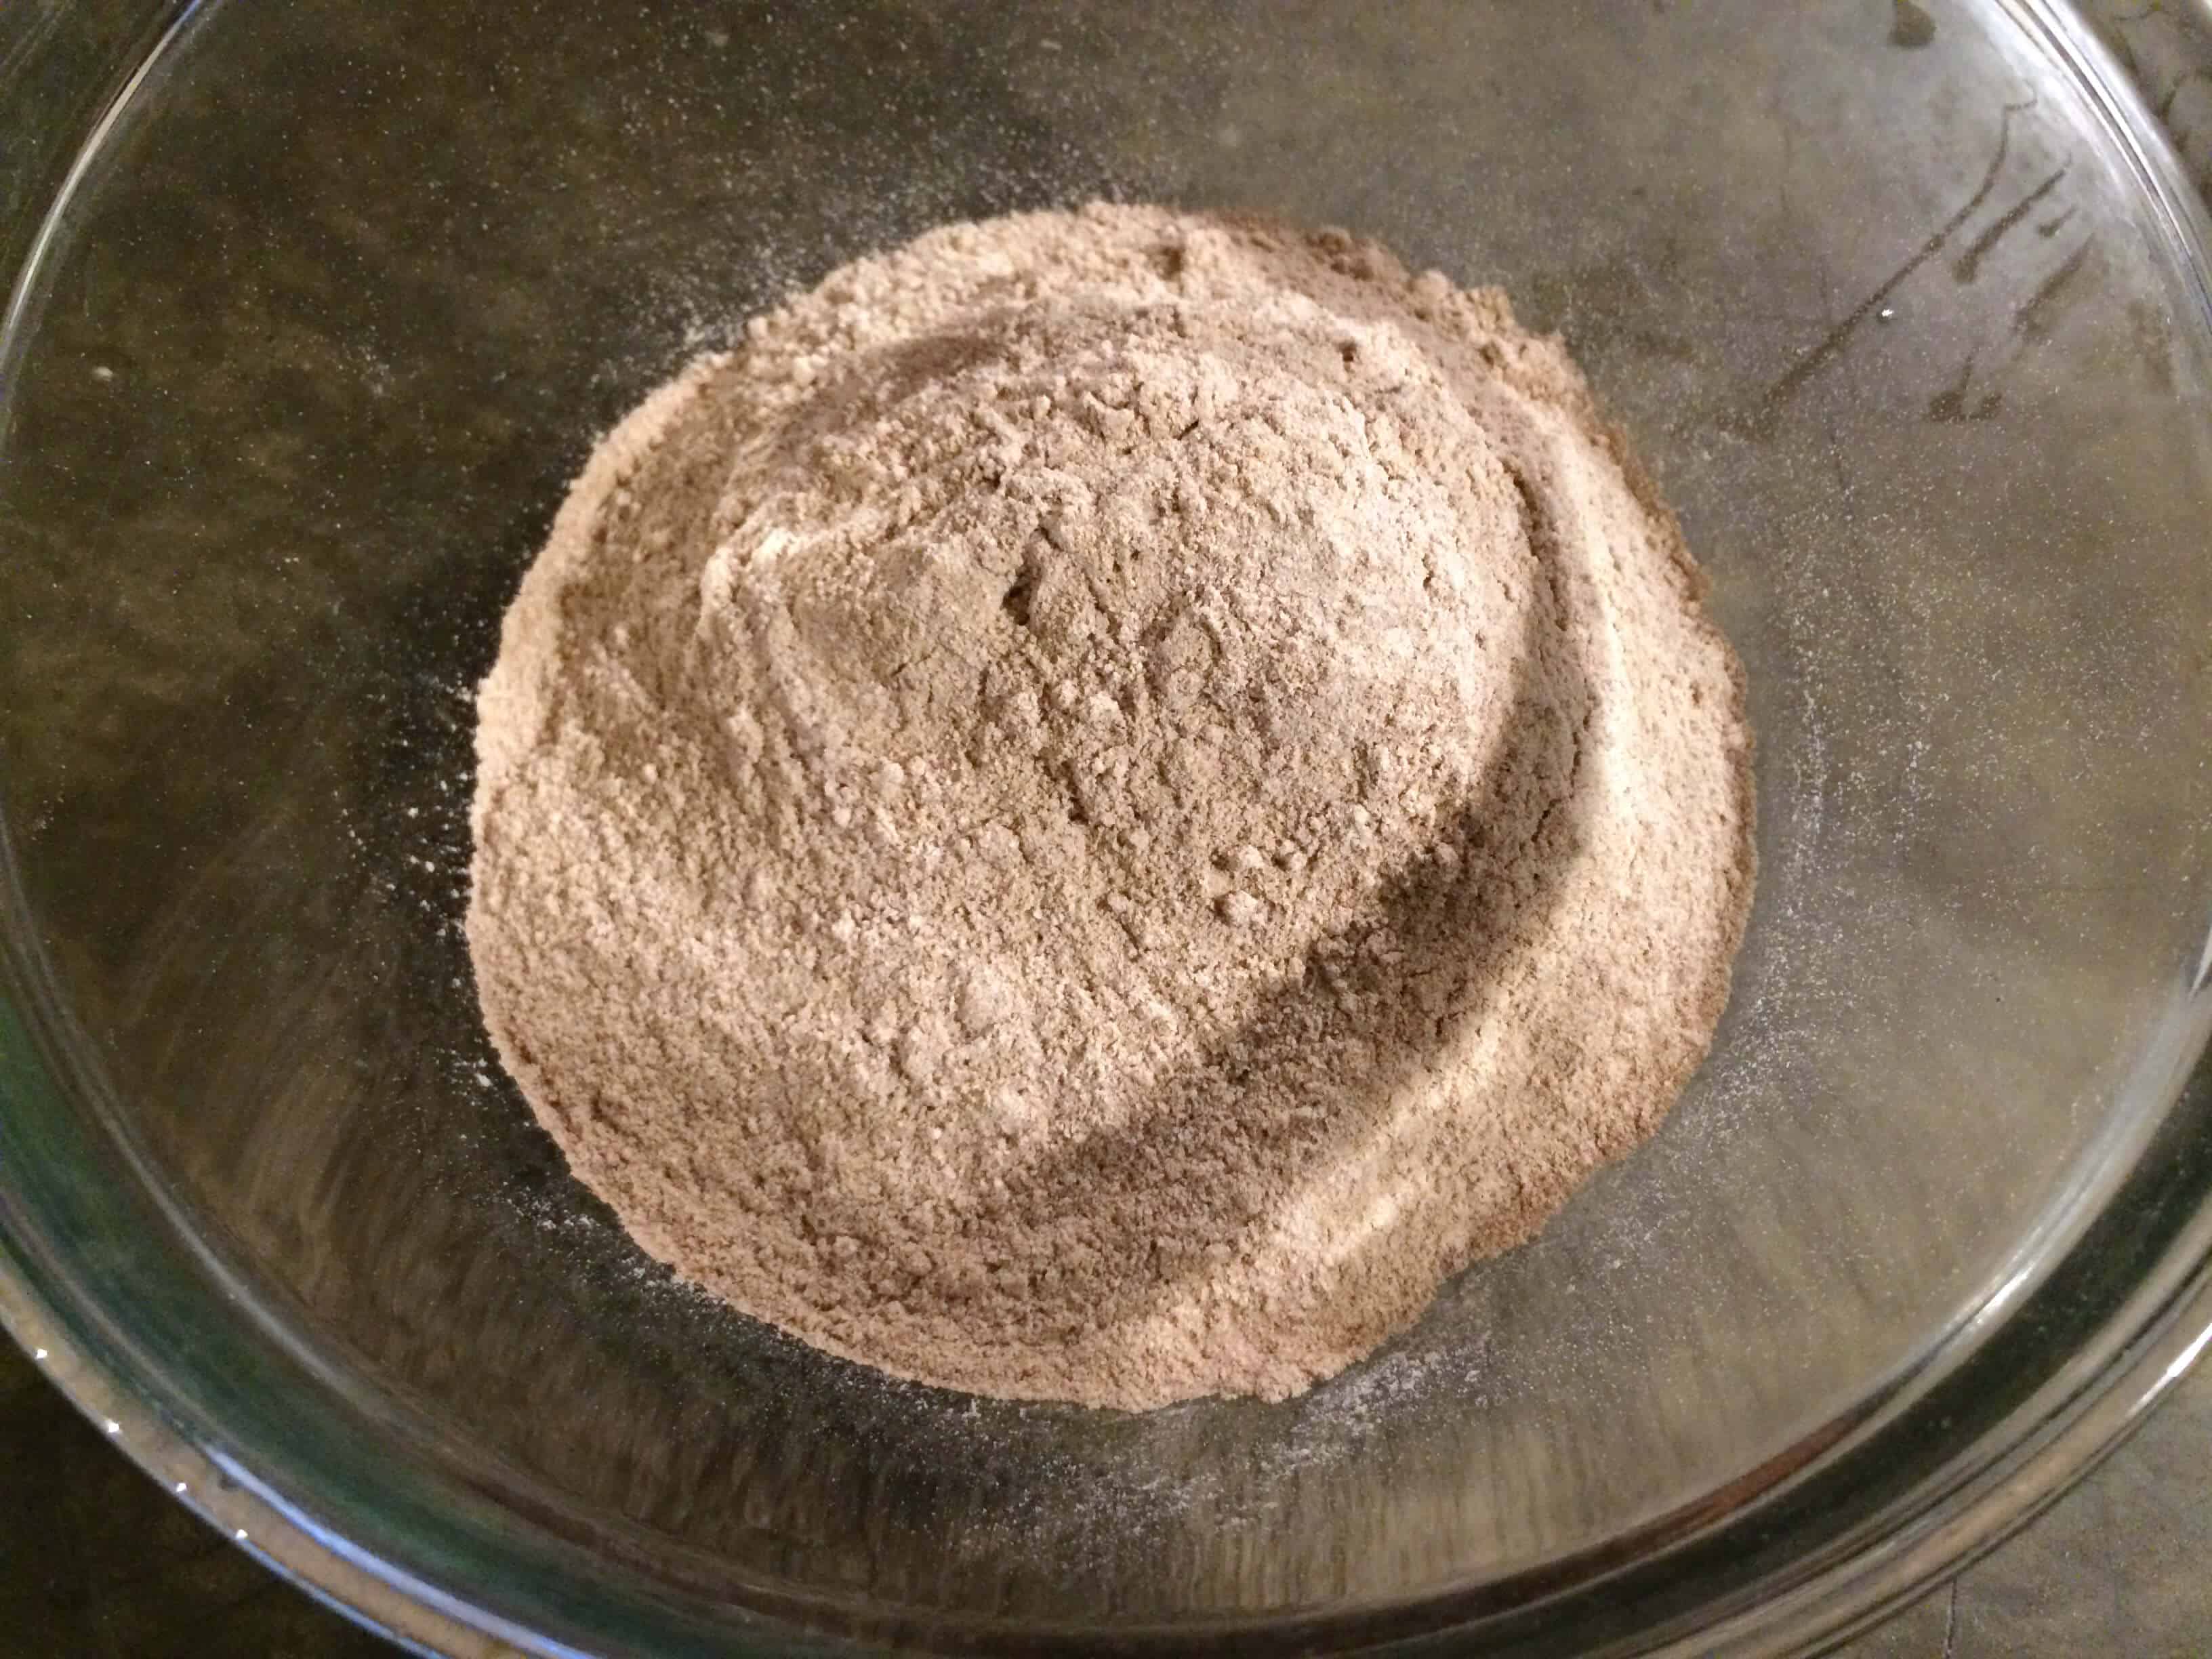
Stir in 3 cups of distilled water (and the yeast if you’re using it).
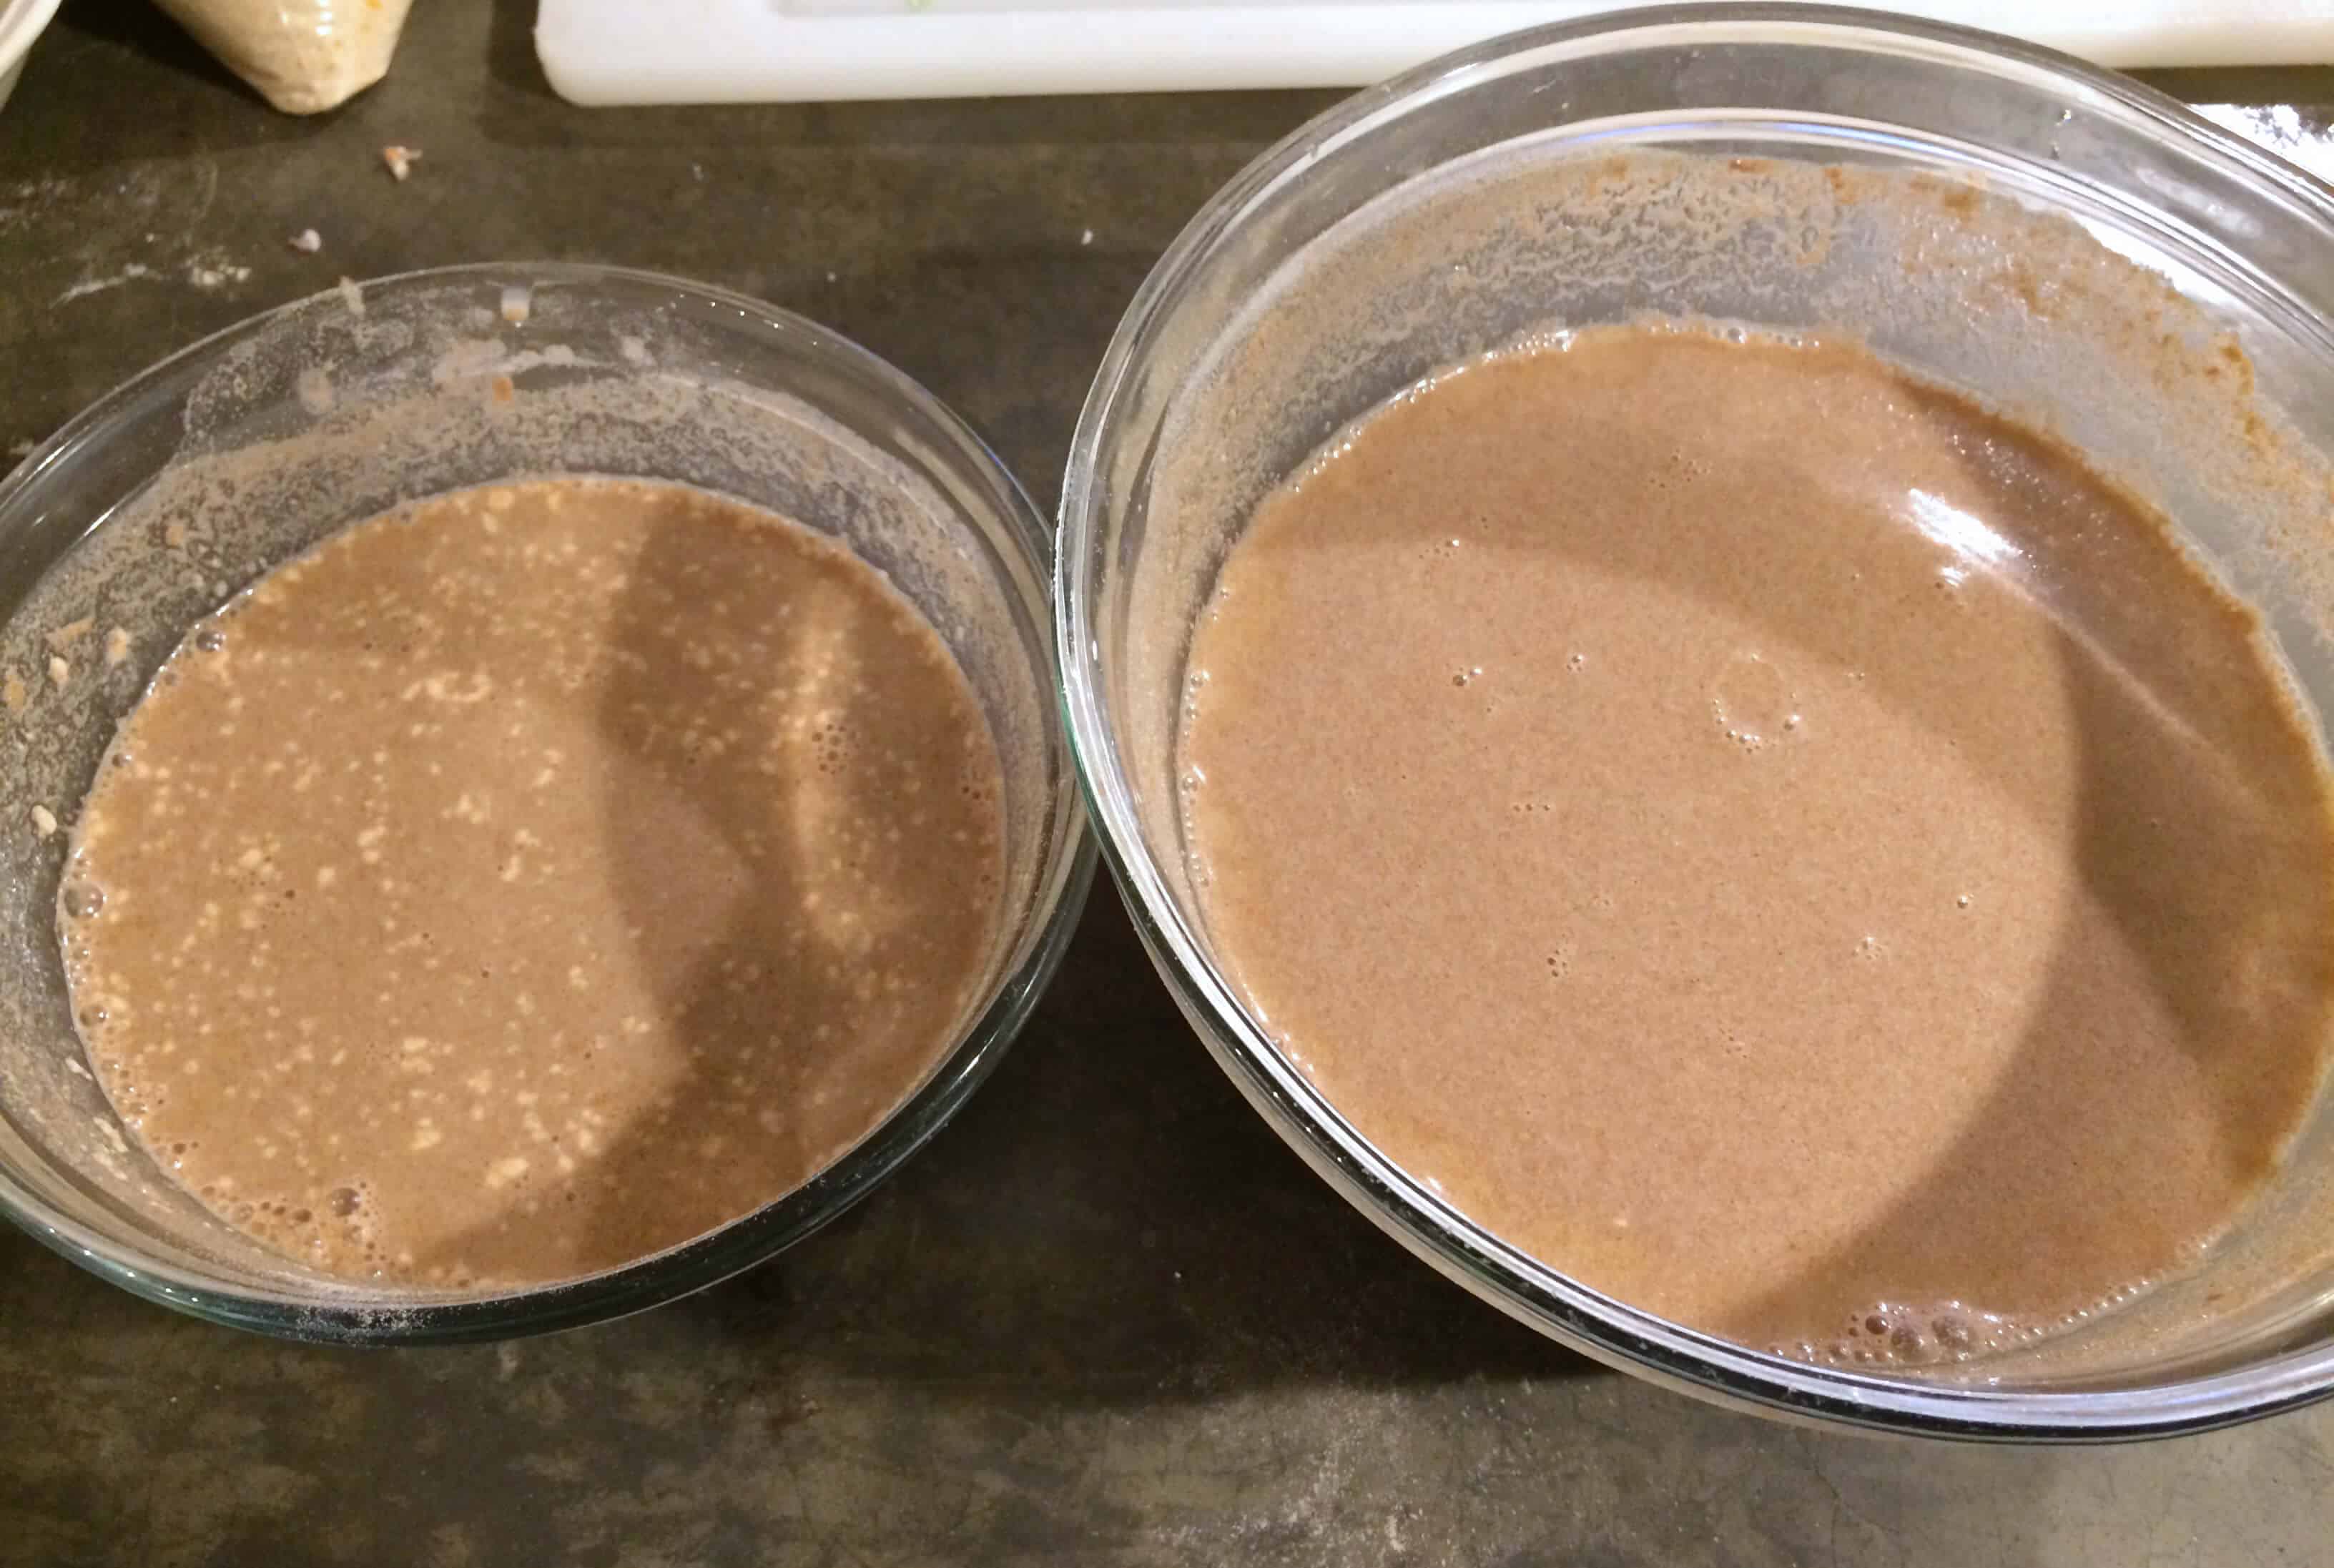
I made two versions to show you the difference – both are identical but in one of them I added some commercial yeast (left) and the other one I didn’t (right). What that does is prevent the formation of wild yeast because the commercial, store-bought yeast dominates.
Loosely cover the bowls with plastic wrap so that air can still get in (but no critters can) – cheesecloth is also a great option. Let it sit undisturbed at room temperature for 5 days. You don’t have to let it ferment that long but at least 4 days is ideal and longer it ferments the deeper the flavor will be.
Note: Depending on what kind of flour you’re using, you may need to add a little more water if the mixture is becoming dry.
After 4-5 days both versions will be fizzy when you jiggle the bowl.
Notice the difference between the mixture prepared with commercial yeast (left) and the wild yeast mixture (right). The version made the traditional way allowing wild yeast to form is not only much darker in color, it has a film of aerobic yeast on top that you may initially think is mold but it isn’t. If your batter forms actual mold on it it will need to be discarded.
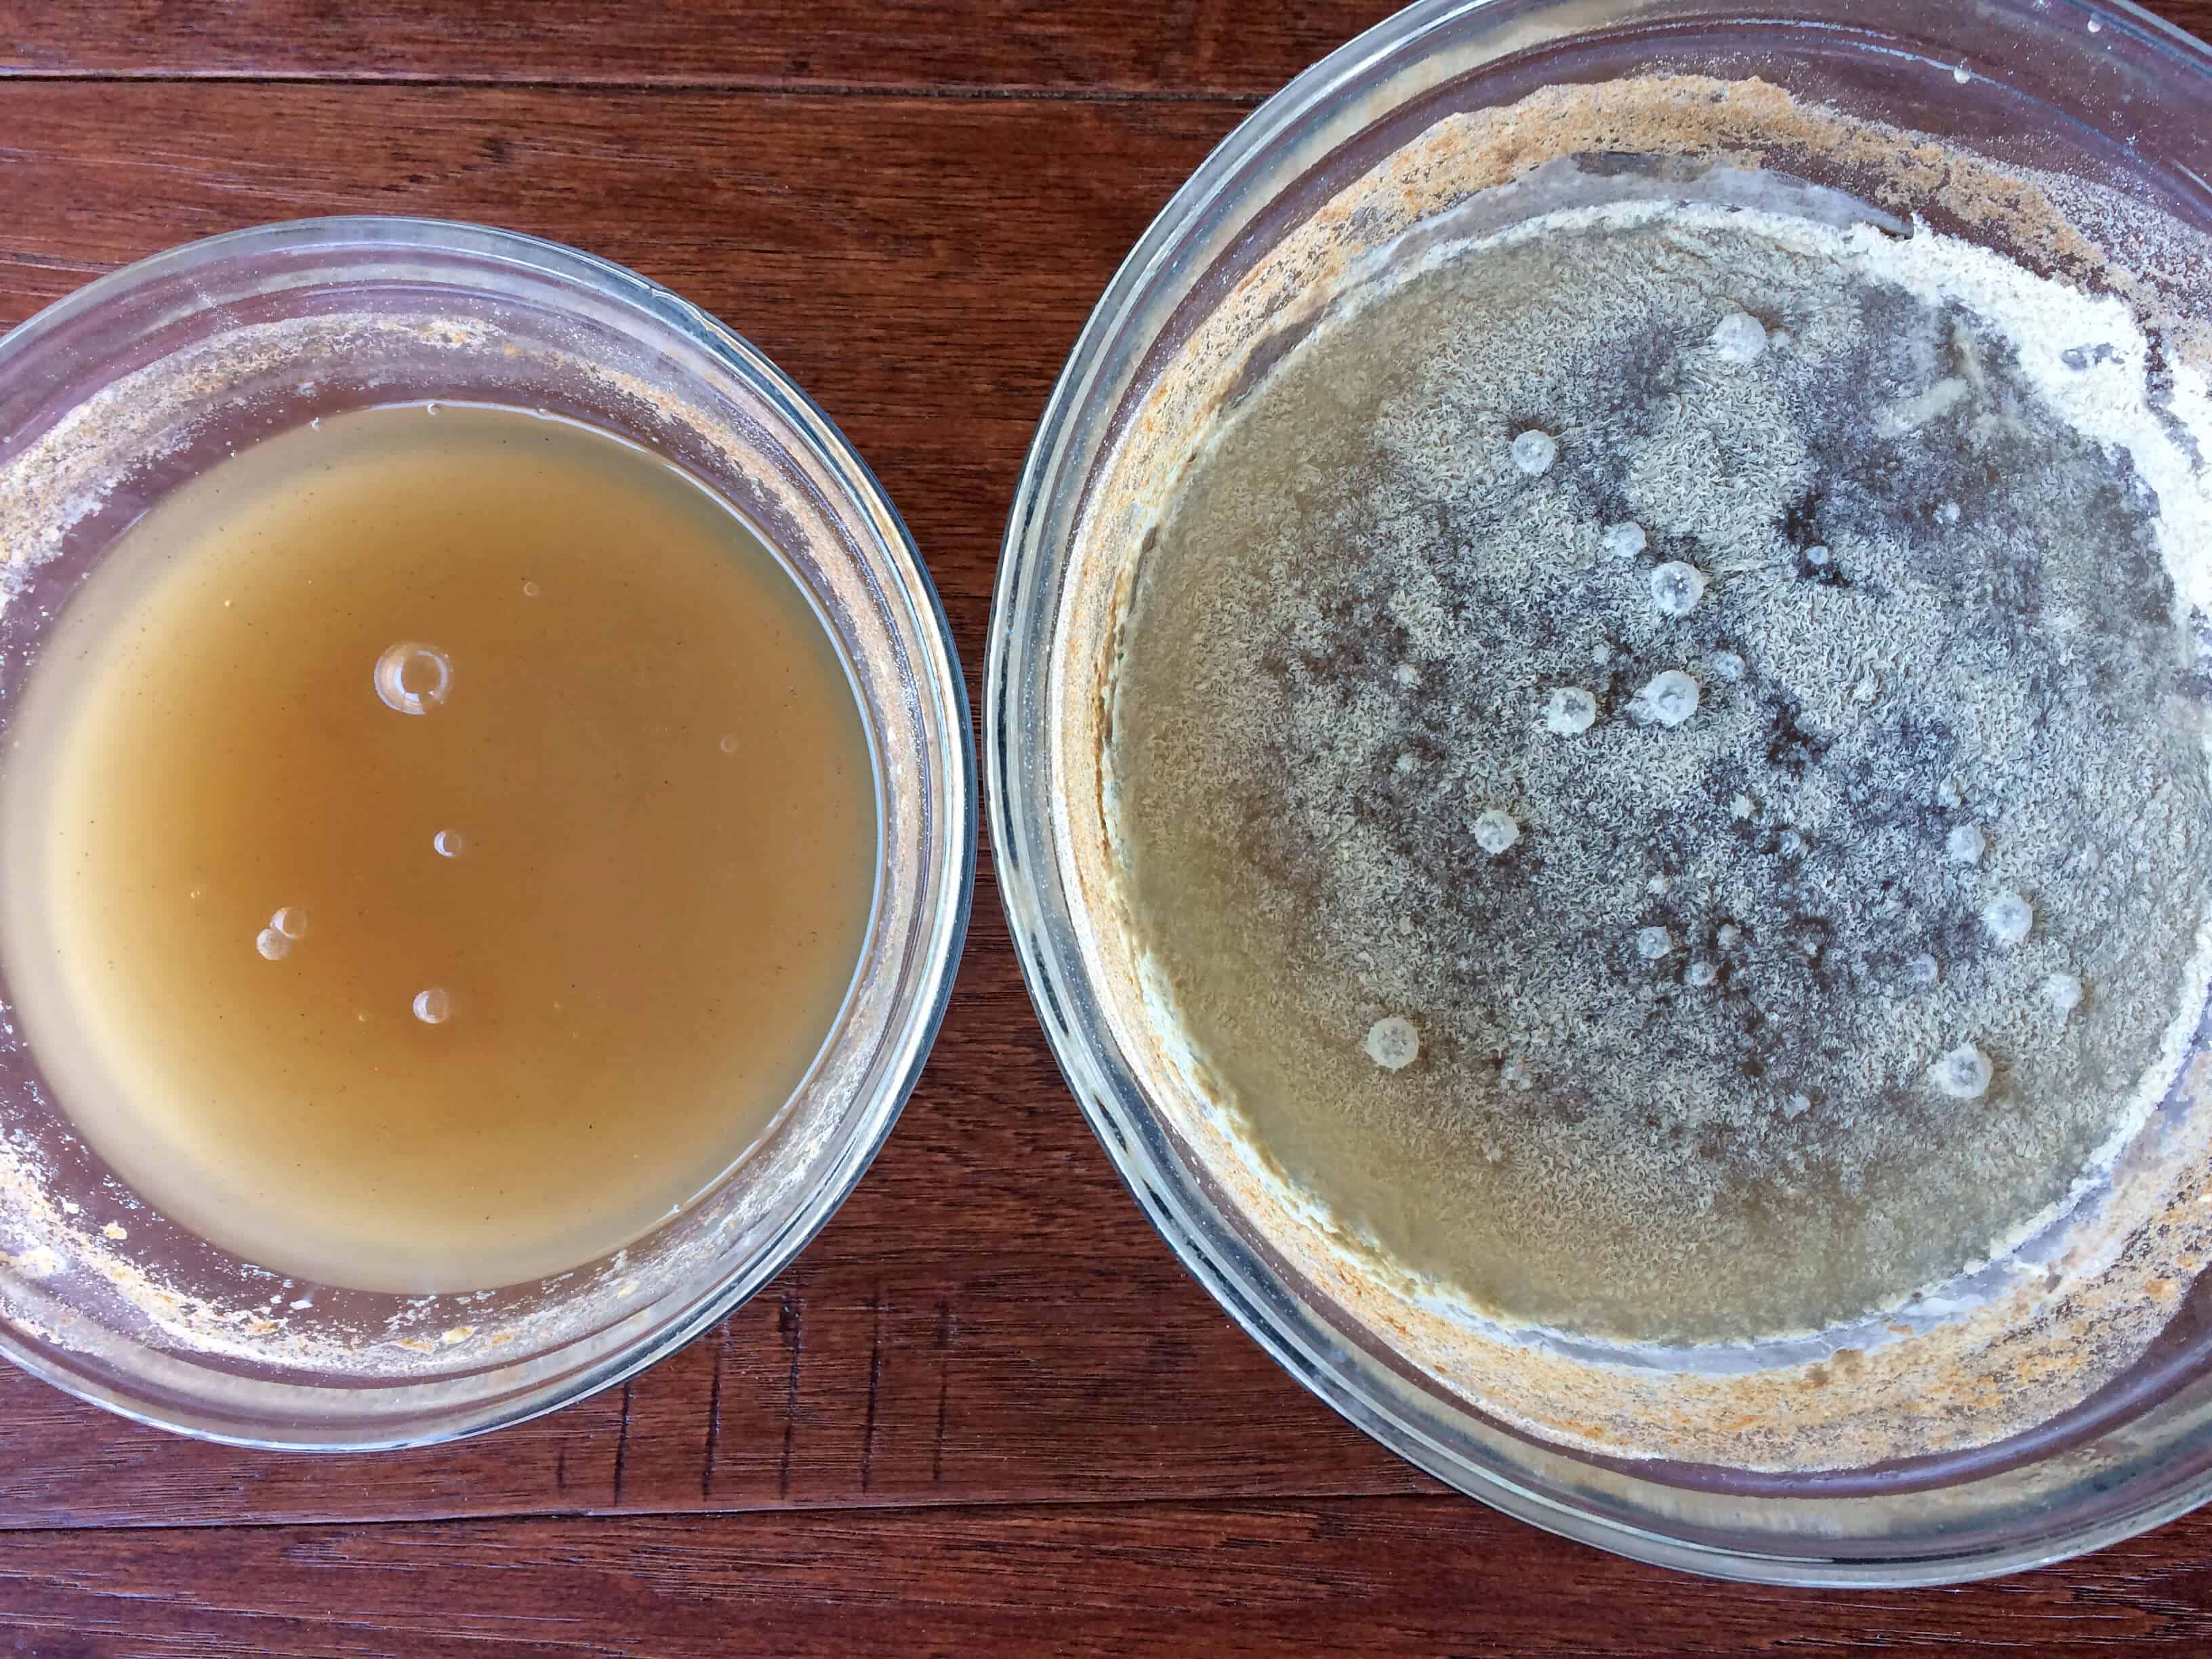
It looks disgusting, I know. Like why would I eat this? But rest assured it’s perfectly normal. That isn’t mold, it’s aerobic yeast caused by the fermentation process. Going the traditional route of relying on wild yeast – a naturally fermented product – over commercial yeast results in an injera with a richer and more complex flavor. It’s the way injera has been made and enjoyed for centuries. Again though, if your batter forms actual mold on it, it will need to be discarded.
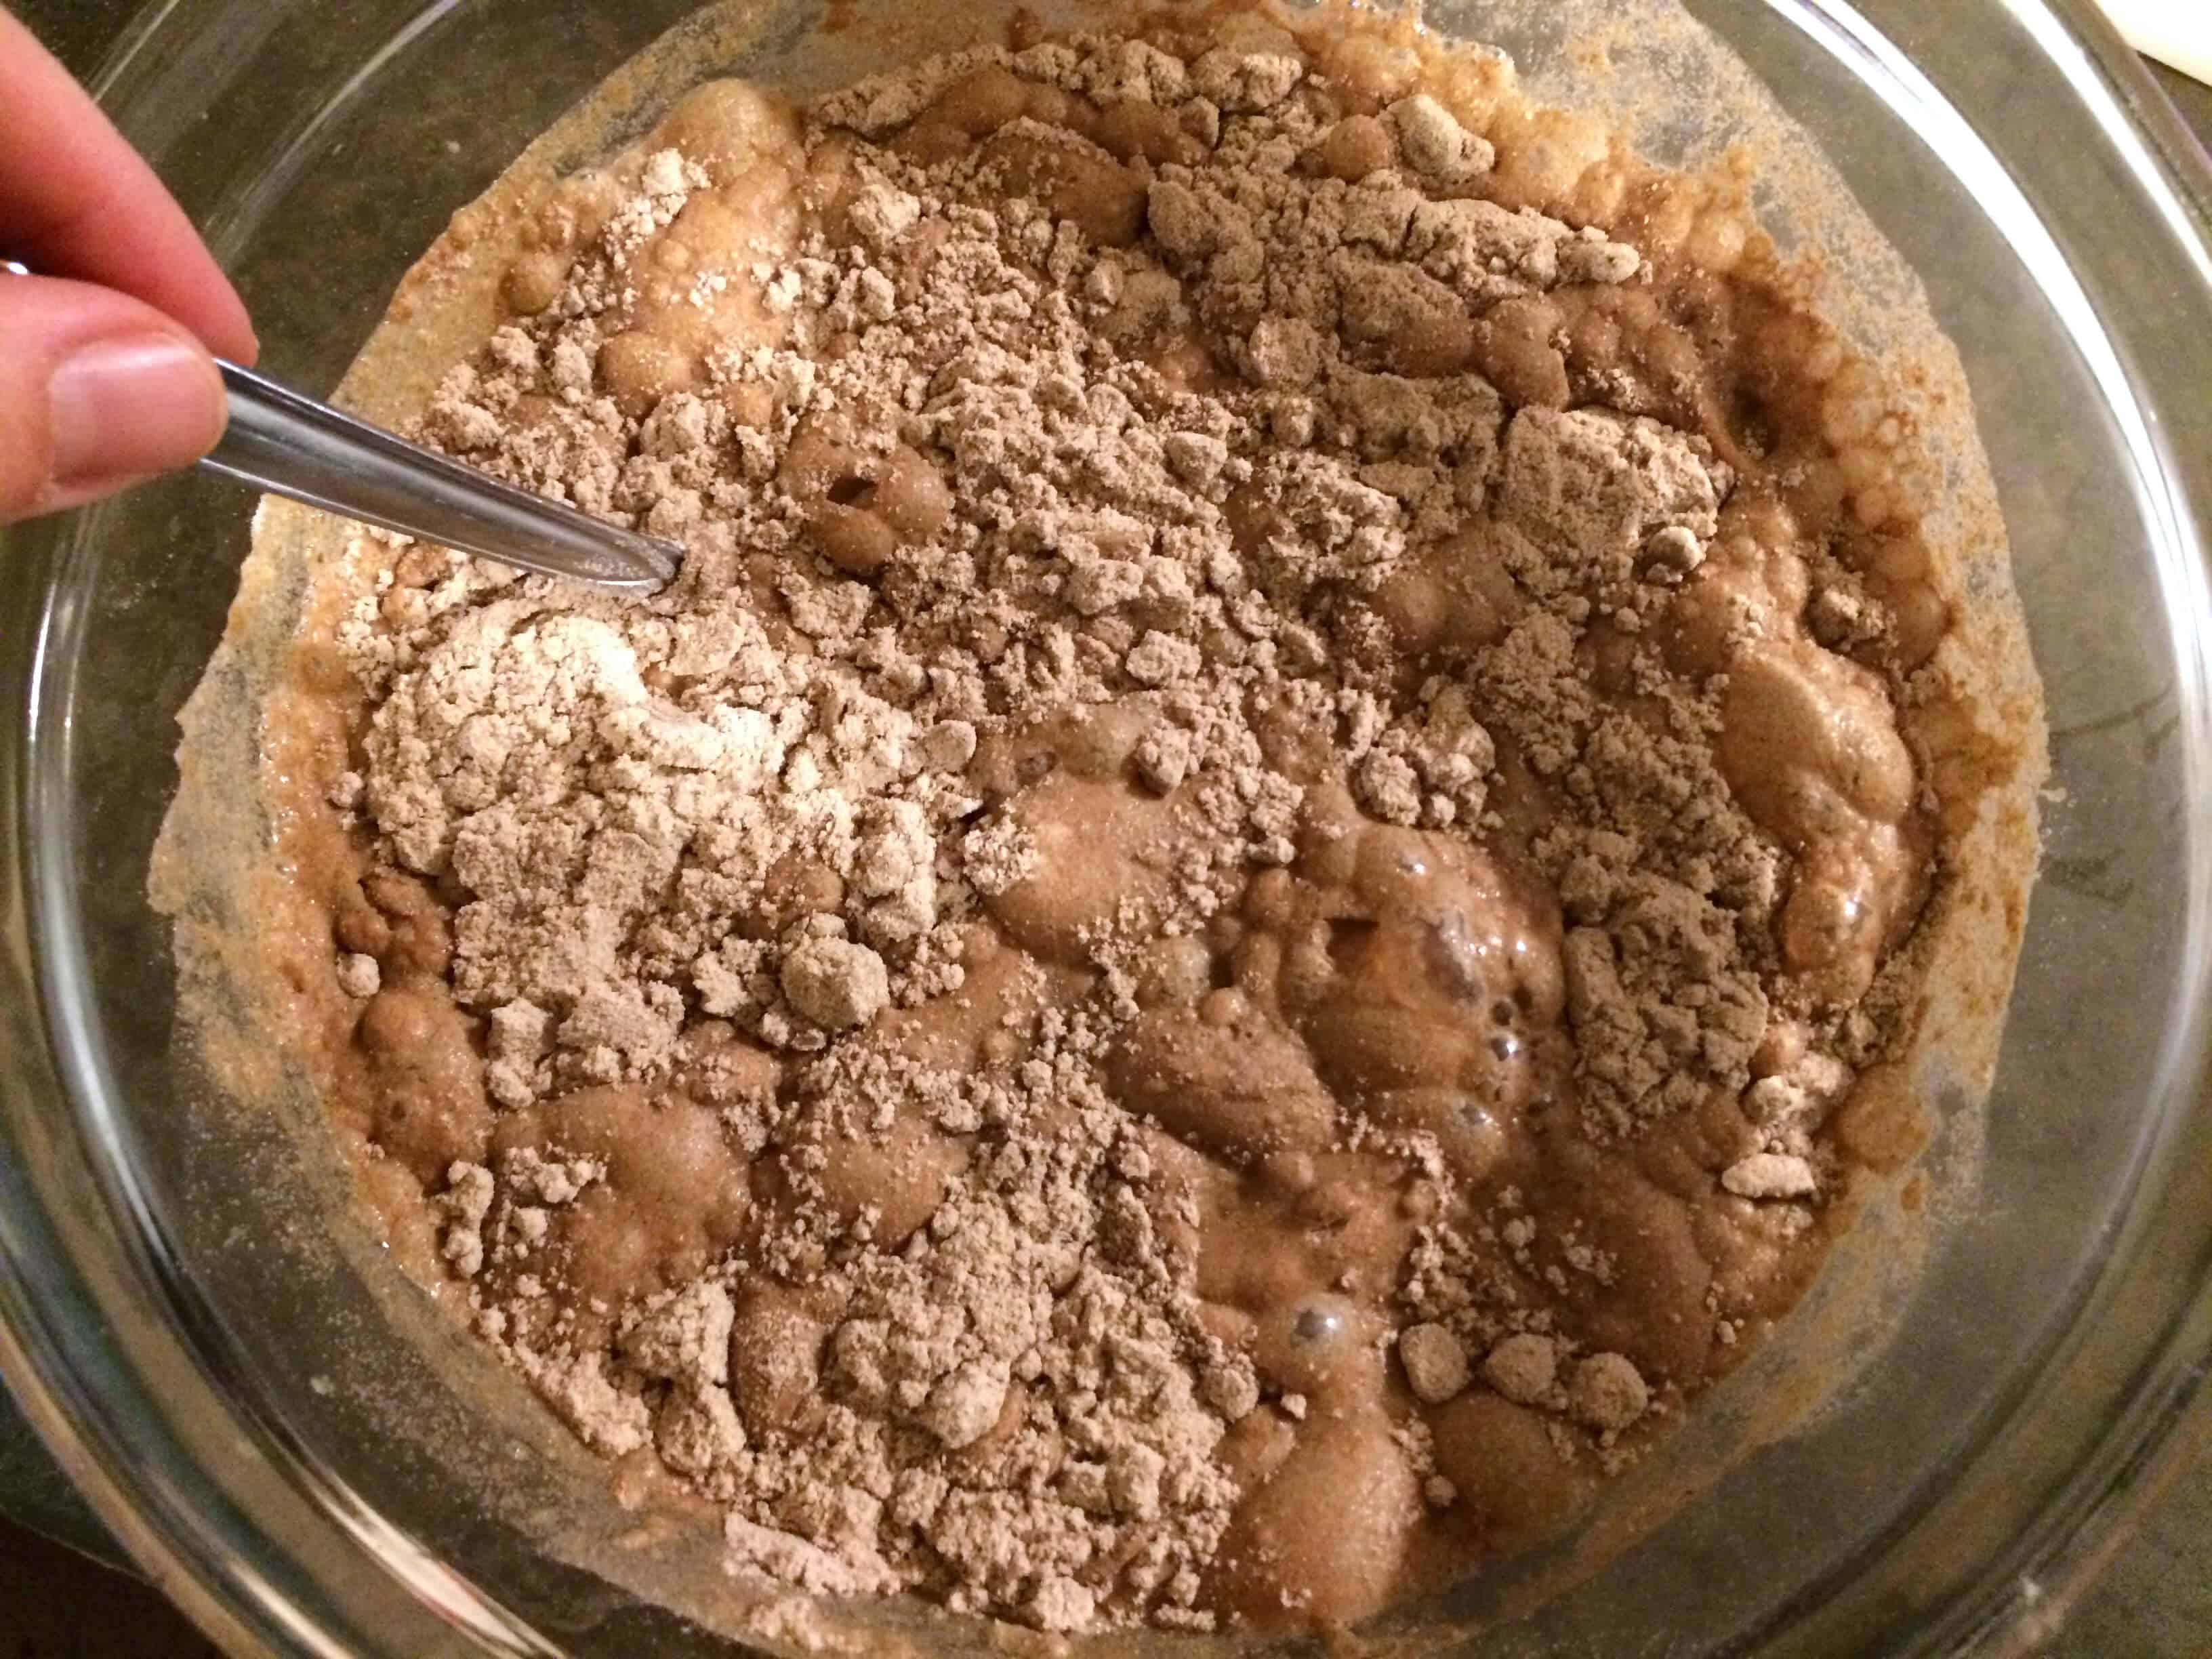
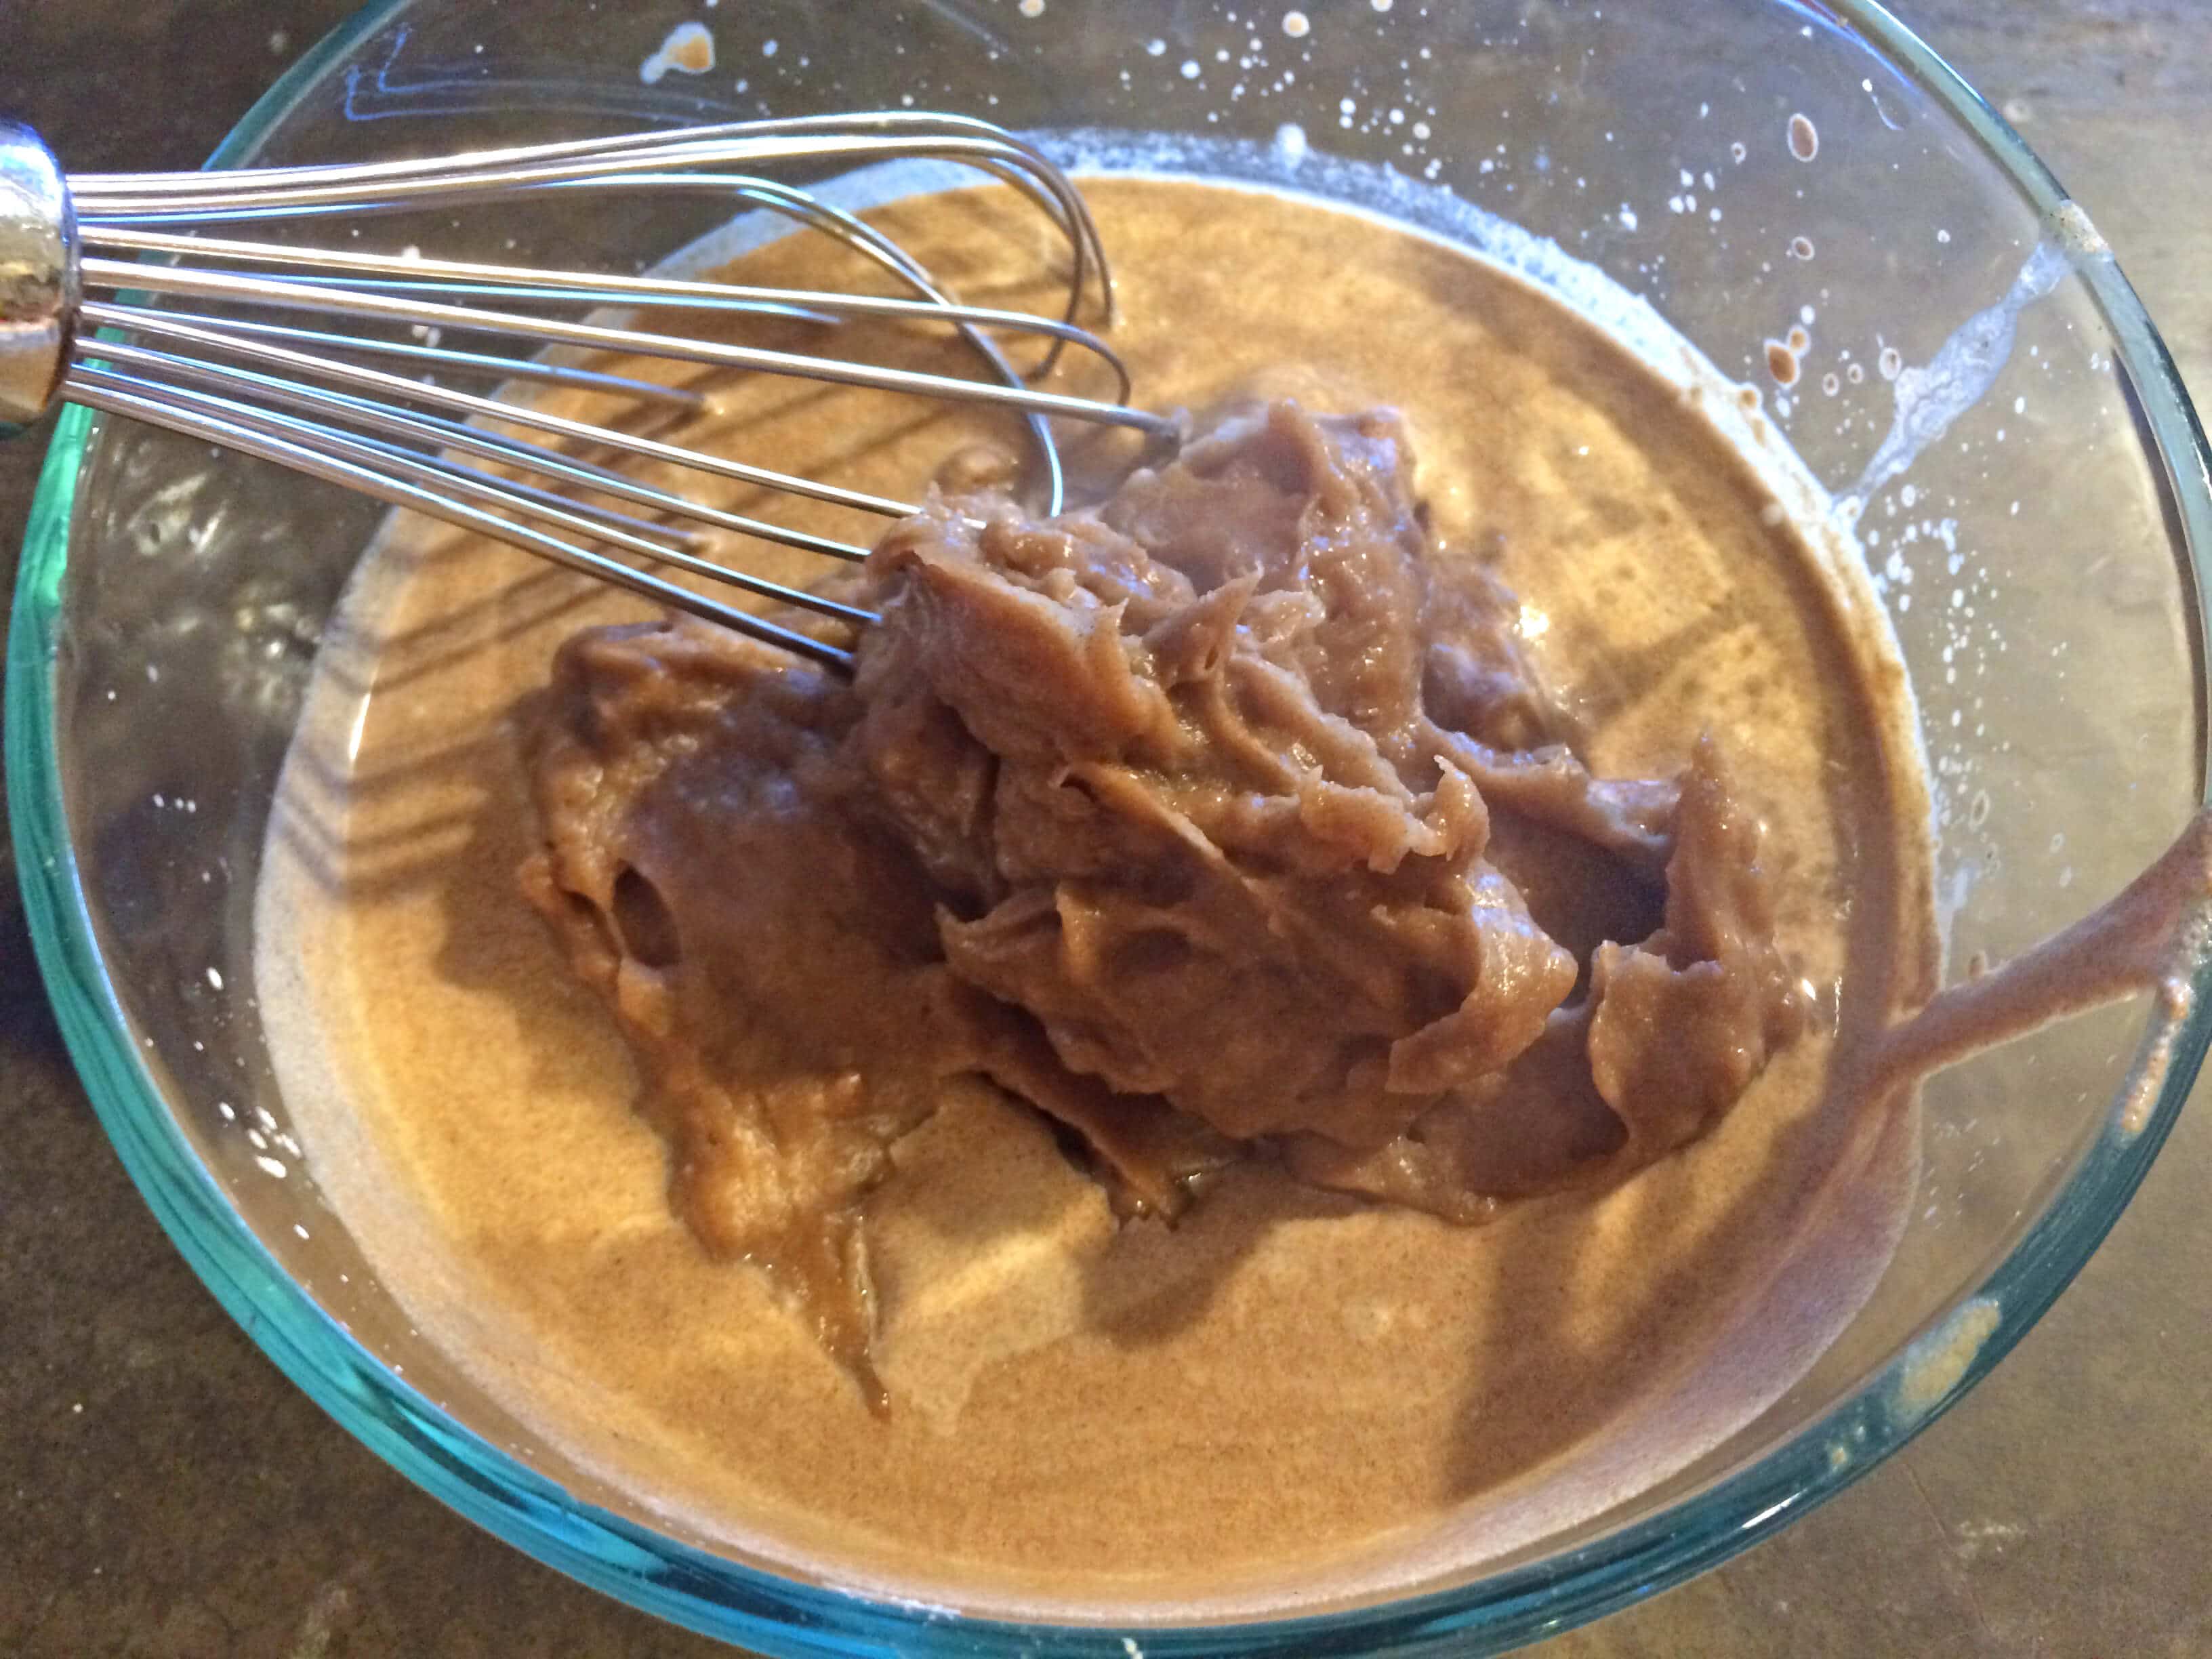
We’re simply going to discard this top layer and use what’s underneath. So pour off the top layer and as much of the liquid as you can.

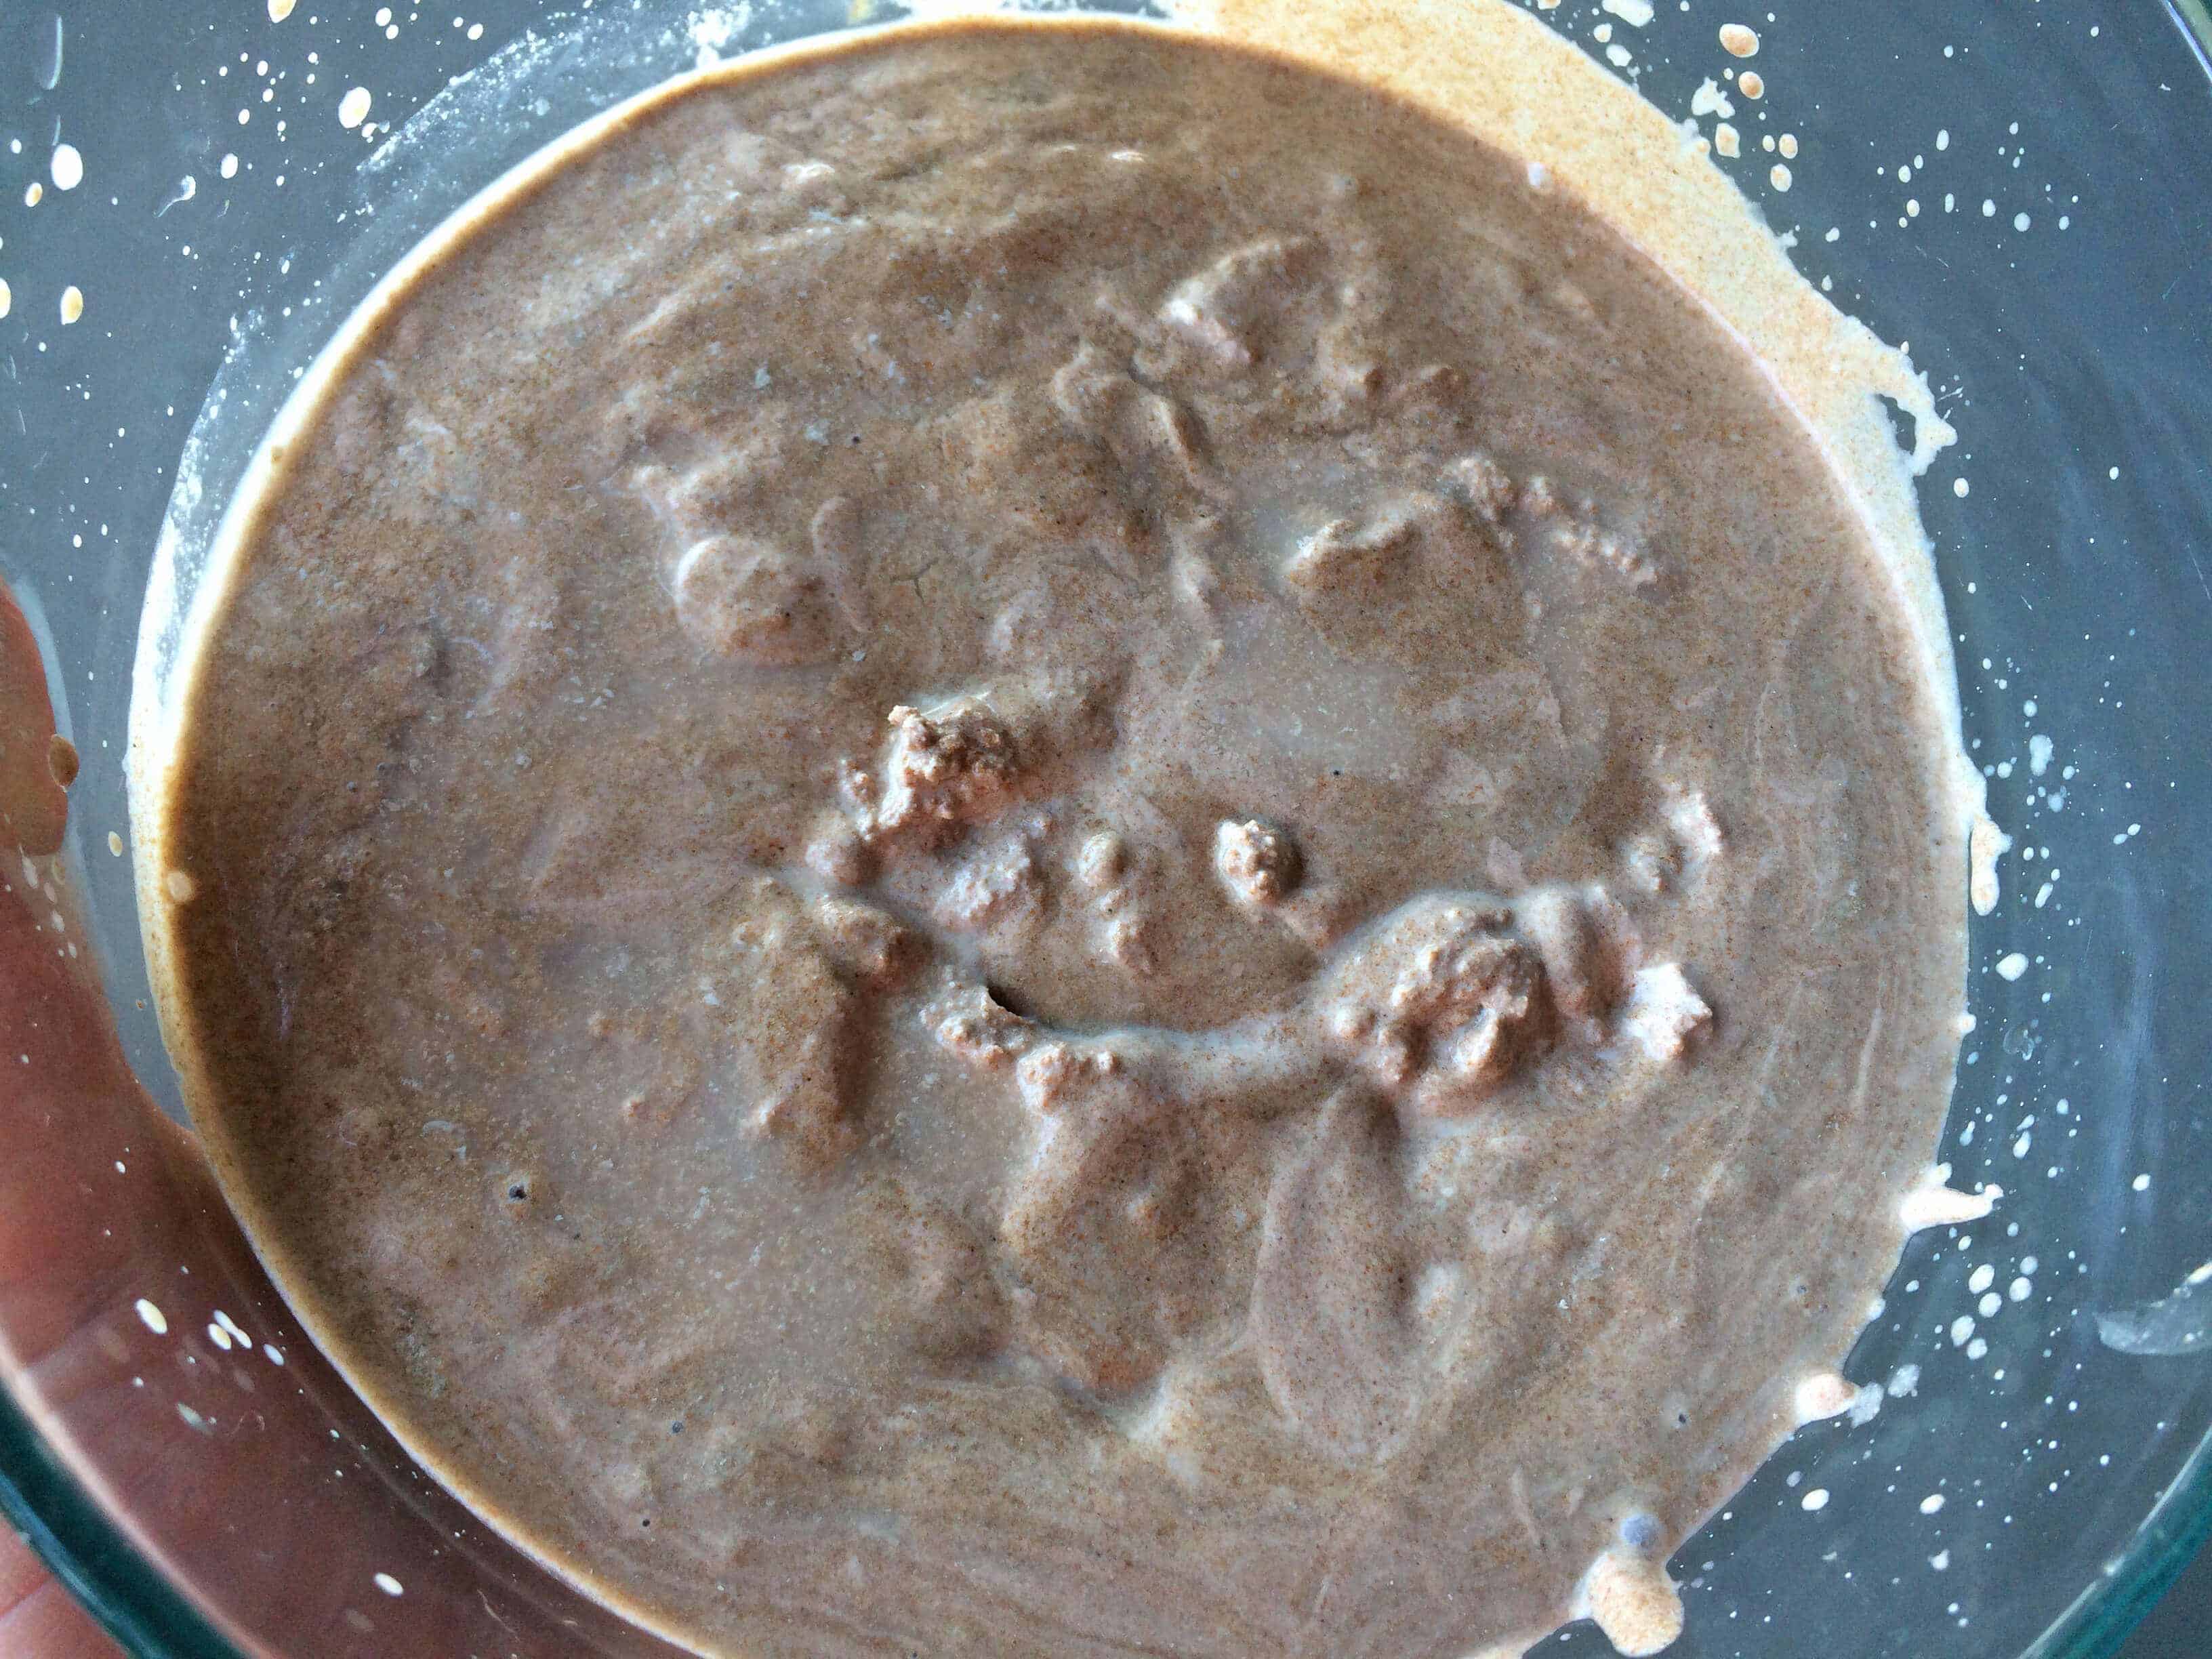
You’ll be left with a clay-like batter. Give it a good stir.
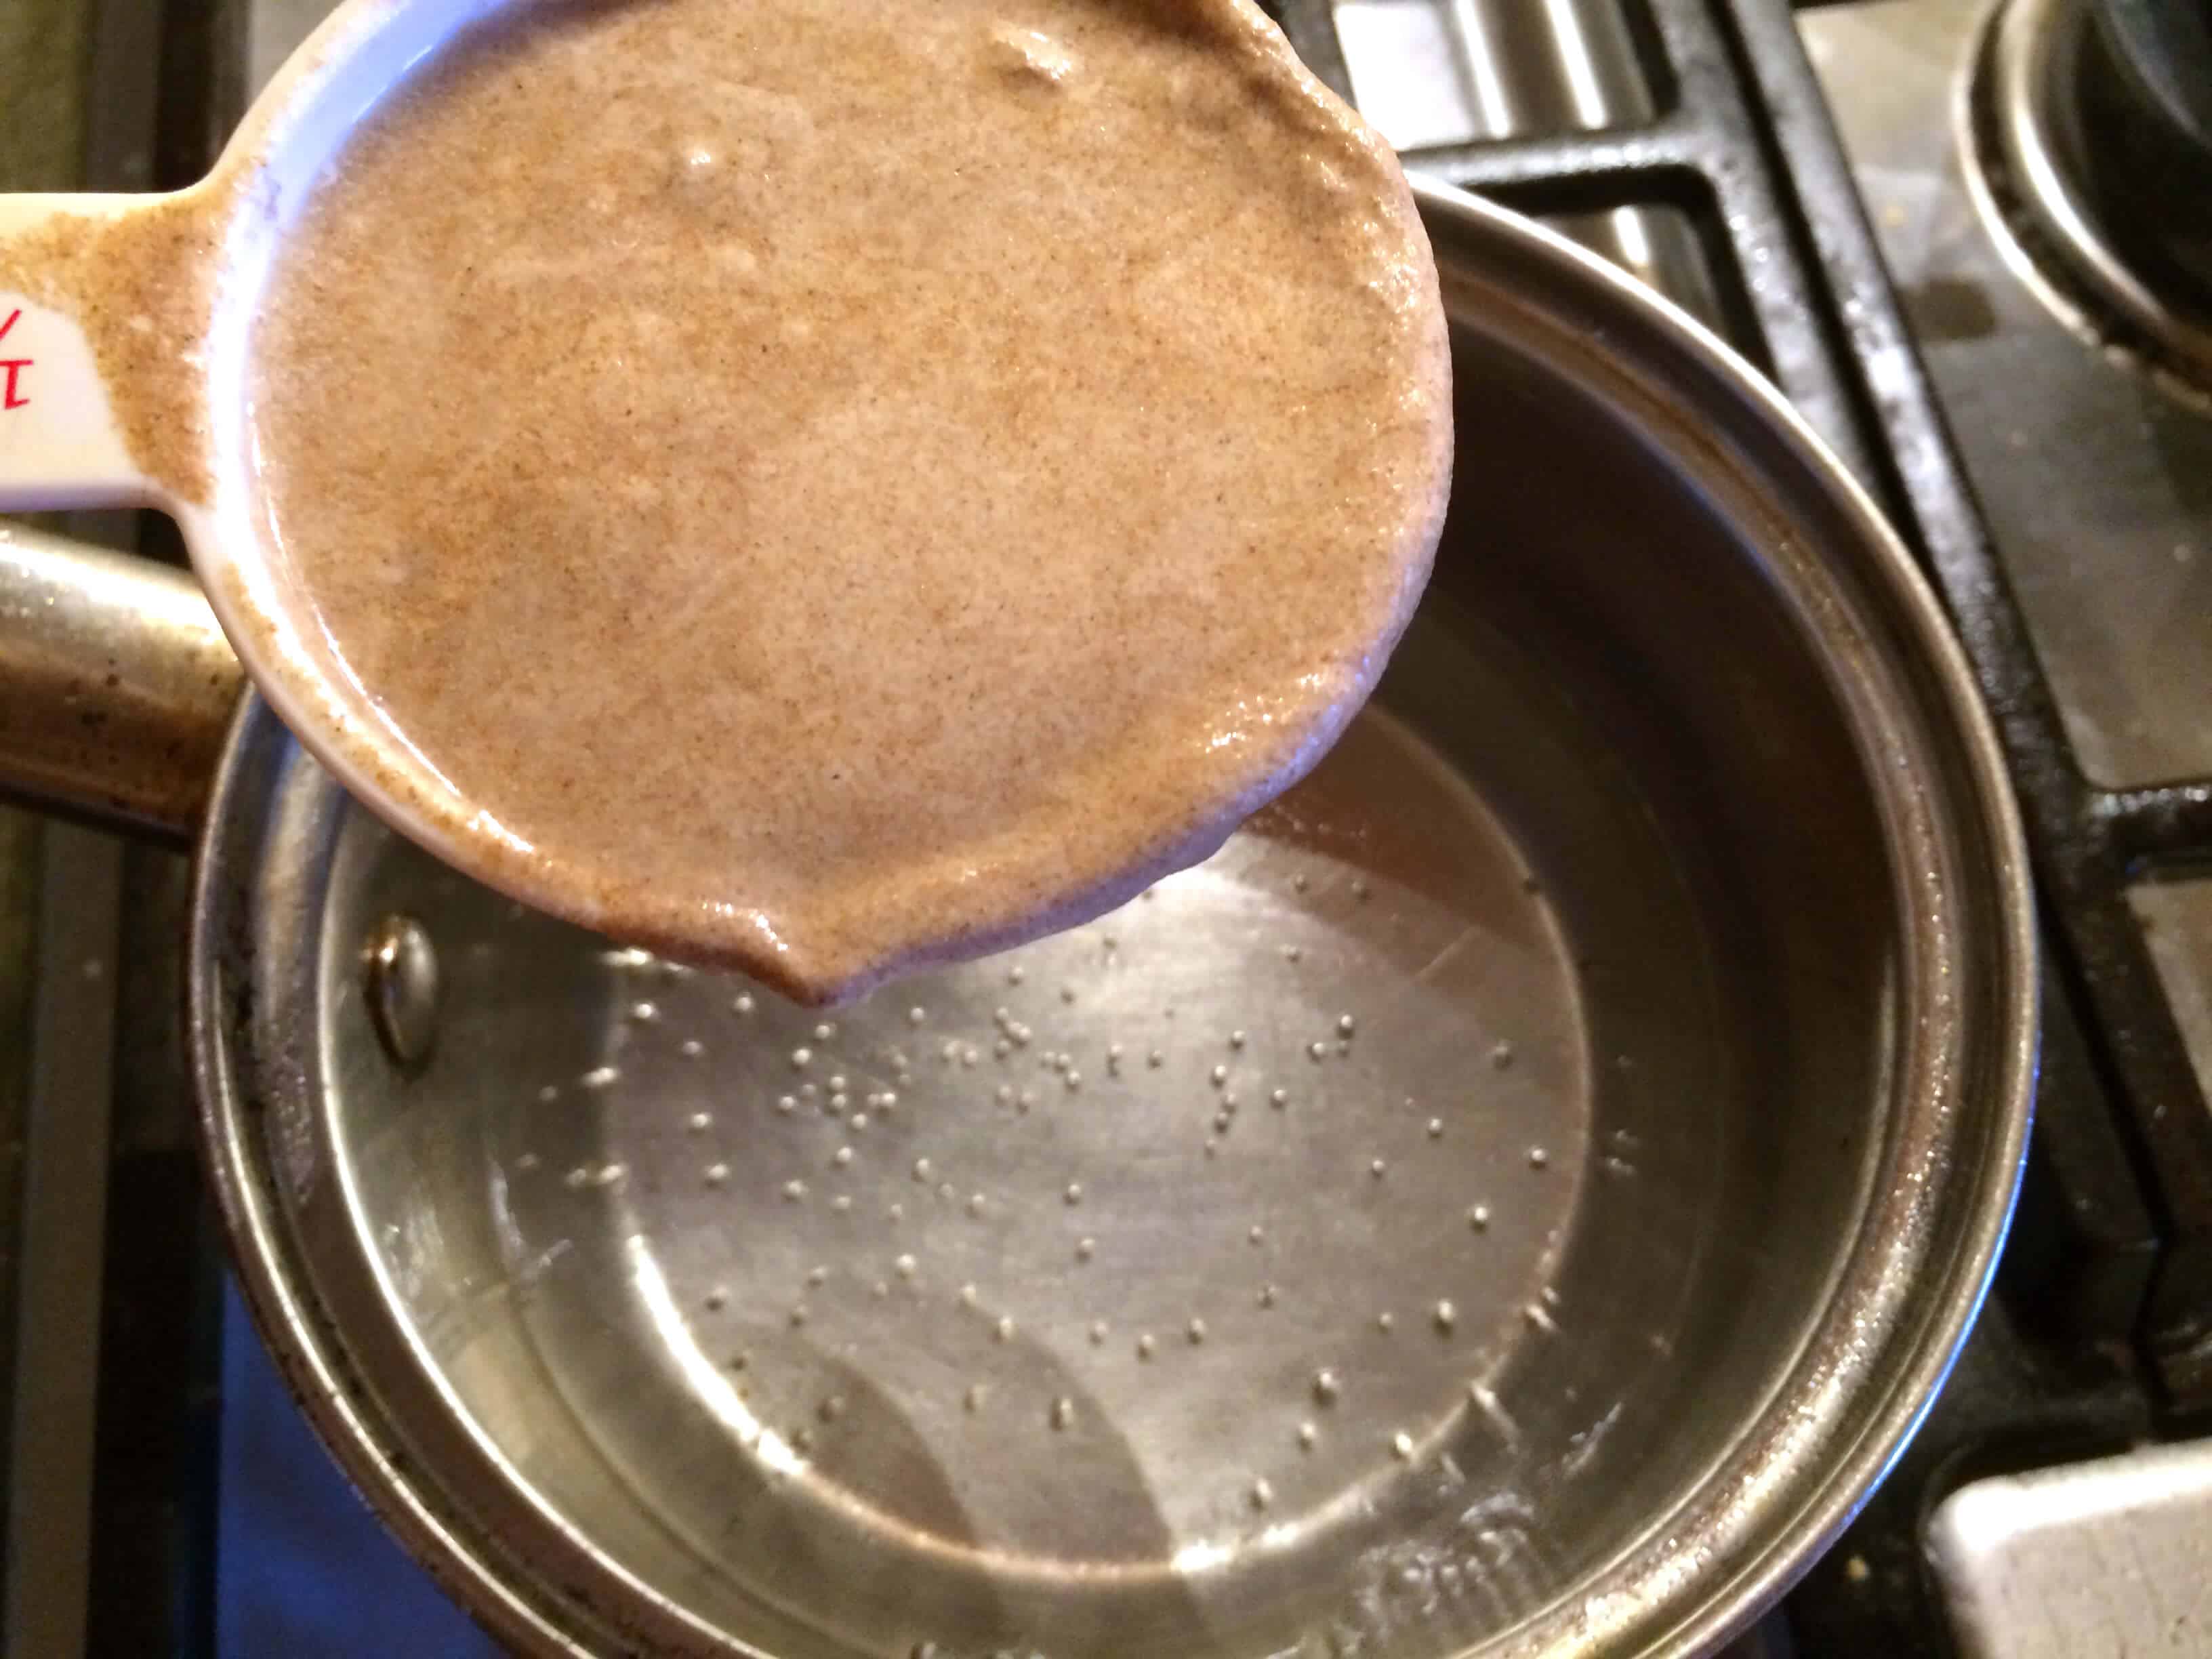
Bring 1 cup of water to a boil in a small saucepan. Scoop 1/2 cup of the fermented teff batter and stir it into the boiling water until the mixture is thickened. This will happen pretty quickly.
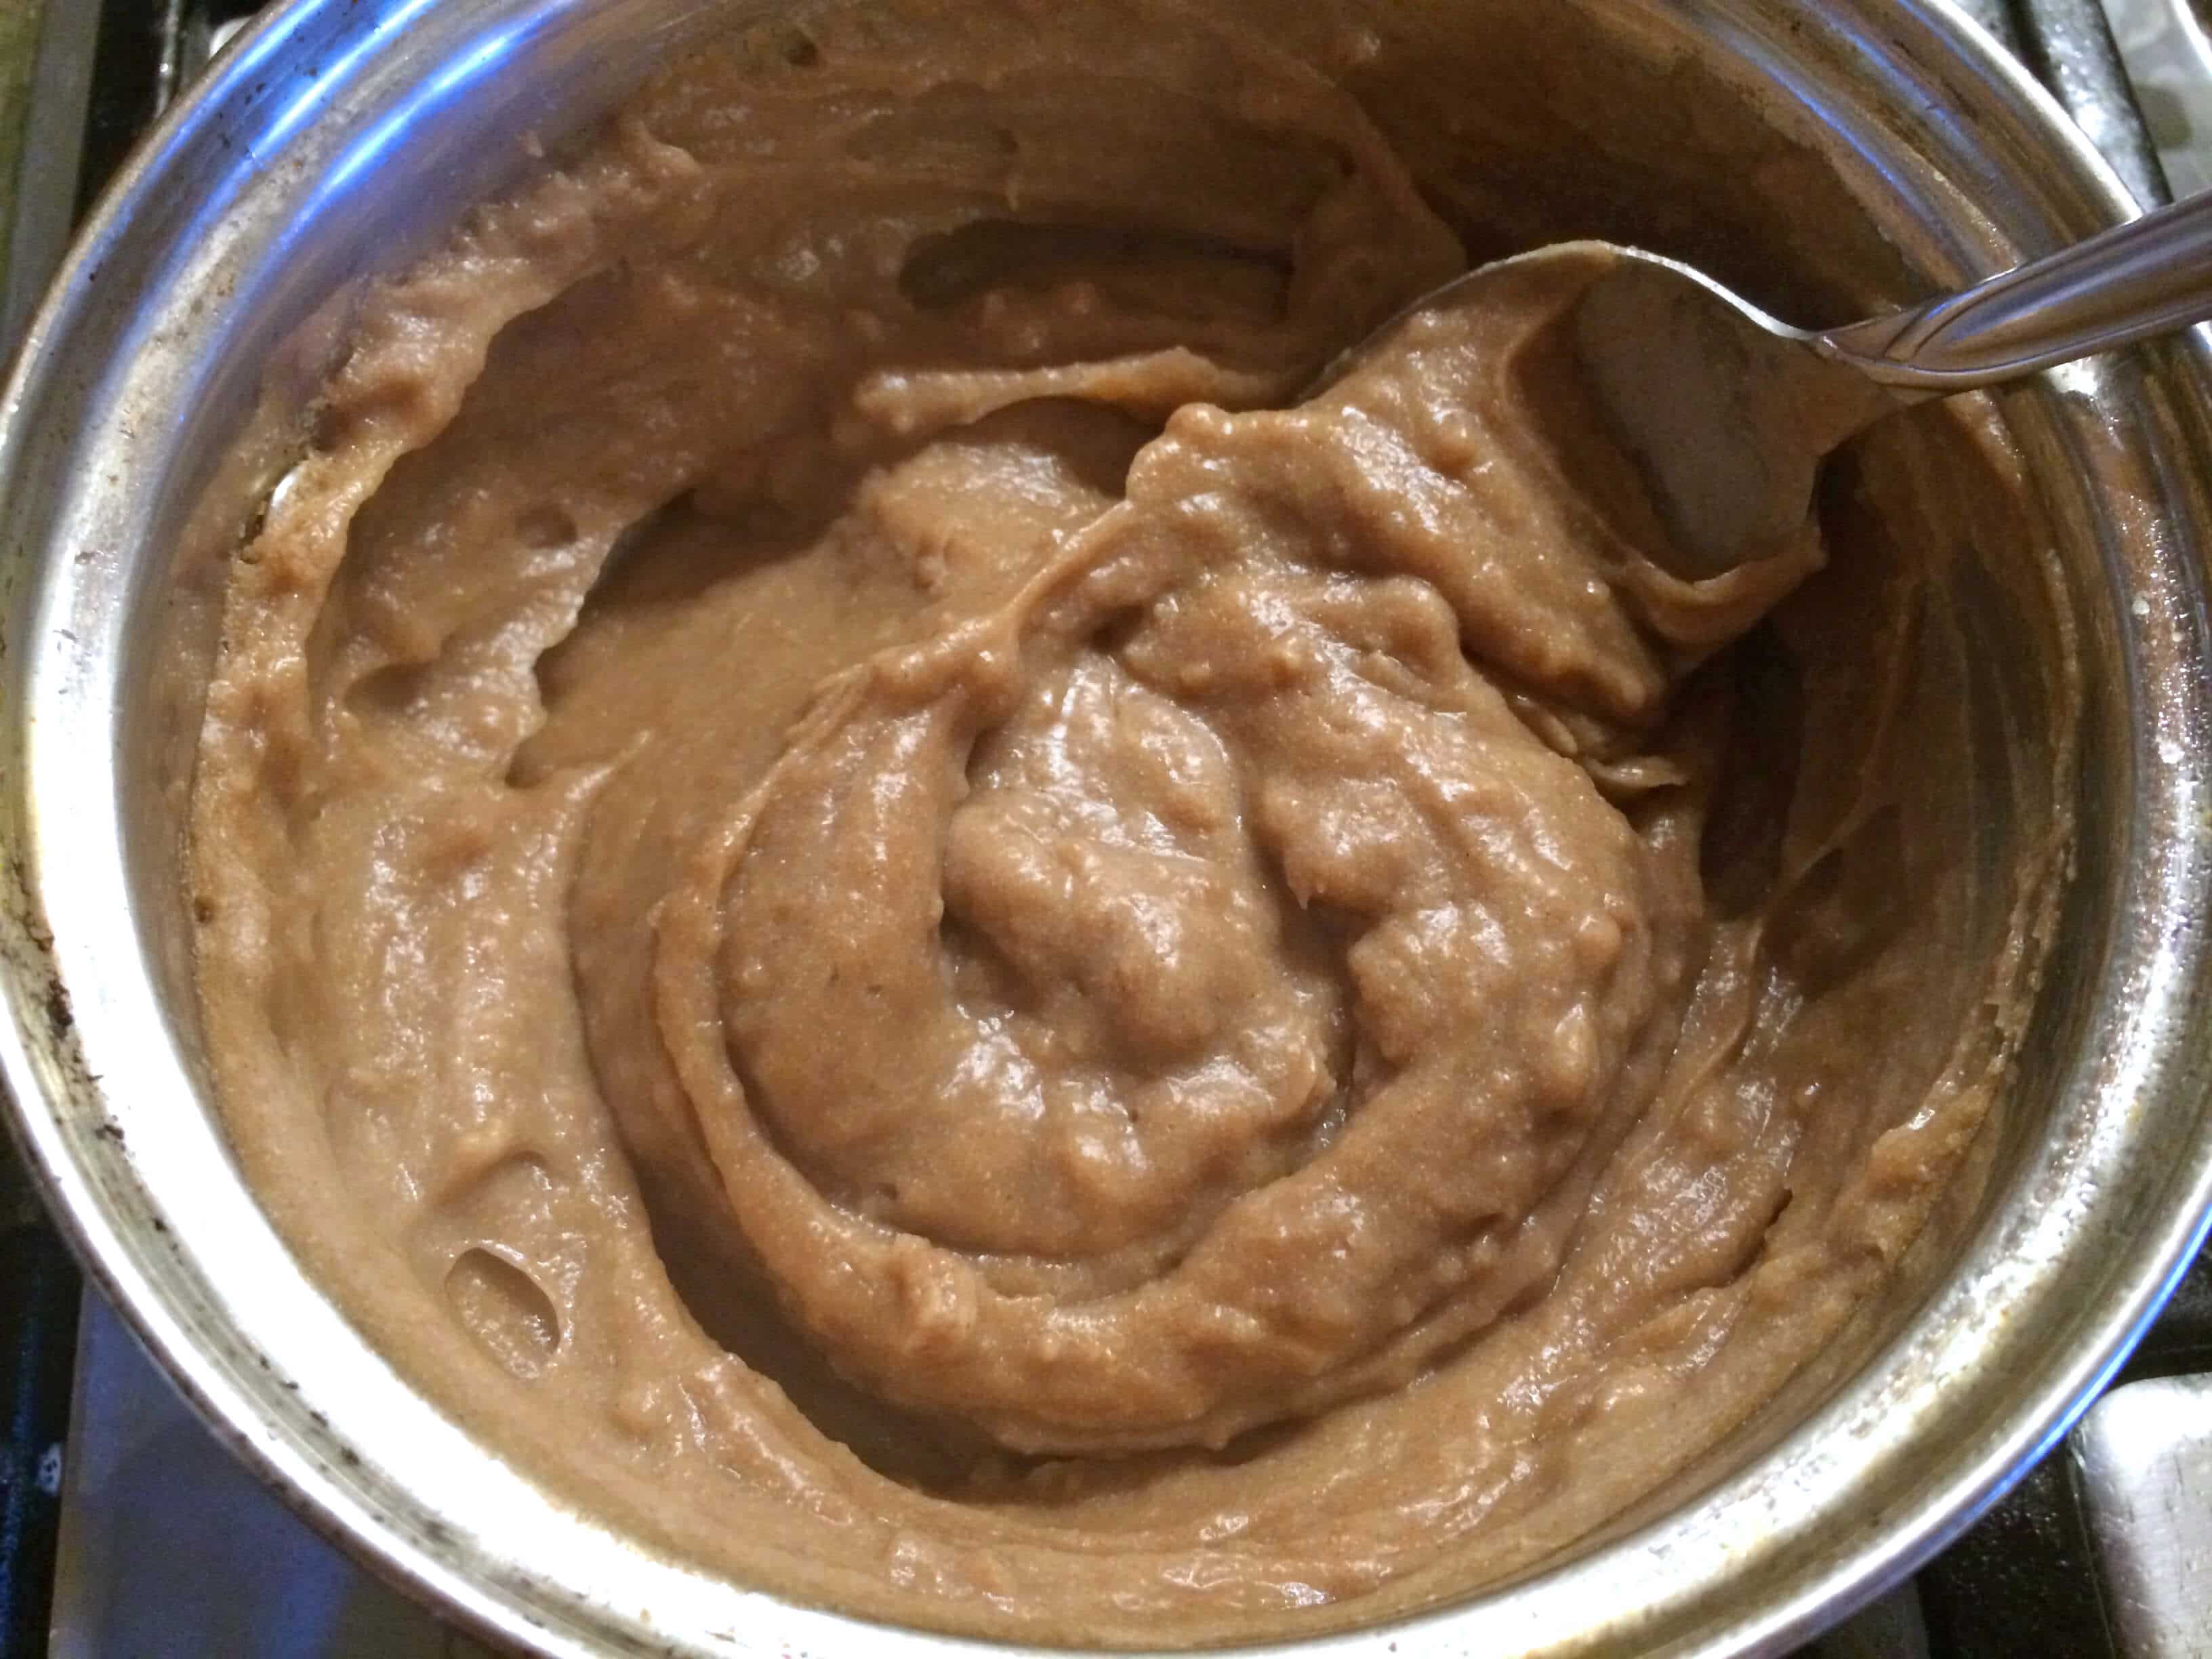
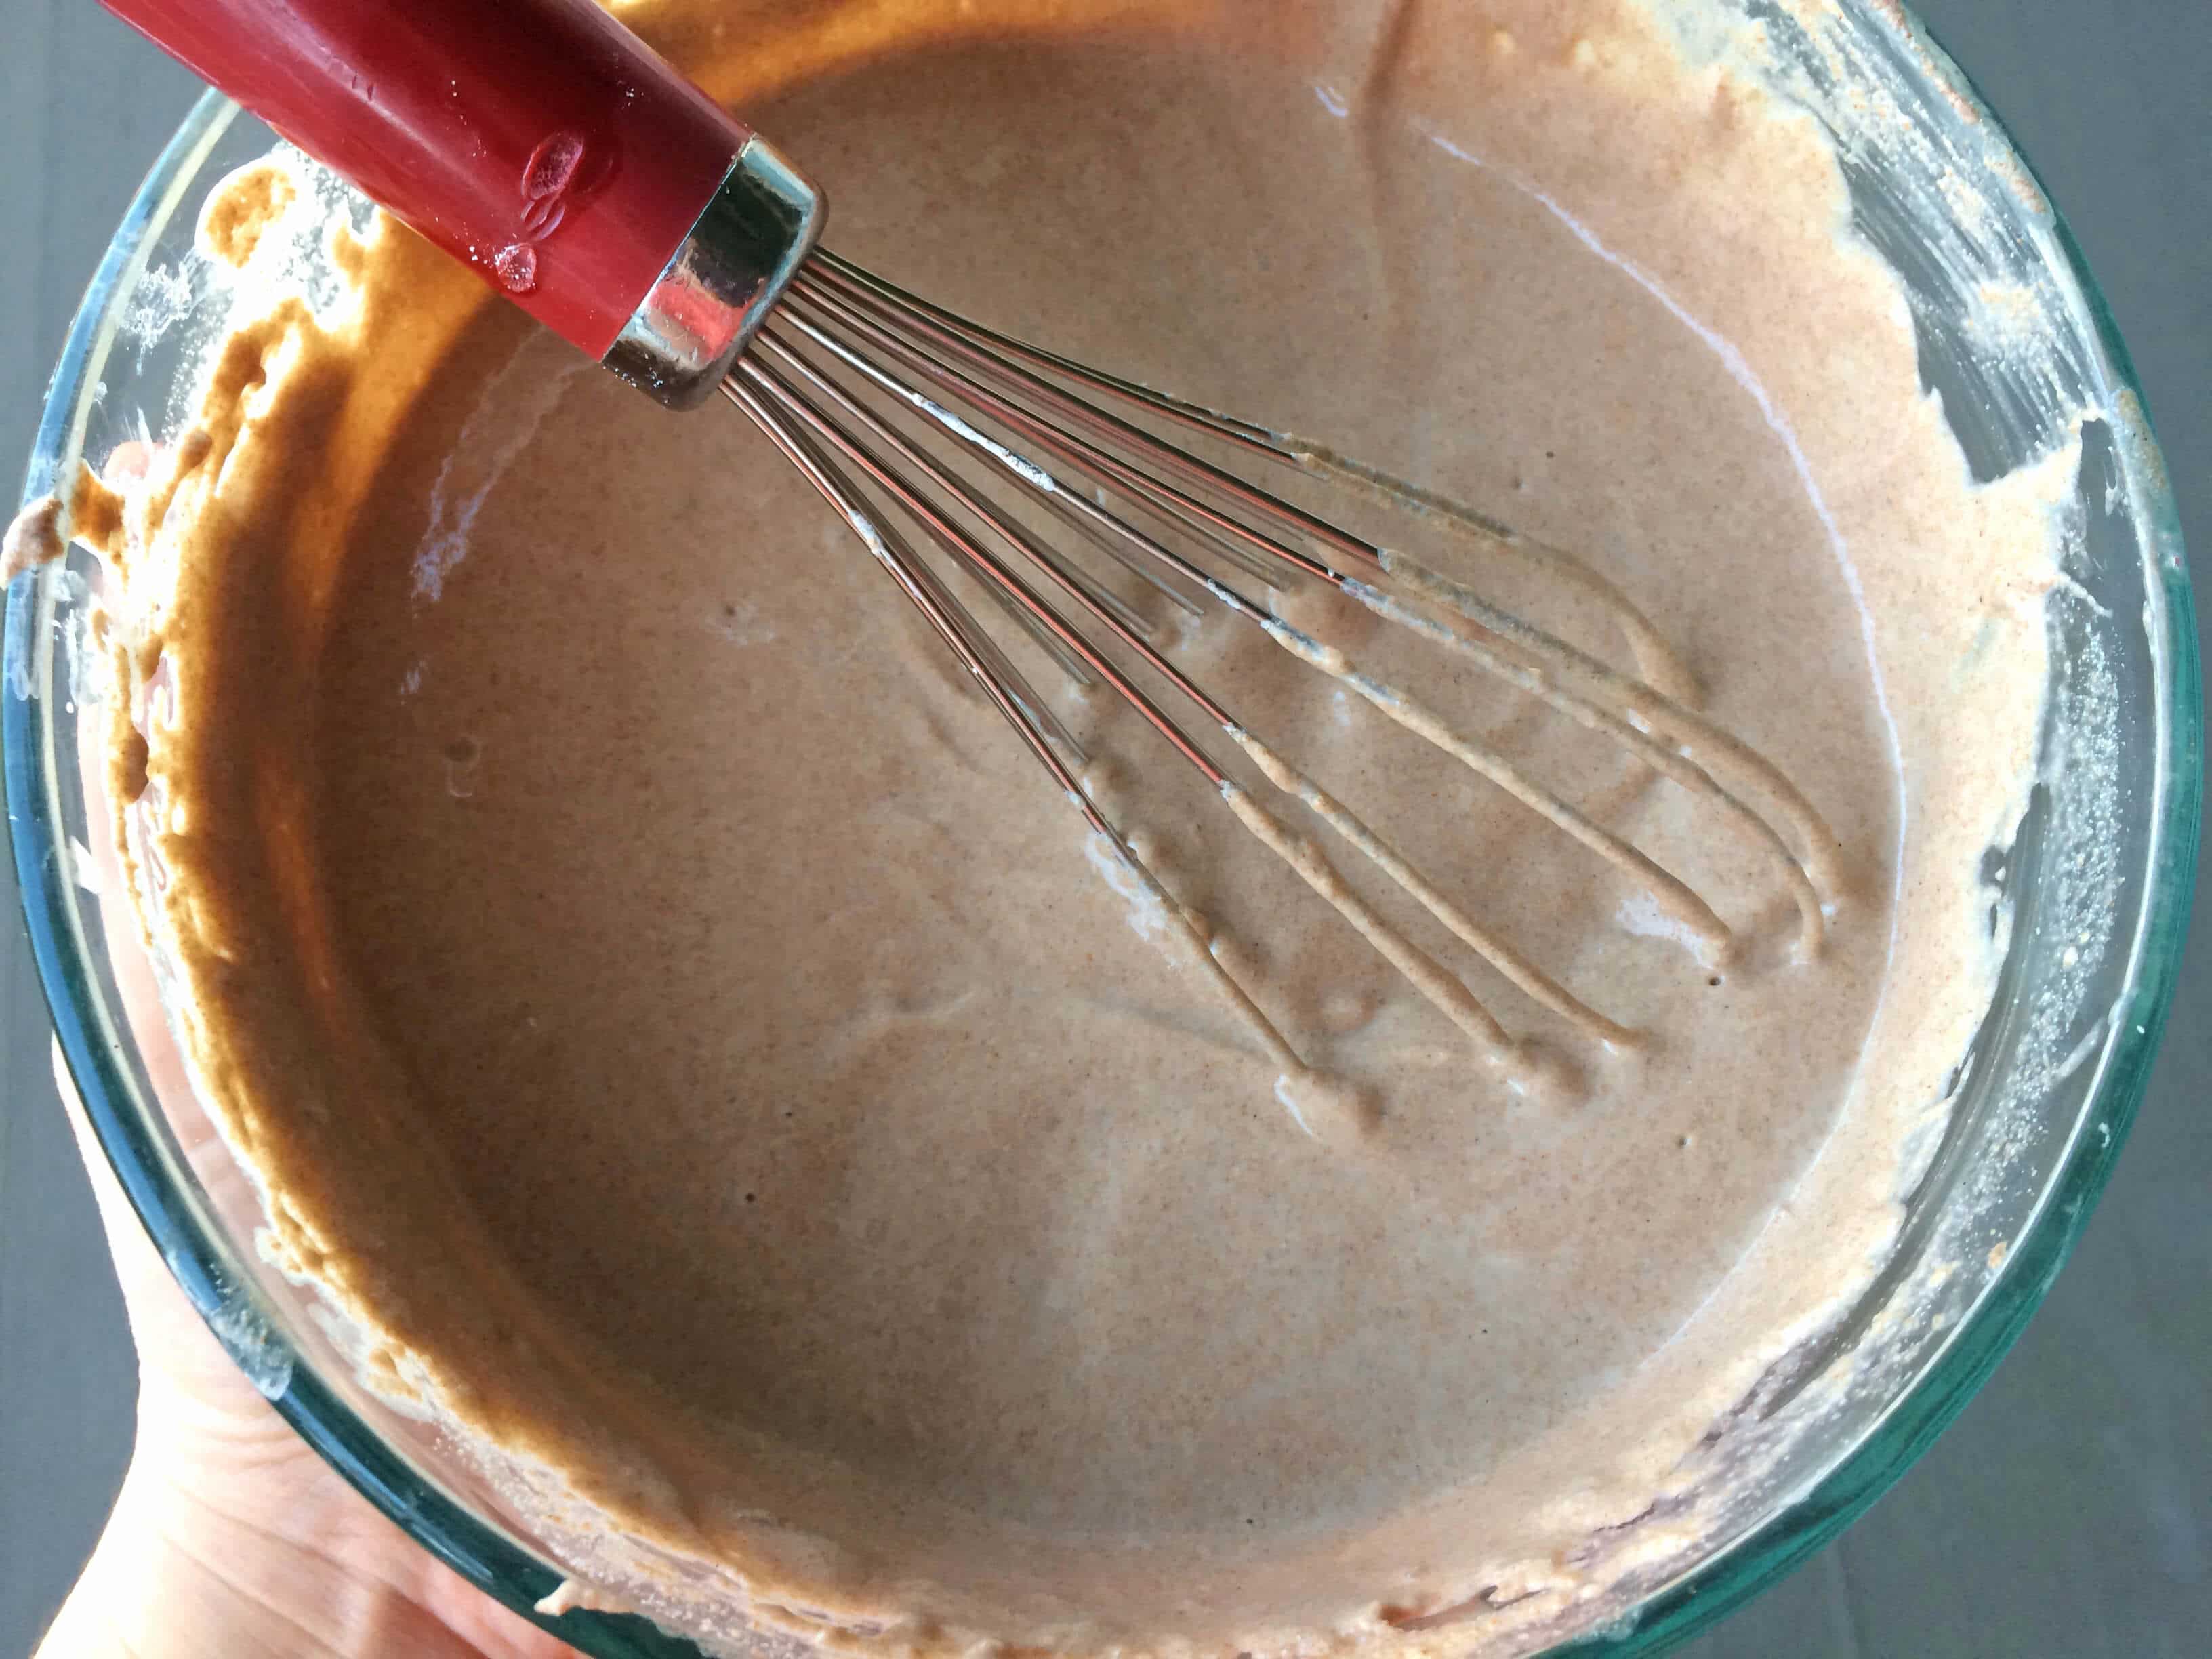
Stir the cooked/thickened batter back into the original mixture.
Add some water to the batter to create roughly the consistency of crepe batter. I added about 2/3 cup of water though this will vary from batch to batch. The batter will have a sweet-soured nutty smell.
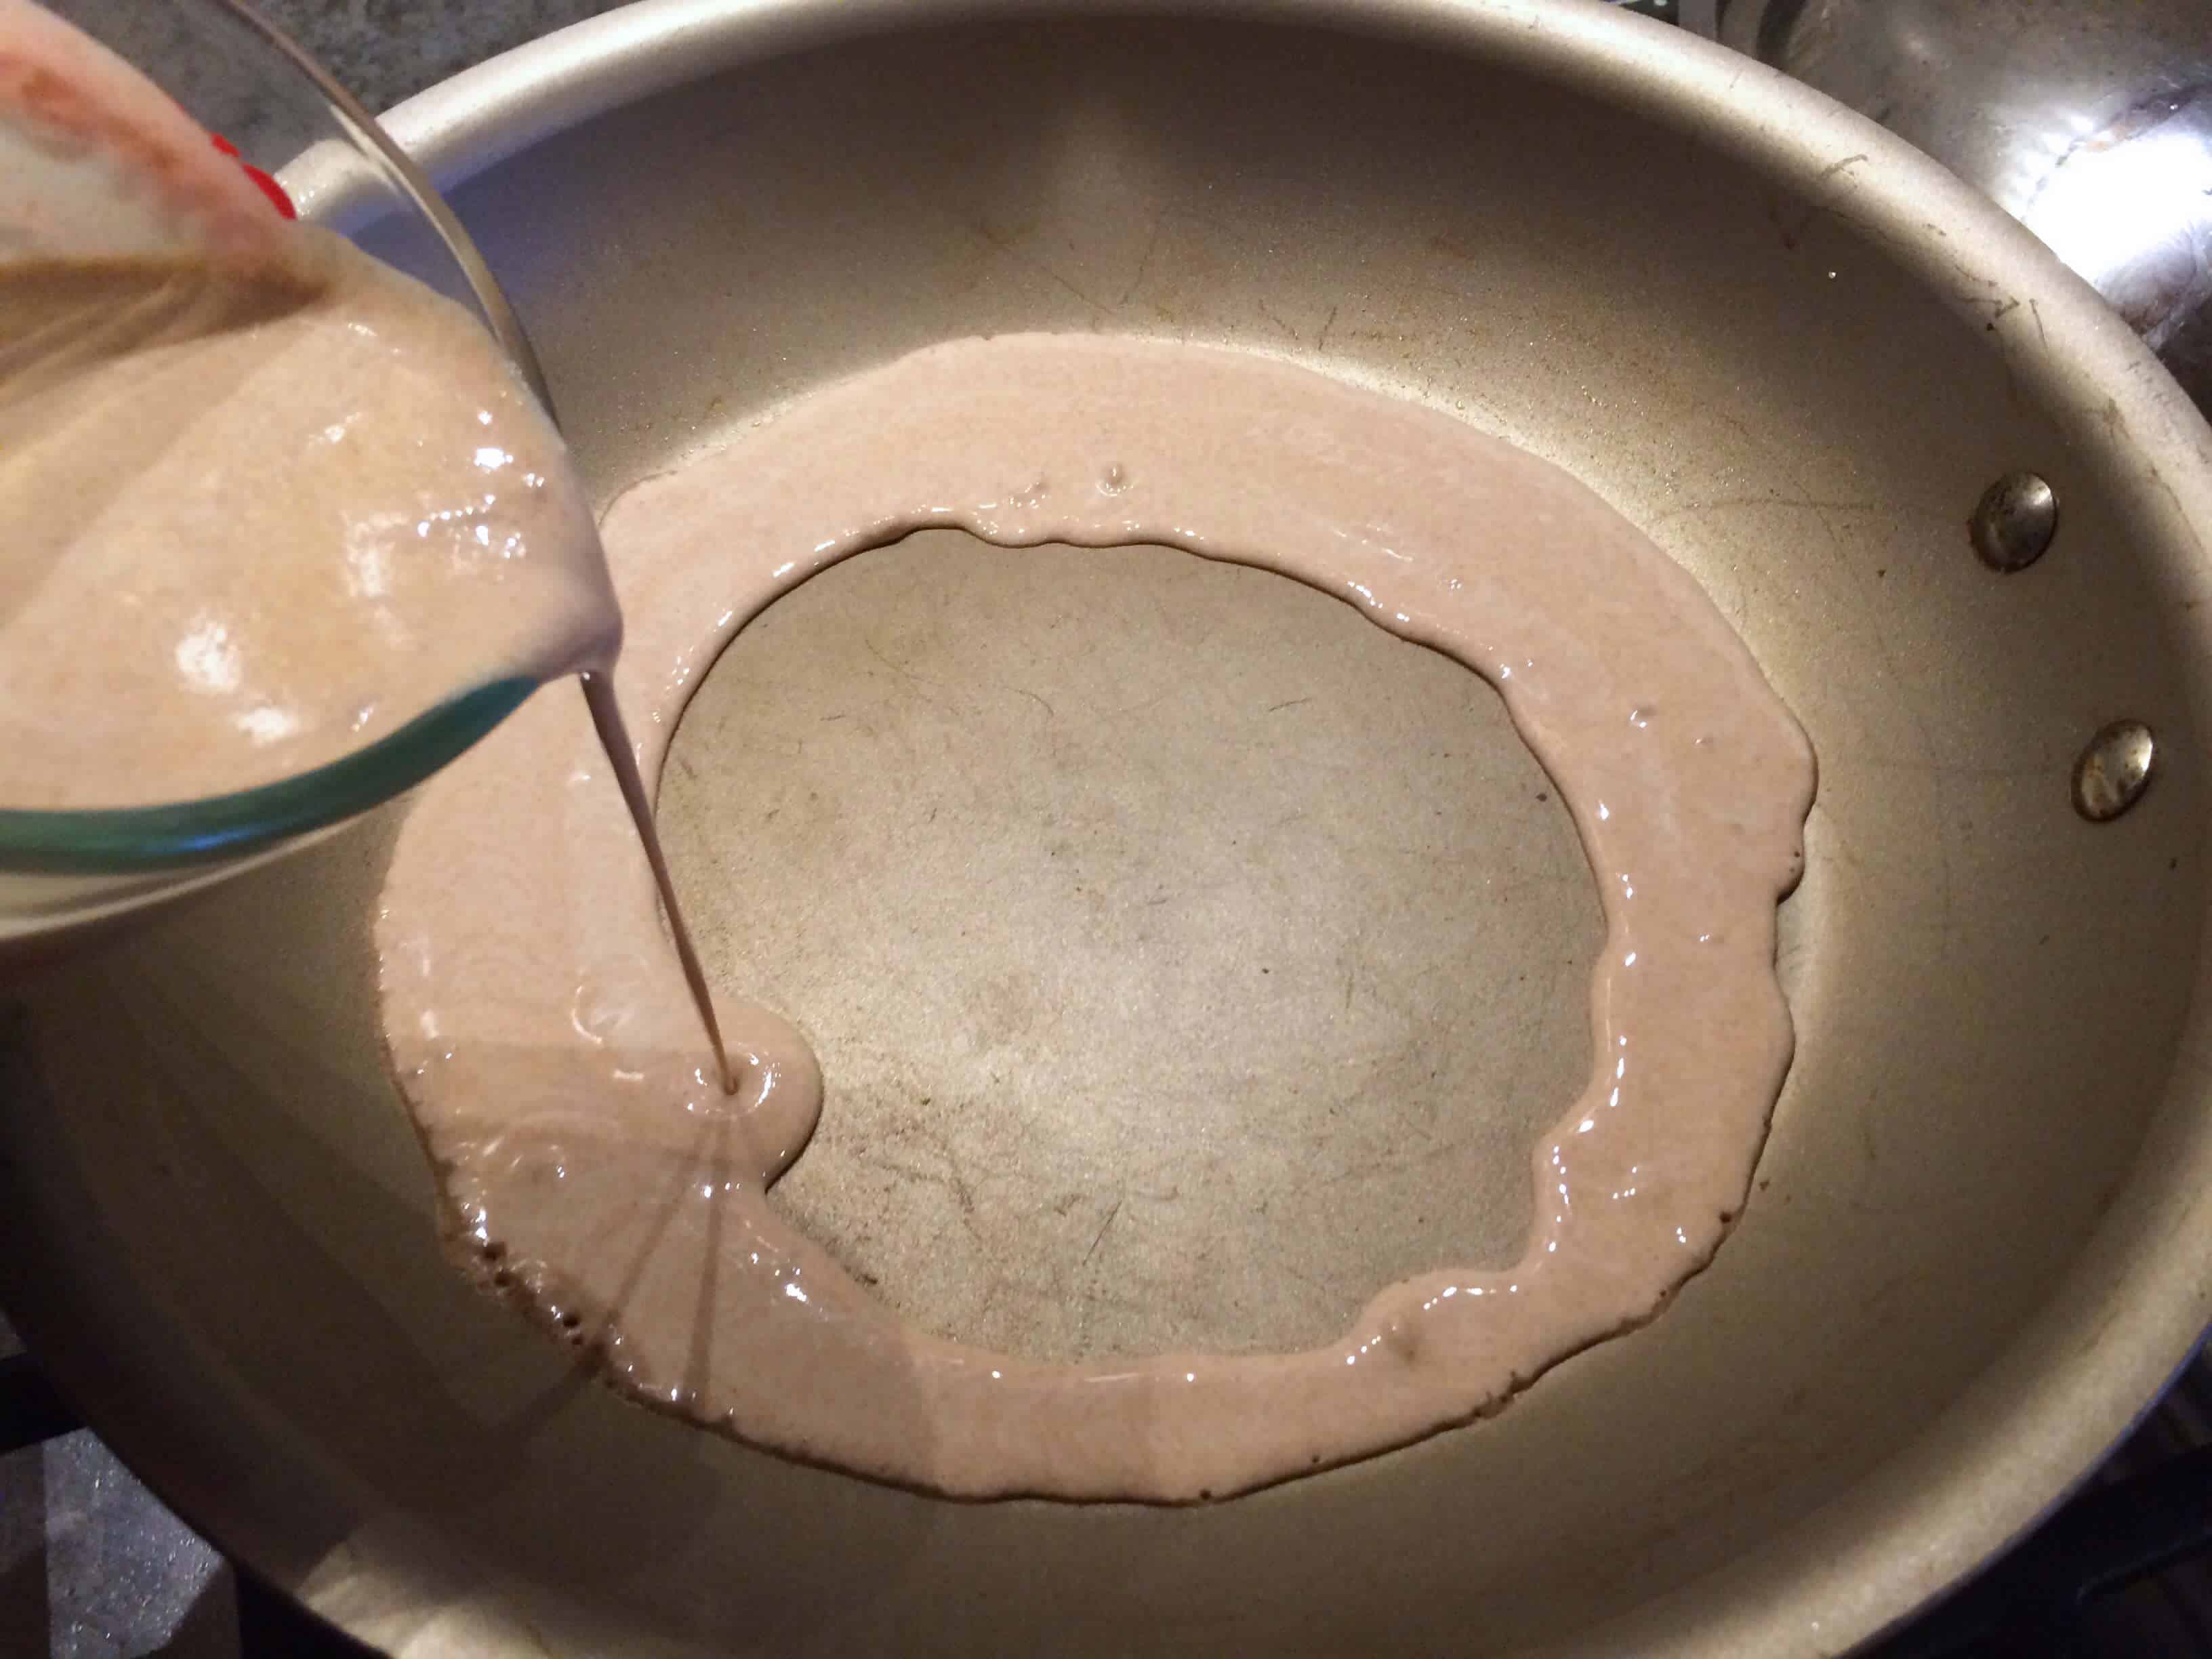
Heat a non-stick pan on medium. Depending on how good your non-stick surface is, you may need to very lightly spray it with some oil.
Coat the surface of the pan with a thin layer of injera batter. It should be thicker than making a crepe but not as thick as a pancake.

Continue to cook – bubbles will form, allow them to pop. Then cover the pan with a lid and turn off the heat to let it steam cook for a couple more minutes or so until cooked through. Be careful though, if you the injera cooks too long it will become gummy and soggy.
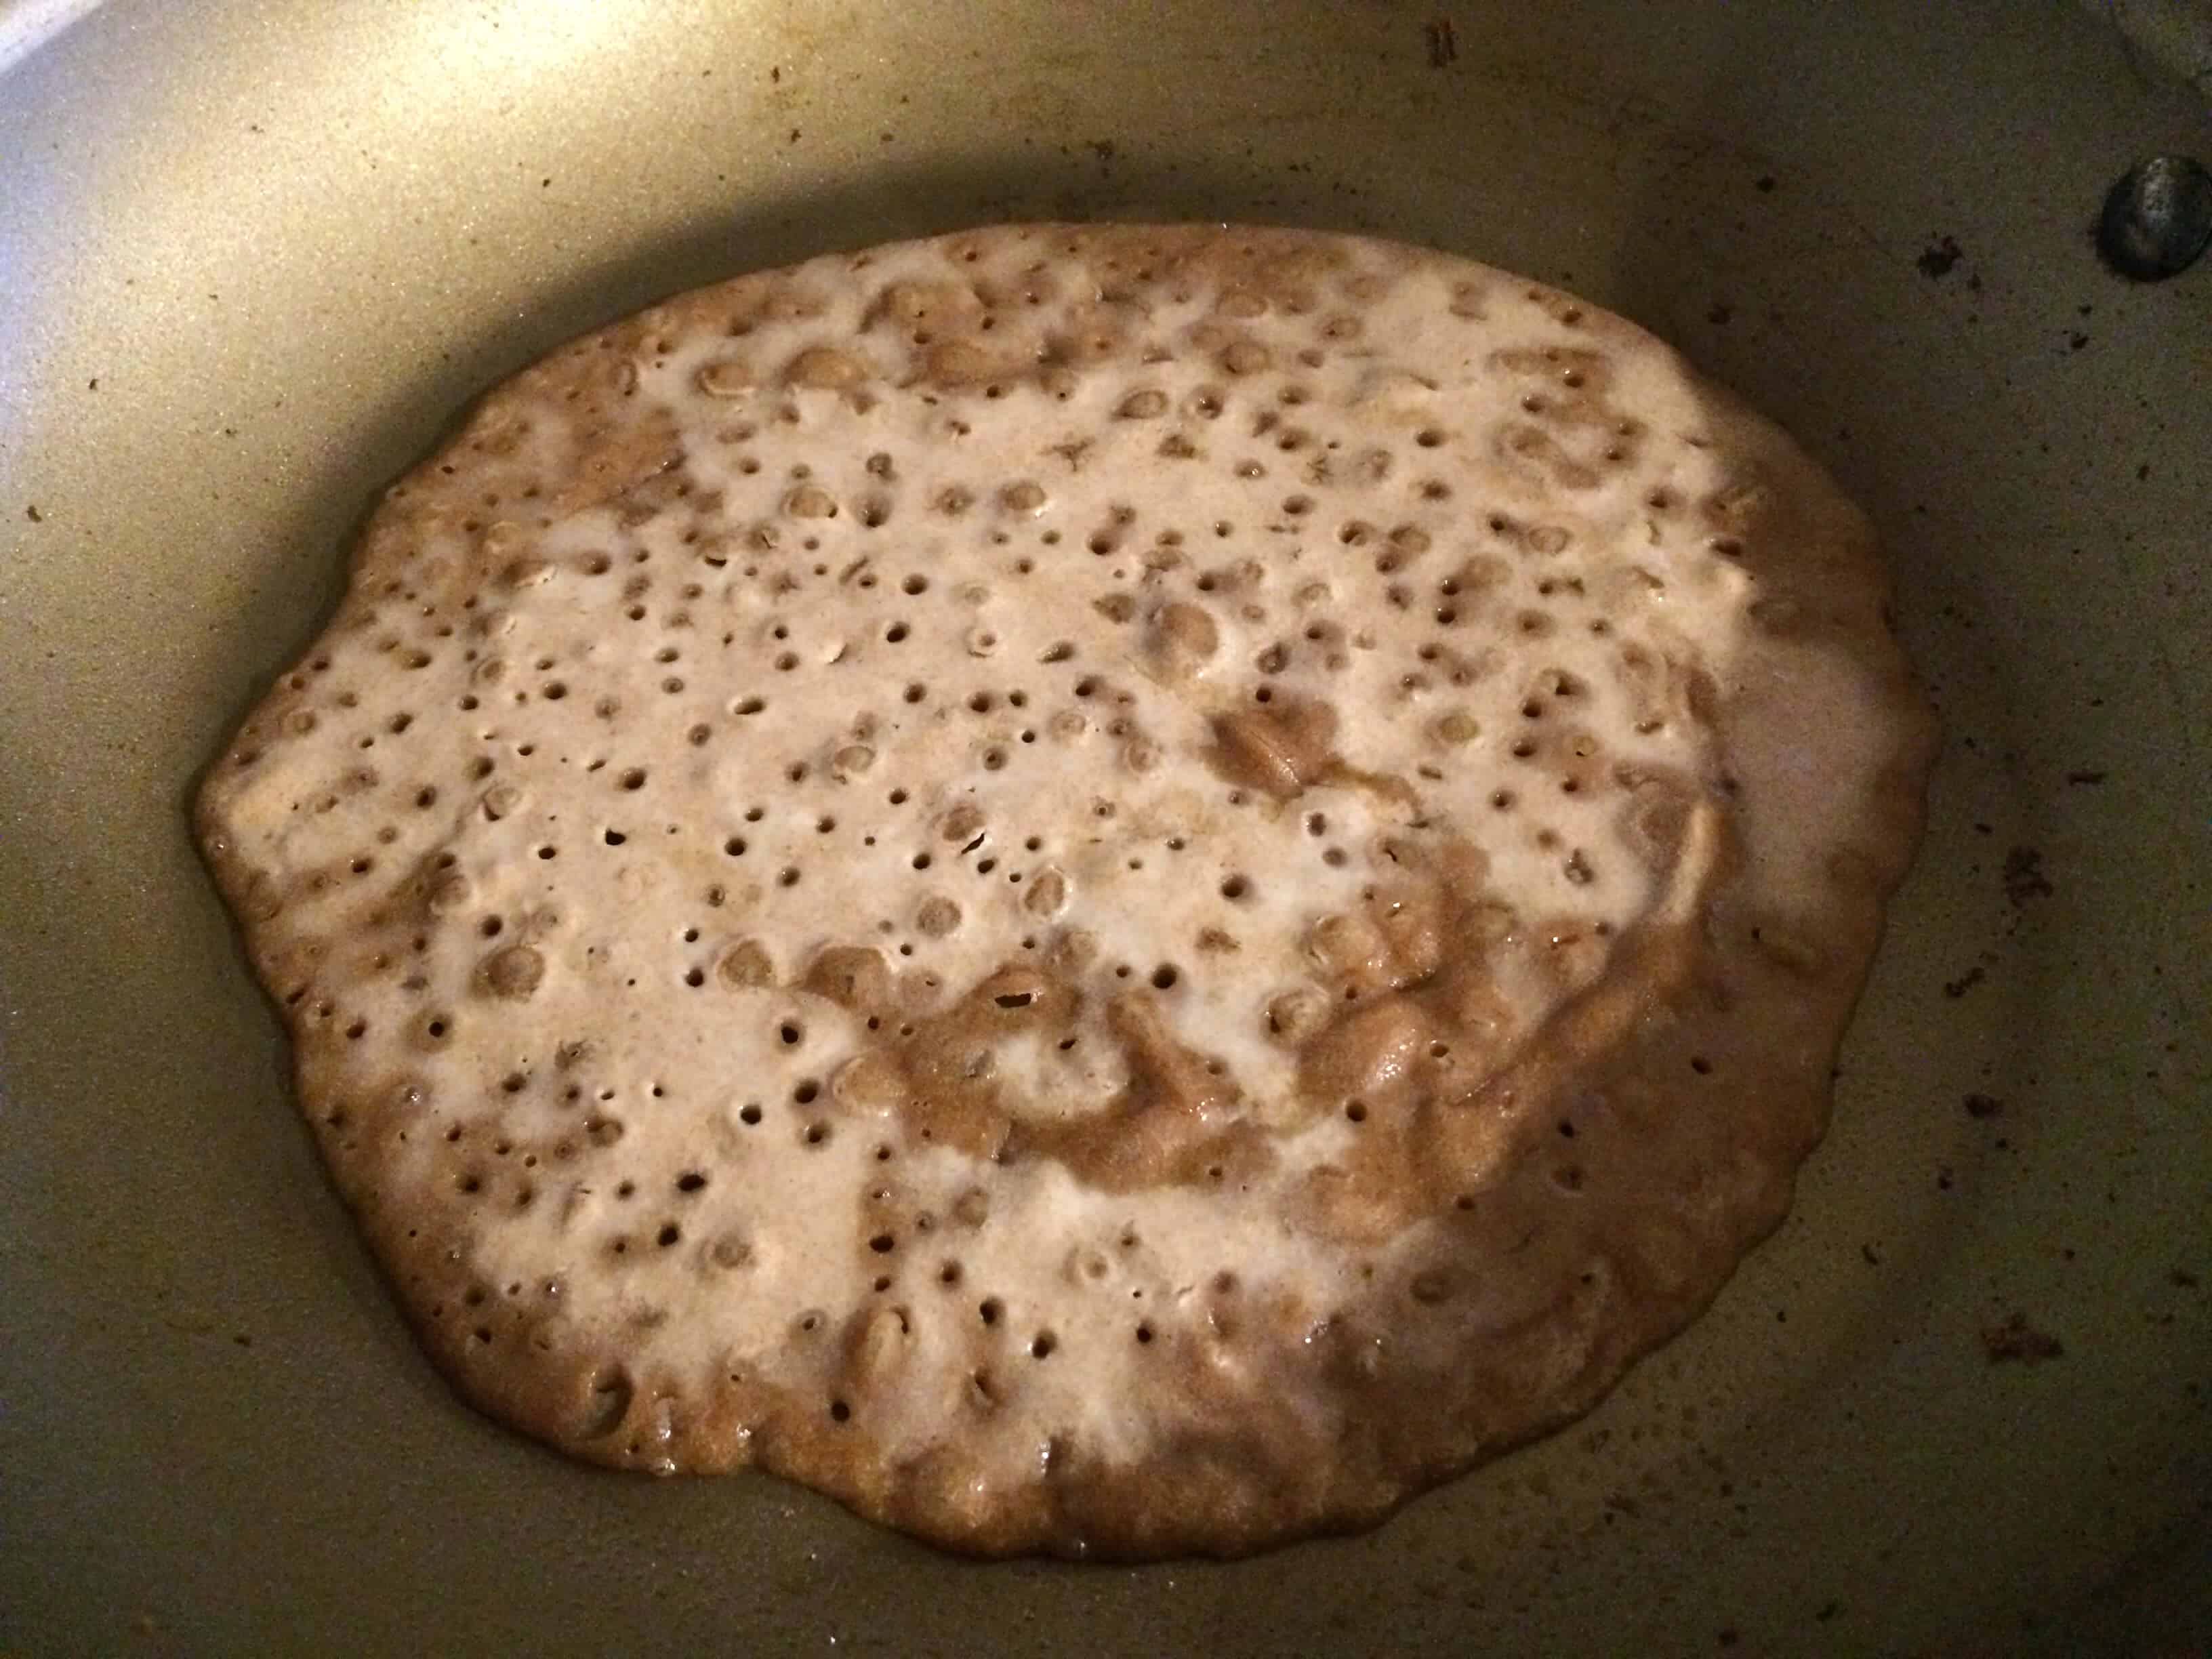
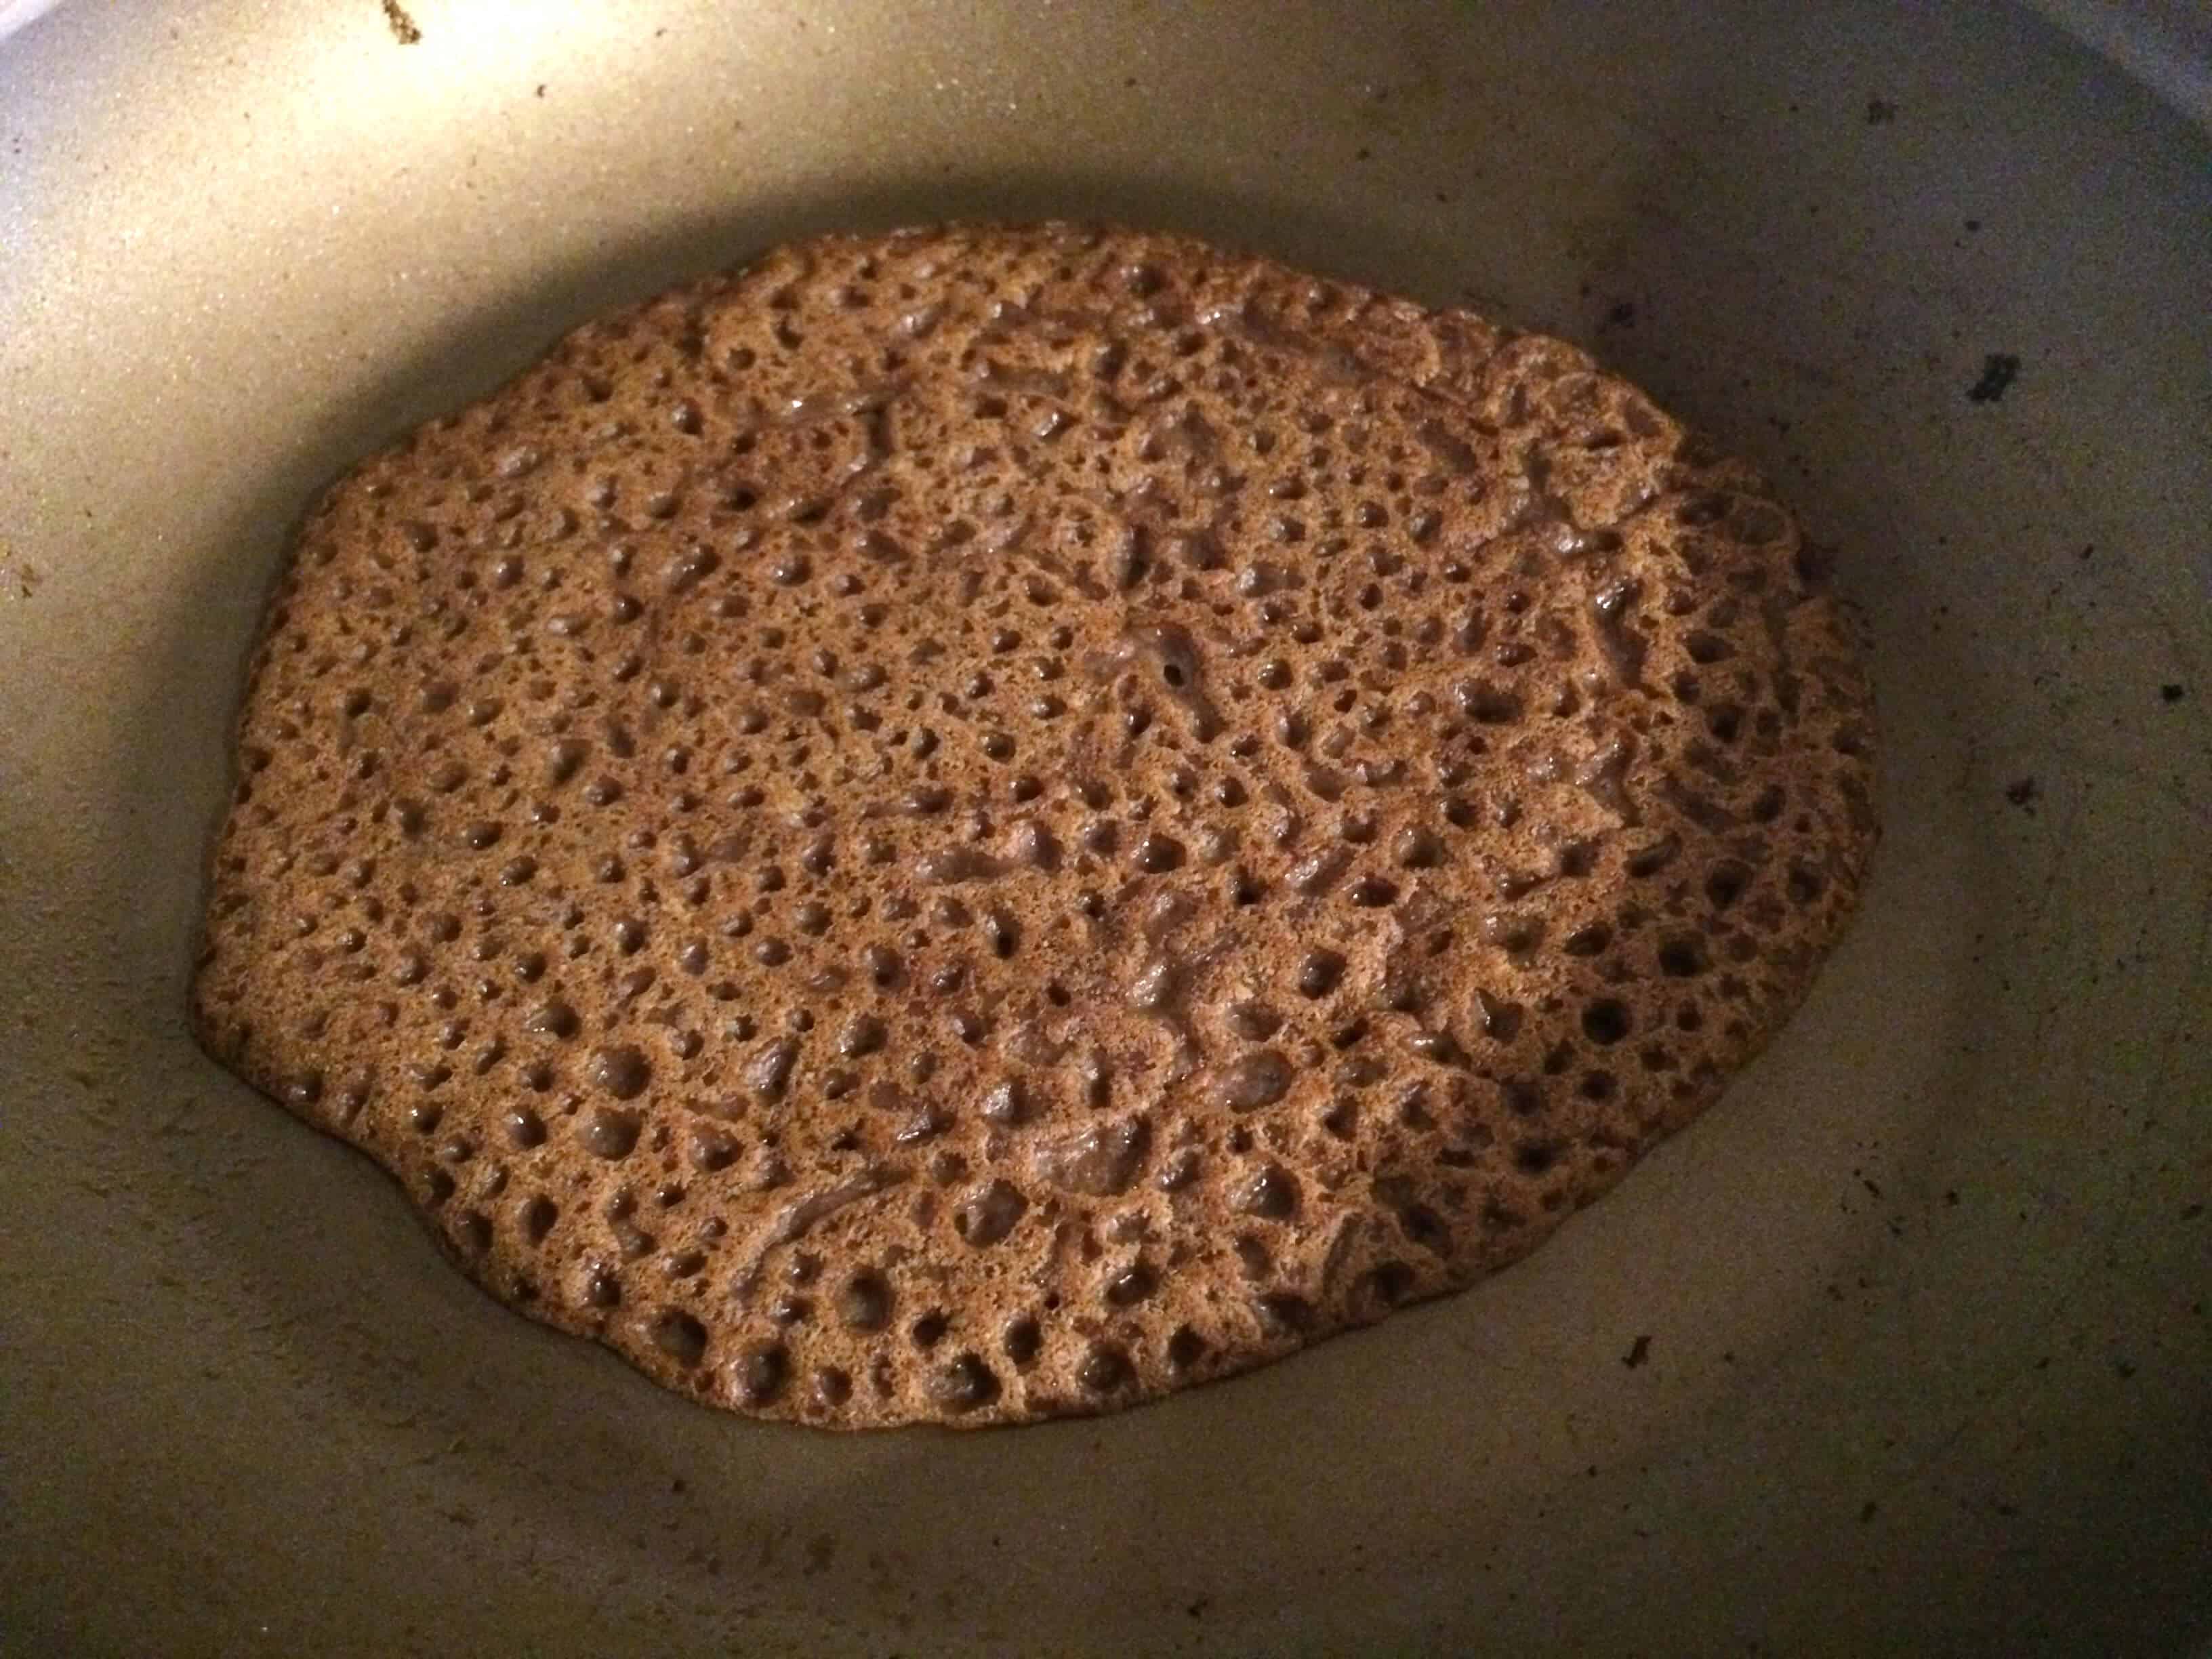
Remove the injera and repeat.
Serve your homemade injera with any of these authentic Ethiopian recipes: Doro Wat, Sega Wat, Misir Wat, and Gomen.
Enjoy!
For more flatbread recipes from around the world to try my:
Save This Recipe
Authentic Injera (Ethiopian Flatbread)
Ingredients
- 2 cups teff flour, brown or ivory , or substitute a portion of it with some barley or wheat flour (note: teff is gluten free)
- Note: If you’re new to making injera I recommend using a combination of teff and barley or wheat as 100% teff is more challenging to work with.
- 3 cups distilled water (fluoride and chlorine will both interfere with the fermentation process)
- Note: This method involves wild yeast fermentation. See blog post for details about using commercial yeast as a starter (you’ll use about 1/4 teaspoon dry active yeast)
Instructions
- *See blog post for detailed instructions*NOTE: Using mostly or all teff (which is the traditional Ethiopian way) will NOT produce the spongy, fluffy injera served in most restaurants which are adapted to the western palate and use mostly wheat, sometimes a little barley, and occasionally a little teff added in.
- In a large mixing bowl, combine the flour and water (and yeast if you're using it). Loosely place some plastic wrap on the bowl (it needs some air circulation, you just want to keep any critters out) and let the mixture sit undisturbed at room temperature for 4-5 days (the longer it ferments, the deeper the flavor). (Depending on what kind of flour you're using, you may need to add a little more water if the mixture is becoming dry.) The mixture will be fizzy, the color will be very dark and, depending on the humidity, a layer of aerobic yeast will have formed on the top. (Aerobic yeast is a normal result of fermentation. If however your batter forms mold on it, it will need to be discarded.) Pour off the aerobic yeast and as much of the liquid as possible. A clay-like batter will remain. Give it a good stir.
- In a small saucepan, bring 1 cup of water to a boil. Stir in 1/2 cup of the injera batter, whisking constantly until it is thickened. This will happen pretty quickly. Then stir the cooked/thickened batter back into the original fermented batter. Add some water to the batter to thin it out to the consistency of crepe batter. I added about 2/3 cup water but this will vary from batch to batch. The batter will have a sweet-soured nutty smell.
- Heat a non-stick skillet over medium heat. Depending on how good your non-stick pan is, you may need to very lightly spray it with some oil. Spread the bottom of the skillet with the injera batter – not as thin as crepes but not as thick as traditional pancakes. Allow the injera to bubble and let the bubbles pop. Once the bubbles have popped, place a lid on top of the pan and turn off the heat. Let the injera steam cook for a couple or so more minutes until cooked through. Be careful not to overcook the injera or they will become gummy and soggy. Remove the injera with a spatula and repeat.
- IMPORTANT NOTE: Both the texture and color of the injera will vary greatly depending on what kind of teff you use (dark or ivory) and whether or not you’re combining it with other flours. Gluten-based flours (e.g. wheat and barley) will yield a much different texture than 100% teff. In the pictures and recipe below I’m using 100% dark teff, something you will not find in restaurants and will look different than what most are accustomed to, but is traditional to Ethiopian home cooking. Make your injera according to what you prefer.
Nutrition
Images of serving platter and woman cooking courtesy Maurice Chédel and Rob Waddington via CC licensing
Originally published on The Daring Gourmet February 7, 2017

Hi, I’m Kimberly Killebrew and welcome to Daring Gourmet where you'll find delicious originals, revitalized classics, and simply downright good eats from around the world! Originally from Germany, later raised in England, world-traveled, and now living in the U.S., from my globally-influenced kitchen I invite you to tour the world through your taste buds!


I’ve made this twice already and love it. I’ve had injera in Ethiopia and in several Ethiopian restaurants. This recipe is a keeper. And I personally like the really dark injera that you feature here made from 100% brown teff. It has such a rich, deep flavor. Love your blog, keep up the good work.
Wonderful, thanks so much, Nathan!
Thanks for a great step by step on the process. I’ve been doing a lot of research into Ethiopian cooking and find your recipe to be the most traditional. All the others have salt, yeast, various flours, etc. To all the people worried about mold, follow the steps and chill out! The fuzz is poured off and then the injera is cooked so there isn’t gonna be anything bad for you left. Just use common sense. I have been making my own kimchi for years, that’s eaten raw! Follow the steps and you’ll be fine. Thanks again for a great read.
Thanks, Alison, I appreciate the feedback. I do a lot of fermenting as well – grains and veggies, including sauerkraut. Kimchi is next :)
Nothing funnier then waiting until you have people over to crack a jar of 5 day ferment kimchi.
I just started a batch of injera per your recipe, I’ll post something here in a few days and let you know how things went.
My official review after trying your recipe!
This is a moody recipe and that is probably why a lot of people are questioning fuzz, bad smells, etc. Because this recipe to make injera relies on wild yeast it is going to be very unpredictable. Results will vary wildly based on things like climate, humidity, temperature, etc
After day 4 mine had a lot of white fuzz. Typically when making sourdough any mold is bad, a little can be ignored though. Despite the fuzz I proceeded. The result was a batter so sour it was pretty much inedible. Though when I took a quarter cup of it and mixed in 1 1/2 cups Teff and 3/4 cup water and let it sit 3 hours it produced the correct flavor, though it didn’t have any bubbles which really is no good.
I have since retained 1 cup of the original batch and added it to two cups Teff and a little water to see what happens.
I also started another batch and am going a more known route of adding 1/8 tsp active dry yeast and feeding it as one would a normal sourdough starter.
I think the traditional route might be a bit difficult for people with little or no experience with fermentation. I would advise those who are hesitant to try a recipe that either calls for a pinch of store bought yeast, or one that uses a gluten free starter. I found King Arthur flours sells online a gluten free starter and they recommend feeding it their ancient grains gluten free flour blend. Going that route you could make a much less temperamental starter then add it to Teff before making injera. A lot more predictable doing it that way!
Just my ten cents!
Thanks for you sharing your experience, Alison. Without a doubt, traditional fermentation (i.e., wild yeast fermentation) is an acquired taste. Just as some people open a jar of kimchi and begin to salivate, others will run the opposite direction! :) Injera is fully amenable to both traditional and more contemporary methods (i.e., the use of a commercial yeast starter).
I should have read ALL the responses before I tossed my batch. It smelled good yesterday (and still this morning after a 3 day ferment), but when I went to make it up there was a lot of white fuzz (mold) on it and no water on top. I tossed it all to try again and found the liquid was under the spongy top later. I’m not at all sure why that happened but if I’d realized a little fuzz was okay I would have skimmed the top and used the rest. Im going to give it another shot.
Hi Dianne, give the blog post itself a read, it discusses this in detail, pics included, in terms of what to expect and what is normal.
I did read it and my results were nothing like what was pictured or explained, but I did identify with some of the things that were said by others. I think I ground my flour too finely and it needed more water to start. I’m giving it another go and will keep trying til I get it right. I love Injera. :)
Hi Dianne, I’m really not sure. I grind my flour on the finest setting (super fine on the KoMo Classic Grain Mill) and the flour-to-water ratio is standard for injera recipes, and I’ve never had a problem. So it seems there are other factors at play here – humidity, room temperature, elevation/evaporation?
Also, Dianne, what kind of flour are you using? All teff or a combination of flours?
So glad I came across this recipe – I have been wanting to try to make this bread for ages!
I LOVE YOUR EXPERIMENT. IF YOU USE THE GRILL INSTEAD OF THE PAN AND NOT USE ANY OIL, THAT WOULD WORK BETTER.
I started this recipe a couple days ago and it’s been sittig on my kitchen counter. There’s a very strong odor though. I imagine this is somewhat normal but it almost smells like my kitchen trash :-/ Was that how yours smelled?
Yes, that’s the smell of fermentation, Karrie :) As long as it’s not moldy it’s perfectly fine and normal. You’ll also notice it’s going to start getting fizzy after a few days when you jiggle the bowl.
Thanks! I ended up throwing that batch away because I think I mis-measured the teff (had to ground it into flour) so I’m going to try again.
The initial injefa is realy very dark. I have been eating Ethio foods for over 30 years and have never seen it this dark. It looks burned or overcooked. The injera served with food in the 2nd photo looks more like what our Ethio restaurants serve.
Why is your recipe so dark when cooked? Please advise. Thanks. Love your blog.
Hi Marquita, it’s because I’m using 100% dark teff flour. Most of what you get in Ethiopian restaurants will either be made with ivory teff flour or – more commonly – a combination of teff flour and a different flour (because it’s cheaper). I included different examples in my post (light versus dark) to show the options.
I’ve never been to an Ethiopian restaurant, but now I really want to give injera a try. :) I love how you explain the whole process here, as well as the history of this flatbread!
What a lovely flat bread. All those little nooks and crannies are incredible!