How To Make a “Gourmet” Christmas Wreath & Simple Advent Wreath
This post may contain affiliate links. See my disclosure policy.

I figured as long as I get the word “gourmet” in there, it’s suitable for a food blog, right?
I don’t spend a lot of time making crafts. I like to devote what little free time I have to my other hobbies (eg, cooking, photography, singing, playing my sax or piano), but there are a few crafts I really enjoy making and here are a couple of them. Growing up my mom and I would often make our own Christmas wreaths and Adventskranz (Advent wreath) and that’s a tradition I’ve continued in my own family. Originally from southern Germany and now living in Washington State, pine branches have always been readily available and that makes this crafting project all the more accessible.
I just made both of these wreaths yesterday and before you go out and buy one, I wanted to share a little tutorial with you on how to make your own Homemade Christmas Wreath and Advent Wreath. They’re fresher and much nicer than most of the wreaths on the market. And if you do find a wreath that’s comparable, it’s going to come with a hefty price tag. You can make one of these yourself at a fraction of the cost and it took me just a little over an hour to make both wreaths, and that included picture-taking time.
There are a few basic steps you’ll need to follow when making your own Christmas wreath but they’re simple, and if you’ve never made your own I want to boost your confidence that you can do it and you’ll be so happy you did! Homemade anything is always so gratifying and each day when you come home and see that wreath on your door or the Advent Wreath on your table, you’ll beam with pride.
Let’s get started!
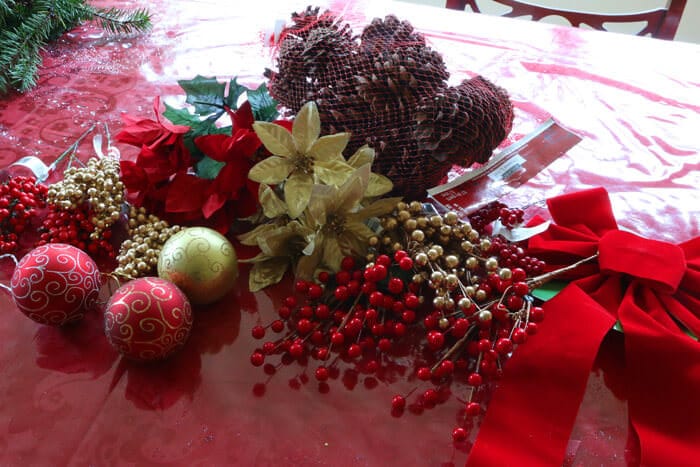
When it comes to Christmas I’m very traditional and I love the old-fashioned red, green, white, gold and silver. You can use any color scheme or kinds of decorations you prefer. You can simply use these ideas for inspiration and customize it to your own preferences.
The size of decorations you use will depend on the size of wreath you use. For example, if you’re making a huge wreath, you’ll want to include some large ornaments. If you’re making a small wreath, large ornaments won’t look very good. I’ve gathered a few decorations of varying shapes and sizes. Michael’s is always a great place to find anything you’ll need for this project. I picked these up a few days ago and everything was 50% off. The Christmas bulbs were 75 cents each, the red ribbon $1, and the little bead clusters were $1 each as well. The pine cones were $2.99 for the bag and the poinsettias were $1.50 each. I just picked up a few of this and that, a few things I thought would go nicely on a wreath.
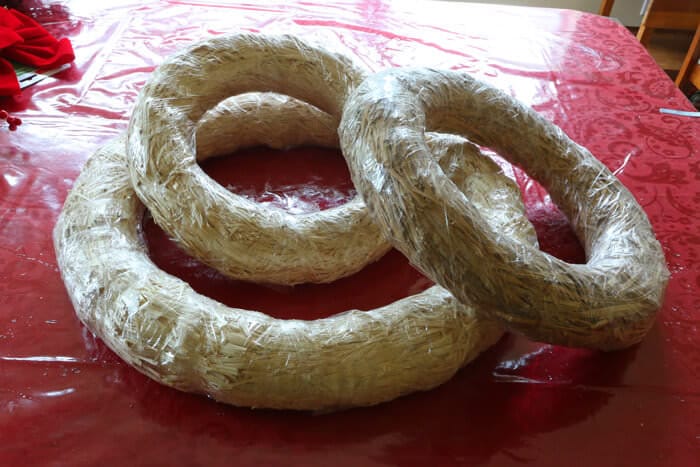
You’ll also need a straw wreath form. The largest one available (18 inches) was about $6 and the smallest (12 inches) about $4. We’re going to use the large one for our Christmas wreath and the small one for the Advent Wreath. I usually just leave the plastic wrap on. There’s no need to remove it and it helps provide some protection to the straw form if you’re going to use it year after year.
You’ll also need plenty of fresh pine branches. Avoid ones with thick stems , go with the thinner ones because you need to be able to bend them. You can find fresh branches at stores, like hardware stores, but if you’re fortunate to live in an area with pine trees, there’s your goldmine. Here in the Evergreen State we have pine trees galore and I clipped and gathered these in from our back yard. In addition to the pine branches, gather some other greens from your yard to serve as accent foliage. Whatever nice greens you can find. A few holly leaves, some pine-like ferns, a few sprigs of blue spruce, and any other attractive greenery add a really nice touch.
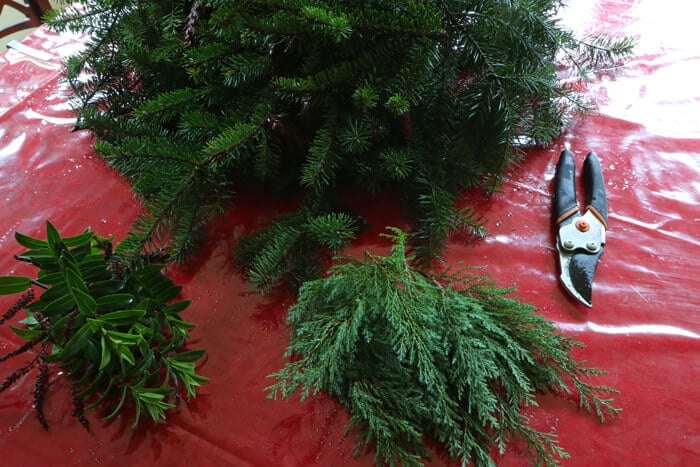
You’ll also need a pair of clippers and some florist wire. 24 or 26 gauge will provide good support while allowing you to easily bend and twist it. I picked up a roll of it for $1.99 and it’s enough for several Christmases. So gather up all your materials on a large work surface like your dining room table.
And don’t forget a glass of eggnog. Not required but highly recommended.
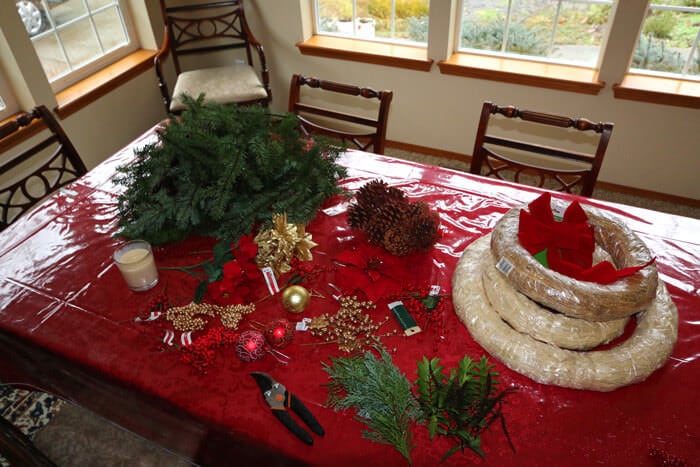
Okay, we’re ready to start!
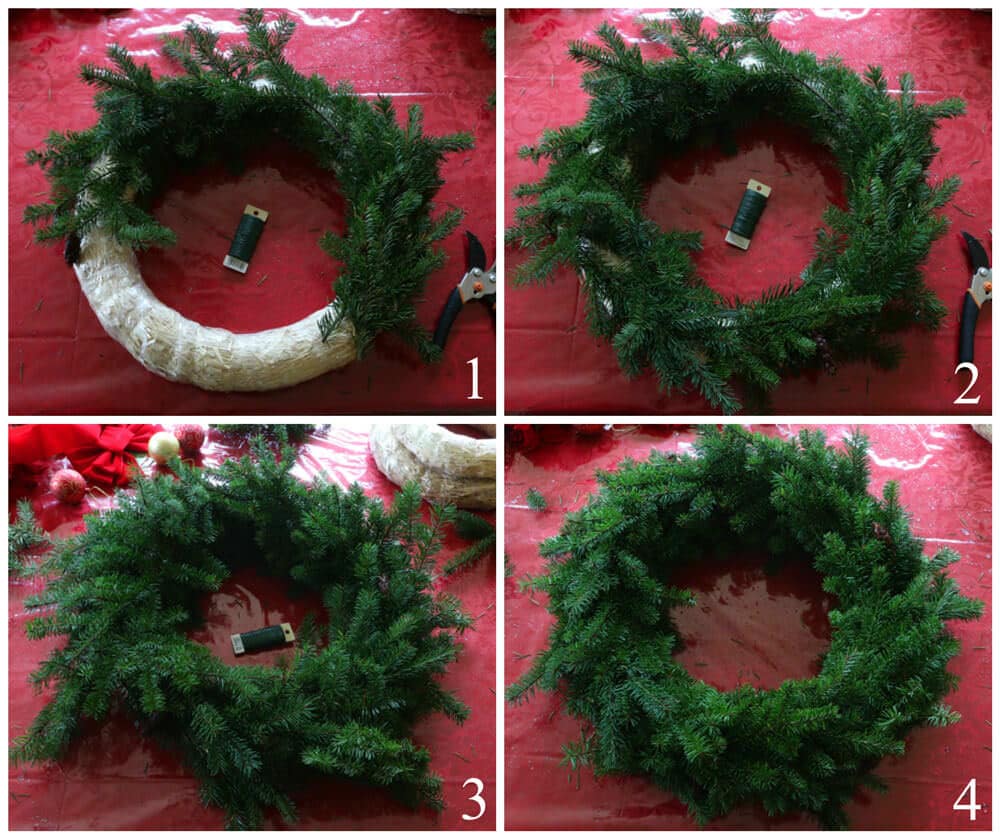
1) First you want to lay down a base of pine branches. Lay them in the same direction, counter-clockwise, so the ends of the branches are on the right, and the soft tops of the branches will be laying towards the left. (Of course you can do it clockwise if you prefer, but for whatever reason counter-clockwise just looks and feels better to me). Secure them to the straw wreath by wrapping some florist wire around them, strapping them down to the base. 2) Continue adding more branches all around the straw wreath form. 3) Now you’ll want to fill in the sides, sliding the ends of the branches in through the existing wire loops and through the other branches. Fill in any gaps with smaller twigs until you have a nice, full wreath. It will look a little disheveled at this point but we’ll address that next. 4) Wrap a little more wire around just to strap down any large branches that are sticking out, looping the wire under some of the smaller branches so you don’t end up with a completely matted, wired down wreath. The green florist wire is hard to see anyway, but you want to make it as invisible as possible. Okay, now your basic pine wreath foundation is complete!
A NOTE ON SECURING THE DECORATIONS: If you live in a windy area, securing everything properly will be especially important. You don’t want your decorations strewn across your neighbor’s lawn and blowing down the street!
1) Now we’re going to embellish the Christmas wreath with some of those accent greens we mentioned earlier. They add such a nice touch. Still going counter-clockwise, simple stick the ends of the branches into the pine branches. If you’re using anything really floppy, secure it down with a little bit of wire. 2) Secure the red bow in place. A bow is optional, of course, but it just looks so festive, we’re going to use it. 3) My pine branches came with the cutest little pine cones attached, so I’m adding a few of those, wrapping some wire around the base of each one and then securing them to the wreath. You can buy pine cones in any craft store as well (we’ll be using some of those later). Now, I just want to point out that you can stop right here and have a beautiful, simple wreath that anyone would admire. Or you can continue on with some decorations. So that this DIY post isn’t cut too short and to give you some more ideas, we’re going to continue on! 4) Symmetry is important to consider when you’re putting your base decorations in place. We want something large in each quarter of the wreath (a total of 4 things) and the bow is already in one quarter, so we’re going to use three of those red bead things.

1) For a little color variety we’re going to add some gold for contrast. 2) And now for some larger pine cones. I love pine cones, don’t you? Take some florist wire and wrap in between some of the pine cone ridges at the base of the pine cone, twist it at the bottom, and stick it in the wreath to secure it in place. You may need to wrap the wire around the branch underneath where the pine cone will be sitting. Again, you want to keep all the wire as hidden as possible. And once again, you could stop here and have a magnificent work of festive art. It’s entirely up to you how much or how little you want to add. I still have a few extra decorations left so I’m going to put them to use. 3) Still following the principle of 3’s, we’re going to add three Christmas bulbs. These particular ones come with wires attaches and I’m just going to carefully twist them around in between some of the pine branches until they’re secured in place. 4) And for a final touch we’re going to cut off some of the poinsettias, three of each color (red and gold), and secure them to the wreath.

You’re done! And just look at this positively gorgeous Homemade Christmas Wreath!
Once again, there are some there are some general guidelines to follow in terms of symmetry, complementary color schemes, and size of decorations in ratio to the wreath size, but take control of your wreath and make it your own. Customize it to you preferences. Own it. Take pride in your accomplishment.

And then put it on display on your front door for the world to see.

And now for our final project. Our Advent Wreath. This will be a cinch now that you’ve got the wreath down.
1) Secure the pine branches in place and add a few accent foliage if you like (see Christmas wreath above for detailed instructions). 2) Secure the candles in place. In Germany where I grew up we traditional use shorter candles. Here in the U.S. tall ones are also common and either can be used. In Germany red candles are traditionally used, though modern trends include other colors. The store didn’t have candle holders with stakes to poke through and secure to the wreath (that would have been ideal), so I just used some clear tealight holders and hot-glued them to the pine branches. 3) I still had a few poinsettias left and used those along with some pine cones.

And there it is: Your Homemade Advent Wreath – beautifully simple and simply beautiful! The Advent wreath is particularly nostalgic for me. In Germany we followed the tradition of lighting one candle on each Advent (each Sunday of the month of December) until the fourth and last advent when all four candles would be beautifully lit, creating a wonderful, reverent glow signaling the arrival of Christmas. It’s still one of my favorite Christmas traditions.

And so my wonderful friends, here are two beautiful homemade wreaths you can complete, one for your door and one for your table, to add some beauty and meaning to this special Christmas season.

And as you gaze on your labors of love you can reflect on the symbolic meaning of the circular Christmas wreath, the never-ending, everlasting love of our Savior Jesus Christ.
Merry Christmas!


Hi, I’m Kimberly Killebrew and welcome to Daring Gourmet where you'll find delicious originals, revitalized classics, and simply downright good eats from around the world! Originally from Germany, later raised in England, world-traveled, and now living in the U.S., from my globally-influenced kitchen I invite you to tour the world through your taste buds!


This is such a beautiful Christmas wreath. I too love the traditional colours, green, red and gold. I have never made a wreath before and wouldn’t call myself artistic or “crafty”, but your instructions are so clear and the photos help enormously too. I really think I could do this and surprise everyone. I am what we call “ ham fisted” in the U.K meaning big clumsy hands. I will post a photograph of my efforts. Thank you for sharing your knowledge and inspiring me to have a go. I wish you a very happy and peaceful Christmas.
Thank you, June, and a very happy Christmas to you, too! :)
Woww, simply beautiful 🌷
Over the years I have given homemade wreaths for some people I know who would not normally do this for themselves for one reason or another. A dear elderly friend of mine who had to move from her beloved country home to an apartment became a recipient. The move for her was so difficult as she grew up near the wood and also a lover of horses , she used to walk to my farm to visit mine . I personalized her wreath that year with greenery from the area she came from ( which was also my town) and found a small wooden horse to embellish. I left the wreath at her apartment door one day before Christmas, in hopes it would bring her comfort. She was overjoyed.
I have found through the years, a wreath lovingly shared with those who are ill, elderly, alone or saddened by loss can bring a small miracle, not only for the receiver but for the ‘giver’ as well. Having lost my son, it’s been difficult to celebrate as I used to but the emotional devastation has enabled me to empathize with others who may be feeling various types of loss. It helps somehow. When my children were young I always made an advent wreath as well. They have grown up and left now, for their own lives and heaven and I have not made that wreath in a very long time. Maybe this year.
Thank you for sharing these touching memories and heartfelt words, Pamela. You are beautiful. May the miracle of God’s love encircle your heart this Christmas season and always.
Sehr Schone – Frohes Weihnachten
Frohe Weihnachten, Alex! :)
Bom dia!!
adorei são lindas,que bom gosto,parabens!!!!
Kimberly, it is November of 2017 and I just made your wreath for my youngest daughte. I is her first wreath since she moved into her apartment. She loves it. Thank you so much for this beautiful idea. Happy Thanksgiving and Merry Christmas.
Vickie
Hi Vickie, what a wonderful gift to make for you daughter. Happy Thanksgiving and Merry Christmas to you and your family!
What you are calling pine I call fir, ..the small bunch is cedar, the other could be an evergreen or berry.
Ola!!! adorei a guirlanda e vou fazer como voce ensinou,parabens!!
Gracias, Noemi!