The Micro-Dwelling Project Part 6: The Bathroom
This post may contain affiliate links. See my disclosure policy.

We moved in our “new” 105 year-old home last year. This gorgeous historic home on nearly 8 acres is in virtually immaculate condition and has many of its original elements intact.
There is a TINY GUESTHOUSE on our property above our garage and workshop (see below) that, unlike the main house, needed a TON of work. So we decided to tackle the project and single-handedly remodel it from the studs up. For the previous 5 installments of this project and to see how far we’ve come, click here.
We are now six parts into this series and today we’re tackling the bathroom!

The biggest challenge was trying to figure out how to fit a toilet, sink and shower in an under 35 square foot space, a little over 6 x 5 feet (what would normally be a 1/2 bath) without having to custom build the shower. That’s exactly what the person had done who built this place – they slapped together a very makeshift shower with basically a couple of boards on a metal pan on the floor.
We ended up knocking down all the walls and rebuilding them from scratch in order to place the door on the other side, which made it possible to configure a better layout.
One of the challenges was trying to decide where to put the sink and toilet in relation to the bathroom door and bathroom mirror above the sink. In the pics below, the bathroom door is to the right. Ideally the sink would be on the left so a wall mirror can be mounted above the sink. But that put the toilet right next to the door – like right next to it. And immediately outside the bathroom door is the kitchen. That decided it and we put the sink by the door below the window instead. The remaining challenge: Where to put the mirror? So right now we’re trying to find some good options for either a mirror that mounts to the wall on the right and can swing out in front of the window when in use, or build our own sliding track above the window so a mirror can be positioned above the toilet when not in use and then slid to the right in front of the window when in use. If you have any other ideas we’d love to hear them!
Once we had the layout figured out we went to work finishing the walls.

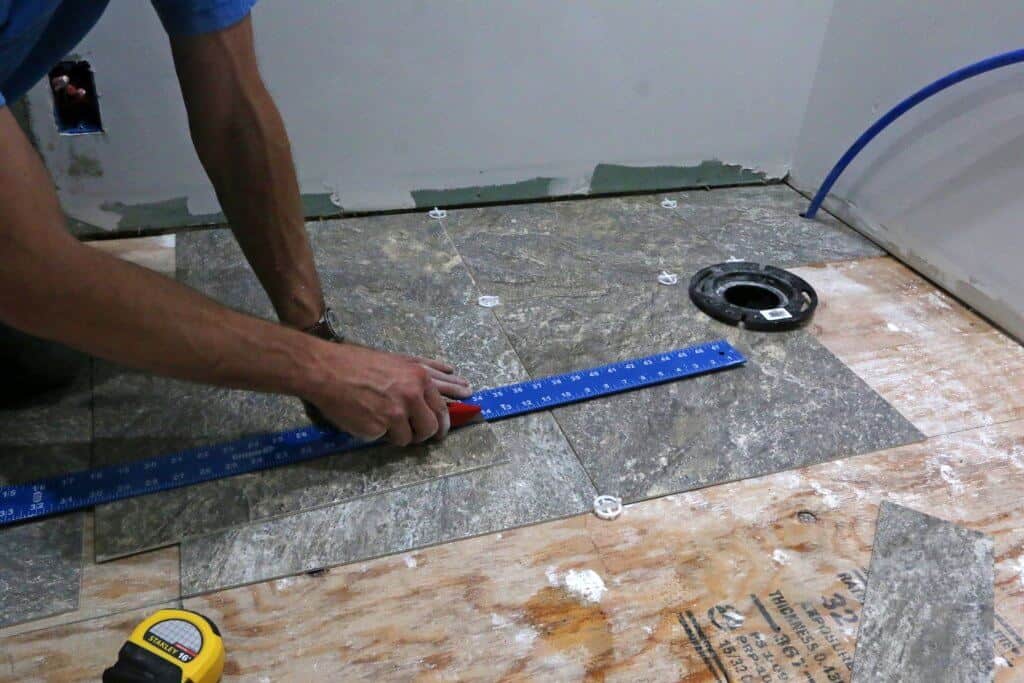
The first thing we tackled was the shower. We laid down the shower base to get the measurements for prepping the wall for the cement boards and tiling, and laying down the flooring.
Once we had the shower base in place we installed the tile flooring. We chose Armstrong Flooring’s Alterna Cuarzo Iron Blue tiles. It’s a special “luxury vinyl” that is actually a composite of limestone and vinyl so you get both the look and feel of real tile but with much easier installation. We love it!
For the complete installation process, see The Micro-dwelling Project Part 5.

Before putting up the cement boards for the shower we put up black poly sheets over the studs as an extra layer of moisture protection. It’s recommended doing that before putting up the cement board in the unlikely event that water would permeate the cement board. The cement board was pretty easy to work with. The most difficult part was making sure the entire surface was flat so that the tile could be put on evenly.

After the cement boards were installed and the joints grouted, we painted on a rubberized moisture barrier over the entire cement board surface. Cement board itself is water resistant but it’s still permeable to water.

Next it was time to tile the shower walls. The easiest route by far would have been installing an acrylic shower wall unit to match the base. But we haven’t been taking any shortcuts on this remodel project and we wanted the quality and appearance to be consistent throughout. Most of these things didn’t necessarily cost more money, rather they were an investment of more time and sweat. That said, had we wanted to go “all out” on this we would have tiled the shower base, but we decided that the acrylic base actually looked better and saved a TON of time and headache.
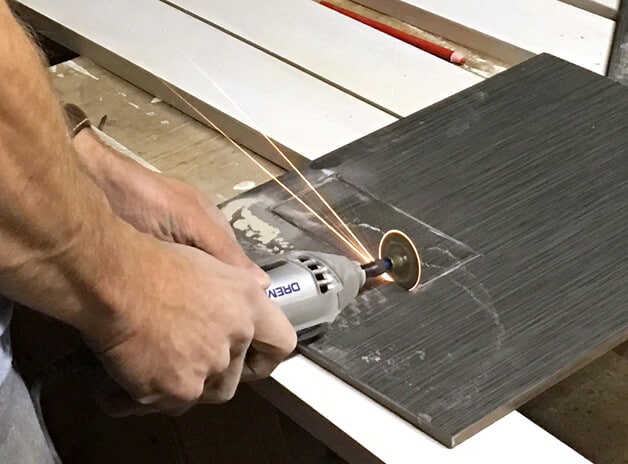
Probably the toughest job of this entire remodel was tiling the bathroom shower because it was porcelain tile and very difficult to cut and drill holes through. To give you an idea, it took nearly 10 minutes to drill each of the 8 holes through the tile to mount the glass shower enclosure. And that was with a diamond tile hole saw. After 80 minutes of non-stop drilling we were worried Todd had developed a permanent twitch syndrome ;)
In the pic below, Todd is cutting a precise hole in the tile for the shower valves. That alone took 30 minutes of non-stop cutting with a diamond blade mounted on a dremel.

Then it was time to install the tiles. We chose large 12×24 inch charcoal-colored tiles for a modern look.
The bigger tiles are quicker to install, but they’re less forgiving of imperfections in the wall, which is why we spent so much time prepping the wall surface to be as flat as possible. Overall it went fairly smoothly, it was just very tedious and time-consuming.
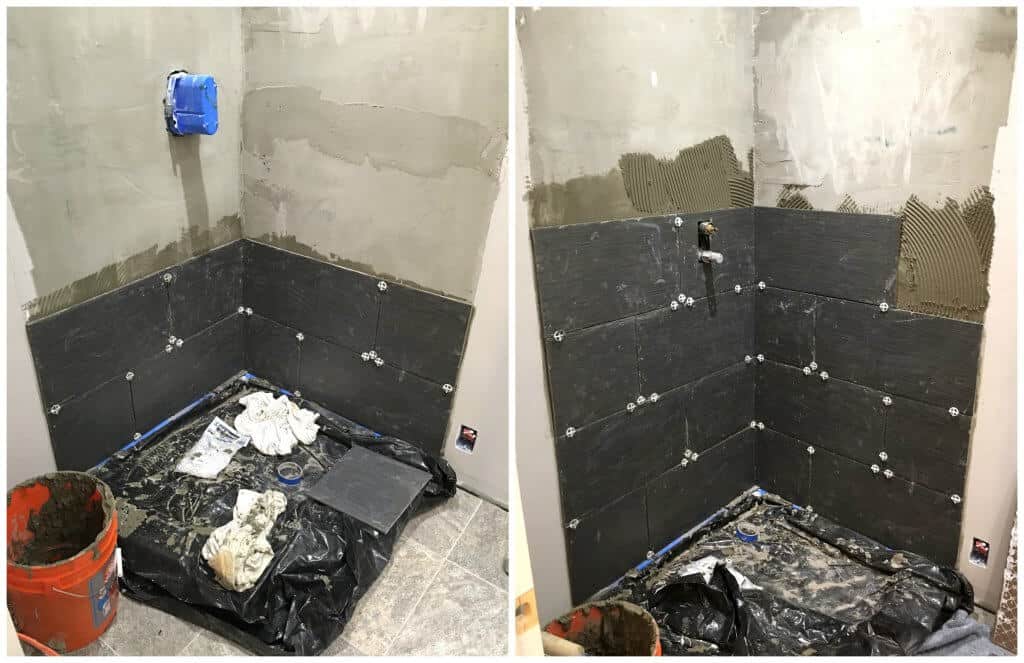
Installing shower tiles really is ideally a two-person job: One person cutting the tiles and the other mortaring the wall and setting the tiles.
Todd and my brother (below) tackled this project together and between the two of them it took two evenings to complete, roughly 6 hours, including the cutting and grouting.

Here’s the part I mentioned earlier where Todd is drilling holes into the tile to install the glass shower enclosure – the porcelain tile was so hard it took Todd almost 10 minutes per hole for each of the 8 holes.
Have you ever seen Charlie Chaplin’s “Modern Times”? There’s that scene in the beginning where he’s working at the factory assembly line performing the same movement with his hands over and over for hours on end and when his shift finally ends he can’t stop the hand motion even when he’s walking down the street? I was half worried Todd would suffer the same condition by the time he was done.

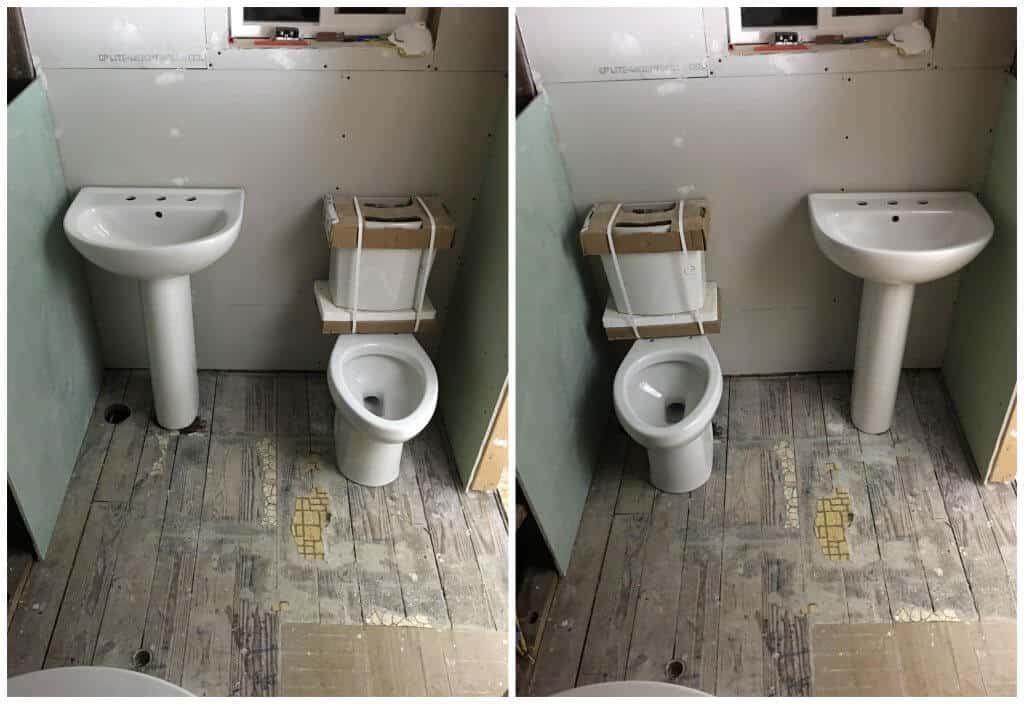
Once the shower was installed the rest of was easy – simply putting in the toilet and sink. Those were just a simply bolt in and hooking them up to the water lines and drain. A welcome and straightforward task compared to the shower. It took one evening to install both the toilet and sink.
The bathroom is done. DONE.
And I’m telling you, you wouldn’t believe what it looked like before unless you saw it!
So here it goes…


Can somebody tell me – who puts CARPET in a bathroom??!
And that includes toilet rugs that scream out, “Come to me germs, come and nest inside my fibers!”
I know, I know – toilet rugs were all the rage in the 80’s and 90’s, but some fads – once dead – need to just stay dead. Forever.
I’ll let you take one guess at how fun it was ripping that nasty thing out and hauling it away…


We intentionally left the wood beam raw and rustic for a cool contrast to the otherwise modern look of the bathroom. The same beams also run through the kitchen and living room ceiling. We also used a traditional/vintage-style bathroom door, door frame and window casing (the latter two Todd built himself) to be consistent with the era and style of our main home.
We also installed Amba’s Jeeves E Straight Towel Warmerto offer our visiting guests the perfect touch of luxury. We have larger one installed in our own master bathroom and love it.


Next we’re going to install some sleek glass shelves above the toilet. There is very little space in this bathroom so we need to maximize it as much as possible.
A nice piece of artwork will go on the wall on the left. Decorating is the fun part!

We found our American Standard toilet at Home Depot. The store clerk had recommended it as one of their best options so I grabbed it during a special promotion. It’s funny because that was actually the very first item we purchased for this micro-dwelling and it sat there in the unit during the whole process of our renovation, serving as inspiration for final finished place :) We also used it to help gauge the space in the bathroom as we were measuring the walls.
Can you believe it?? Seriously, when we look at the “Before” pictures we can hardly believe it ourselves! It seems like forever ago that we first started this project – it’s been almost a year – and we are just so grateful that it’s nearly completed. And we couldn’t be more pleased with the results!

A massive applause to American Standard for making our bathroom remodel possible!
They had the perfect selection for our micro-bathroom: Quality, modern-style products small enough to fit in this 6 x 5 foot space. Let’s take a look at them…
We used the American Standard Serin 2-Handle Thermostat Valve Trim Kit.
Installed with a thermostatic mixing valve, you select the temperature of the water with the bottom lever and use the top handle to turn the water on and off. Once you have the temperature set it remains consistent.


For the shower head we used American Standard’s 6 3/4 Inch Modern Rain Shower Head.
It’s a luxurious over-sized showerhead provides a drenching rain pattern. The spray nozzles are easy-clean to eliminate the worry of clogging. We love its clean and sleek look.

In looking for small bathroom appliances, we needed a very small sink. American Standard offered the perfect solution with the Evolution 22-inch Pedestal Sink.
Despite its small size it has a faucet ledge with a large shelf area. Simple yet sleek, the sink and pedestal are both made from high-gloss, stain-resistant Vitreous China.


For the faucet we chose American Standard’s Serin 2-Handle 8 Inch Widespread High-Arc Bathroom Faucet.
Sleek and modern, the handles on it complement the hardware on the kitchen cabinets just outside the bathroom door, which is one of the reasons we chose it – for consistency of style.
We LOVE this faucet. Here’s the product description: “Longer ADA approved metal lever handles accompany a streamlined spout for a faucet that excels in both form and function. Created from fine brass, this metal faucet is designed for prolonged exposure to water, giving it a long-lasting durability with no-drip performance that lasts for a lifetime thanks to an innovative ceramic disc valve cartridge. The exclusive speed connect drain uses fewer parts, installing in a fraction of the time compared to an ordinary faucet.”

Last but not least, the crowning feature of this micro-bathroom: The shower.
We searched far and wide for a shower that would fit in such a tiny bathroom but would also look modern and give an illusion of more space. American Standard came to our rescue with the perfect solution to our challenge: The Axis 36-Inch Curved Shower Door.
It’s designed for corner installation with a door that slides smoothly open and closed with an inside and outside knob handle. It also comes with the option of a reversible sliding door for right or left installation.


A special THANK YOU to American Standard making this transformation possible!


We partnered with American Standard to bring you this post.

Hi, I’m Kimberly Killebrew and welcome to Daring Gourmet where you'll find delicious originals, revitalized classics, and simply downright good eats from around the world! Originally from Germany, later raised in England, world-traveled, and now living in the U.S., from my globally-influenced kitchen I invite you to tour the world through your taste buds!


What a transformation! We built a house 3 years ago and I’m already ready to update the bathrooms! I like the stand upshower shape- much more roomy than a traditional square.
Definitely, Jessica, the corner shower makes a huge difference in opening up more space. Fortunately for you you’ll be starting at a much different place in your reno – working with a 3 year old, well-maintained bathroom will be a much more pleasant project than tackling a 40+ year old bathroom that has sat neglected that entire time – well, except for the visiting squirrels and bats who regularly used it ;) Good luck with your remodel!
It looks amazing! What a difference!
Thanks, Stephanie!
Wow! It looks amazing! We are about to do a bathroom remodel soon, and this gave us some inspiration.
Awesome, Carrie, and thank you so much!
I have LOVED following this and all the wonderful work you’ve done. Thanks so much for sharing!
Thank YOU, Becky, we really appreciate your support through all of this!
LOVE that you left the exposed beam! What a great finished product!
Thanks, Brandy! We love the raw element it adds to the bathroom amidst the sleek and modern look.
You guys have done an amazing job. You can see the love and hard work everywhere.
Thanks so much, Amy! :)
love the transformation. I especially am loving those dark tiles.
So do we, Christine, thank you!
What an amazing transformation! I am loving following along on your rehab journey, so inspiring!
Thanks, Joanie, it’s been so nice having you along for the ride! :)