Whether you’re making regular or Greek yogurt, it’s time to learn How to Make Yogurt! It’s incredibly easy, requires virtually no prep work and the outcome will amaze you: Wonderfully thick, creamy, luxuriously delicious yogurt! This homemade yogurt recipe is SO good and SO easy, you’ll NEVER need to buy store-bought again!
How long does it take you to pour a gallon of milk into a slow cooker? That’s how much prep time is involved in making this gloriously thick, rich, creamy Easy Homemade Yogurt recipe! And you have full control over its thickness – we’ll show you how to make Greek yogurt or regular yogurt, your choice!
Why Should I Make My Own Yogurt?
There are several advantages to making your own yogurt: It tastes better, has a better texture, is MUCH CHEAPER, and it’s MUCH HEALTHIER than store-bought because it has a MUCH HIGHER PROBIOTIC CONTENT. Really, it’s a complete win-win!
What Kind of Milk Should I Use to Make Yogurt?
For the thickest, creamiest yogurt we recommend whole milk but you can also use 2% and even skim milk.
How to Make Greek Yogurt
The difference between making regular and Greek yogurt simply comes down to how long you strain it. More on that in the recipe below.
What Do I Need to Make Yogurt?
- Milk
- Plain yogurt (as a starter culture)
- Cheesecloth
- Thermometer
- Pot or Slow Cooker
- Colander
Besides milk you’ll need some plain yogurt as a starter culture for your initial batch. Then you can use yogurt from that batch for your next batch and so on. There is no need to buy a special starter culture, all you need is plain yogurt. The plain yogurt will act as a starter culture to introduce healthy bacteria/probiotics to your homemade yogurt. It is essential that the yogurt you use has live cultures in it. Most grocery stores sell plain yogurt with live cultures but just be sure to check the label on the container confirm that it has l. bulgaricus and s. thermophilus in it.
You will also need some cheesecloth to strain the yogurt (trust me, it’s much easier than it may initially sound). I use and recommend this cheesecloth because it’s 100% unbleached cotton, is high grade, is very durable for multiple uses, and you get a ton of it. Overall it’s the best value I have found for the quality.
You’ll also need a thermometer. Heating the milk to right temperature and then reducing it to the right temperature are both critical to the success of your yogurt.
The other item you’ll need is either a slow cooker or a large, heavy stock pot and a colander for straining.

© Piliphoto | Dreamstime
Slow Cooker or Stovetop to Make Yogurt?
You can use either with great success and the choice is entirely up to you.
Using a Slow Cooker:
Pros: The heating process is slow and gentle so there is no risk of scorching the milk and having to throw it all out. Plus it’s hands free and the milk can heat up over the course of a few hours while you’re doing other things.
Cons: It takes a lot longer to heat up the milk than if you’re using a pot. But that’s only a disadvantage if you’re in a hurry.
Using a Stock Pot:
Pros: It’s much quicker than using a slow cooker. The milk heats up faster and then all you have to wait for is for it to cool back down and then set.
Cons: It requires your constant attention and as the milk gets hotter it requires constant stirring in order to prevent the milk from burning (and it can burn very easily if you’re not paying attention).
You can see that both have their pros and cons and it purely comes down to personal preference. I use and like both methods but generally use my slow cooker/crock pot more often because of the hands-free convenience of plugging it in and going about my daily tasks. Any crock pot or slow cooker will do the job. I use and love my Hamilton Beach Stay or Go 7 Quart Slow Cooker.
Do I Have to Bring the Temp to 180 F if I’m Using Pasteurized Milk?
Virtually every yogurt-making recipe will tell you to heat the milk to 180 degrees F before bringing it back down to 110 degrees F to inoculate it with a starter culture. The question you may ask yourself is, if I’m using pasteurized milk already do I need to heat it to 180 degrees or can I just skip that step?
Here’s what I’ve learned: Heating it to 180 degrees isn’t for the purpose of killing unwanted bacteria as much as it is for creating a thick texture. The heat changes the structure of the proteins in the milk and enables it to thicken into yogurt. I wanted to test that for myself and heated the milk to just a little over 110 degrees, added the starter culture, and proceeded from there. It hardly thickened at all. But when I heat it to 180 degrees, then let it cool to 110 degrees before adding the starter, it thickens up beautifully.
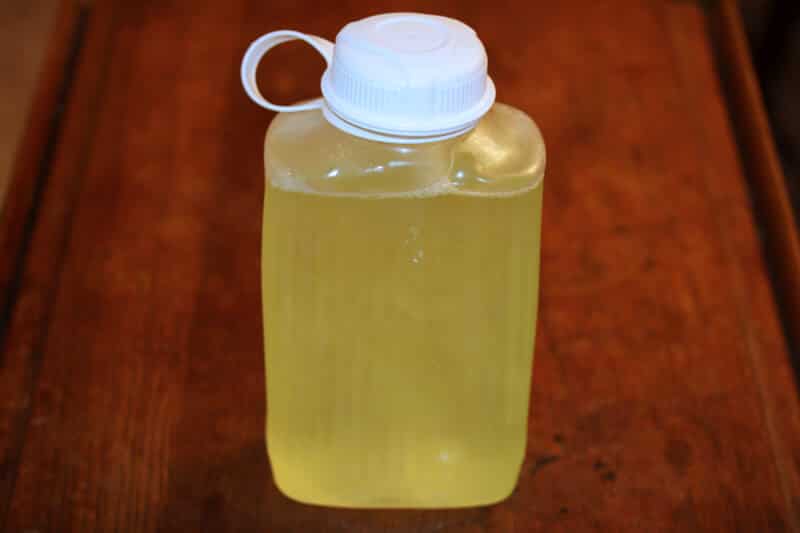
What is Whey?
That yellowish liquid that’s left over after you strain the yogurt….that’s called whey. When making homemade yogurt, you’ll always end up with some whey as a by-product. The longer you strain the yogurt, the thicker it will get, the more whey it will yield. If you strain it to full capacity for an extra thick Greek yogurt, you’ll end up with about 8 cups of whey, but every batch will be different.
Whey is milk minus the fats and solids. It’s basically water with lactose and protein. And it’s the protein that’s the valuable ingredient here. Milk contains two types of protein, casein and whey. Most of the casein ends up in the yogurt and the whey is in the liquid by-product.
How to Use Leftover Whey
I’m so glad you asked! Whey is a great source of protein and is used in powdered form in protein shakes and protein bars. But how can you this leftover liquid whey? Here are a few ideas:
- Use it in place of water when you’re making broth or soup for an extra rich broth.
- Use it in place of water for baking bread or pastries.
- Add it to your smoothies of an extra protein boost.
- If you have a vegetable garden, use it lower the pH level of your soil if you’re growing things that prefer soil with a higher acidity level, like tomatoes.
Can You Freeze Whey?
Yes, it can be frozen for up to 6 months.
Can I Make a Smaller Batch of Yogurt?
This recipe calls for a gallon of milk because this yogurt will keep for a good 2 weeks in the fridge, giving you plenty of time to finish it off. (Note that a gallon of milk won’t yield a gallon of yogurt. It will yield about 2 quarts of yogurt depending on how long you strain it.) If however you would prefer to make less you can absolutely cut the recipe in half and use a half gallon instead. Just be sure to remember to reserve enough of the yogurt to act as the starter for your next batch.
How Much Protein and Calories Are in My Yogurt?
This is a question I get frequently. Calorie count and protein content will depend on how much whey was removed in the straining process and there really isn’t a way to measure that. Even calories are hard guess because through the straining process the end product is much more condensed that the original milk product. The best we can do is estimate.
© Fortyforks | Dreamstime
Homemade Yogurt Troubleshooting
“My yogurt didn’t set and I have yogurt soup!”
There may be an occasion or two when your yogurt doesn’t set properly. I’ve made probably close to 50 batches and fortunately it’s only happened to me twice but it was nevertheless disappointing. Many factors can be at play for a failed batch, anything from the first step to the last. If you’ve done everything right and have followed every step correctly from start to finish, all I can say is that the yogurt-making process involves fragile live bacteria and sometimes, well, they have a mind and will of their own. And if you’re using store-bought yogurt as your starter culture, it may claim to have live bacteria that is…no longer live. The only thing to do is try again with a new batch. But just because it failed turning into yogurt doesn’t mean you can’t still enjoy it.
Don’t throw out the “soup!”
Throughout Europe and other parts of the world you can get a variety of delicious plain and flavored yogurt drinks. You can drink your yogurt milk and you’ll still be benefitting from those healthy probiotics. Add some honey or flavored syrups or blend in some berries or fruits of your choice and enjoy it in smoothie form!
Ways to Eat Yogurt
The ideas are almost endless. Here are a few:
- Add fresh berries or cut up fresh fruits to enjoy with your yogurt along with a sprinkle of cinnamon and/or a drizzle of honey or maple syrup for a healthy breakfast or snack.
- Make parfaits with fresh fruit and granola.
- Blend it with fresh or frozen fruit or with nuts, peanut/cashew/almond butter, chocolate, etc. to make smoothies.
- Add other ingredients and seasonings to use as a sandwich, toast or bagel spreads.
- As the base of a savory dip for oven-baked chips, bread or raw veggies.
- As the base of a sweet dip for fresh fruits or toasted cinnamon pita strips.
- Use it in place of mayonnaise for ranch dressing and other creamy dressings.
- Make homemade tzatziki sauce.
- Replace sour cream and buttermilk with yogurt in baked goods like cakes, muffins, pancakes or our sweet potato pie.
- Make yogurt fruit popsicles.
- Use it in place of sour cream for things like tacos, enchiladas and burritos.
- Use it in place of mayonnaise for egg, tuna, chicken salad and potato salad.
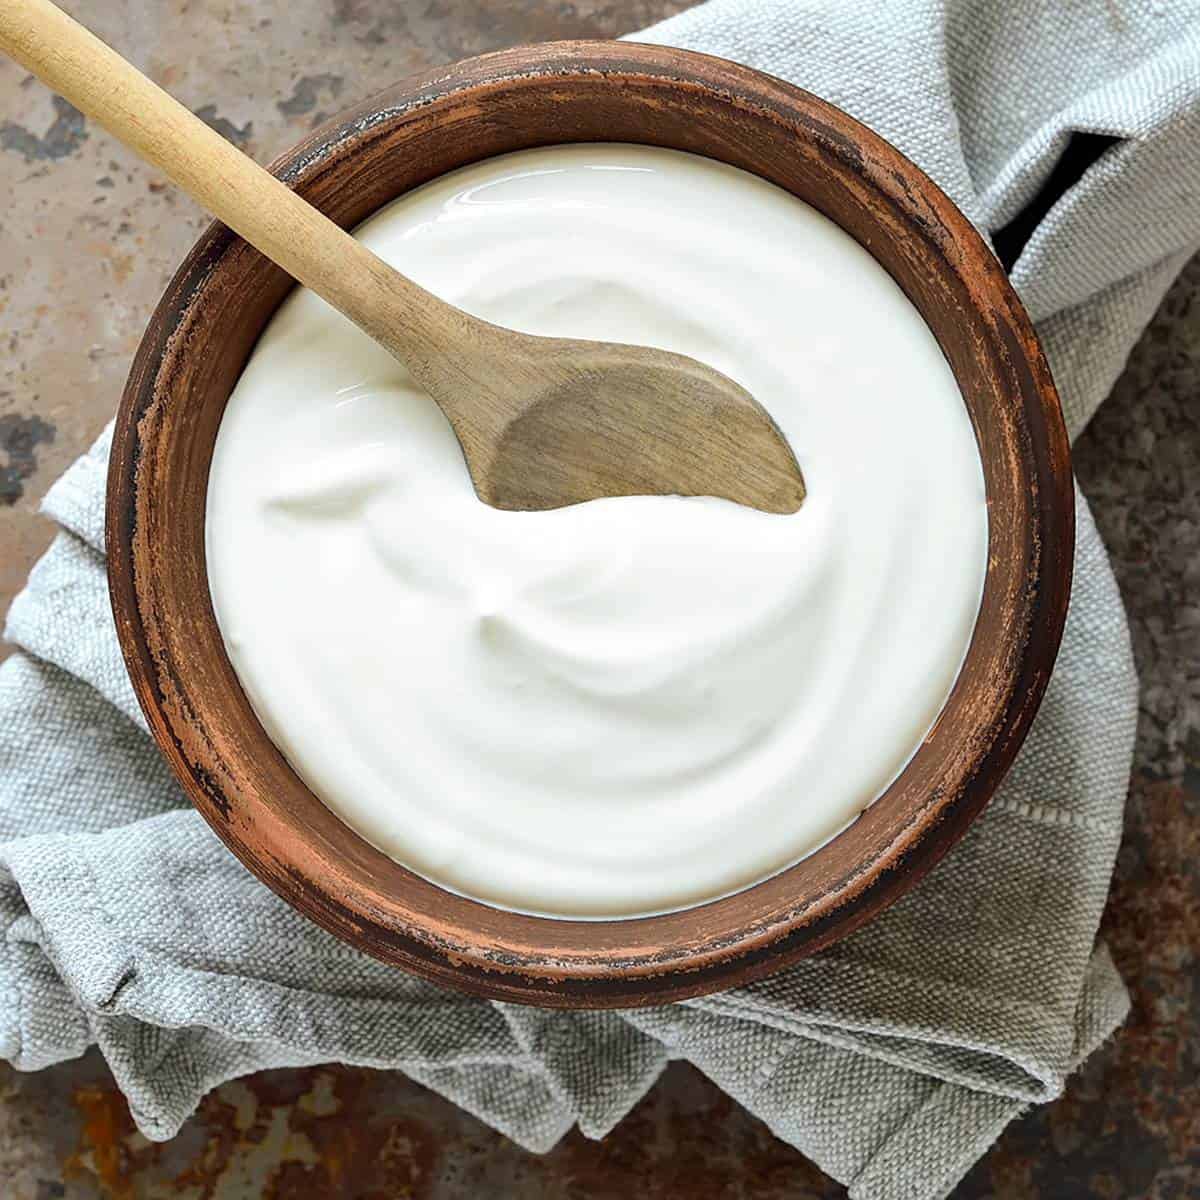
The way I most commonly enjoy my yogurt is simply stirring in a spoonful of fruit preserves with a little powdered stevia for a healthy, low-carb treat to satisfy my sweet tooth. Another favorite way is to make vanilla yogurt by stirring in some high quality vanilla bean paste.
You’re going to love how rich and creamy this yogurt is – it’s almost like eating dessert!

© Corinna Gissemann | Dreamstime
How to Make Yogurt
Let’s get started!
IF USING A STOCK POT INSTEAD OF A SLOW COOKER: If you’re in a hurry or don’t have a slow cooker you can use a stock pot. Simply heat the milk in a large stock pot over low to medium heat. Just be sure to stir it regularly, especially as it gets hotter, to prevent the milk from scorching. Then follow the rest of the instructions as written.
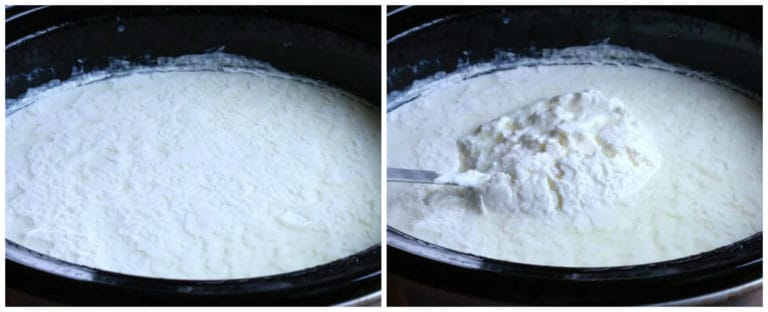
Pour the milk into the slow cooker and set it to HIGH. Go about your business, it’ll take at least 2 hours (usually longer) before the temperature’s up to 180 degrees. Use a thermometer to check the temperature.
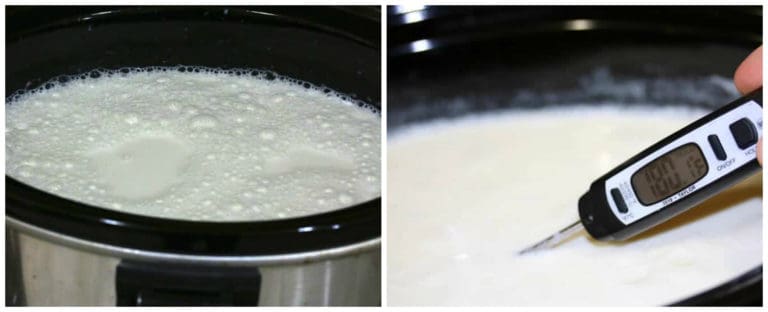
Once the temperature is up to 180 degrees, turn off the slow cooker or stove top and let the milk cool to 110 degrees F. Again, go about your business, this will take at least another 2 hours.
Once the temperature is 110 degrees, mix a little of the warm milk into the room temperature starter yogurt, then gently but thoroughly stir it back into the milk using up and down, left and right motions (not circular). Close the lid and turn off the slow cooker.
Wrap a large bath towel around the slow cooker and let it sit undisturbed in a draft-free, room temperature (or warmer) area for 10-12 hours or overnight. If the environment is too cool the yogurt will not set.

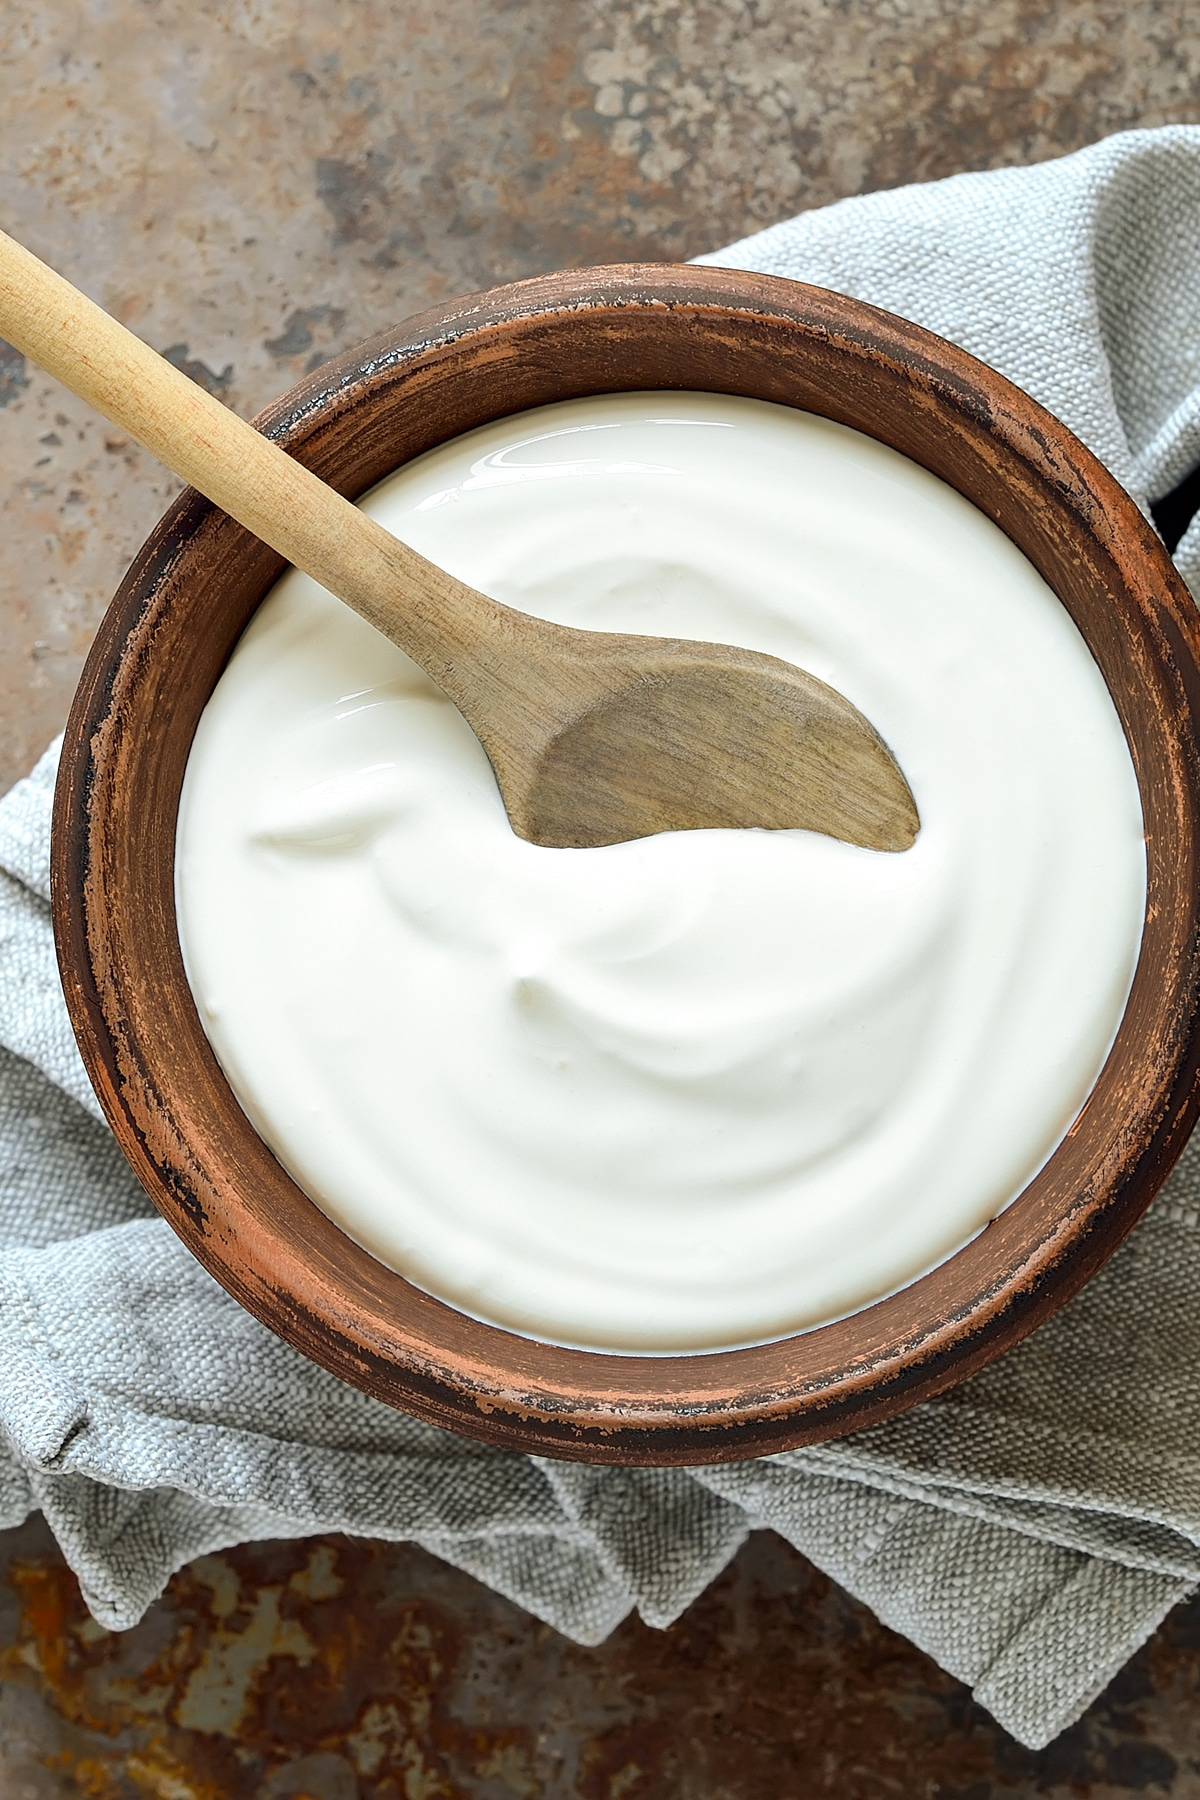
When you remove the lid you’ll find that the milk has thickened and the whey has separated.
Look at that fabulous thick texture! The transformation is almost magical. You’ll be so excited the first time you make this! I still get excited every time I lift the lid.
Line a colander with some cheesecloth.
I currently use this cheesecloth. It’s great quality and you get a lot of it for an excellent price.
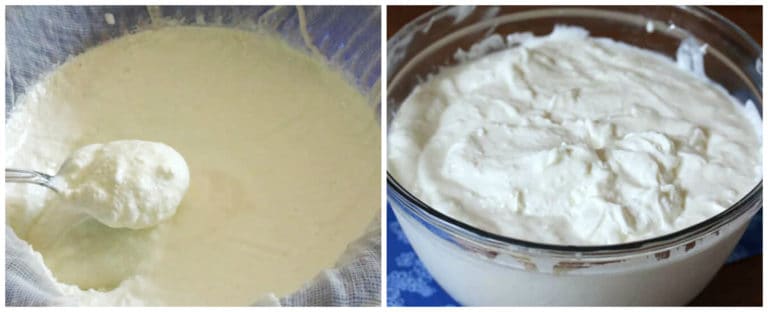
Pour the yogurt into the cheesecloth. If it doesn’t all fit (depending on the size of your colander), let the yogurt strain until there’s room enough to add the remaining yogurt, then continue to strain.
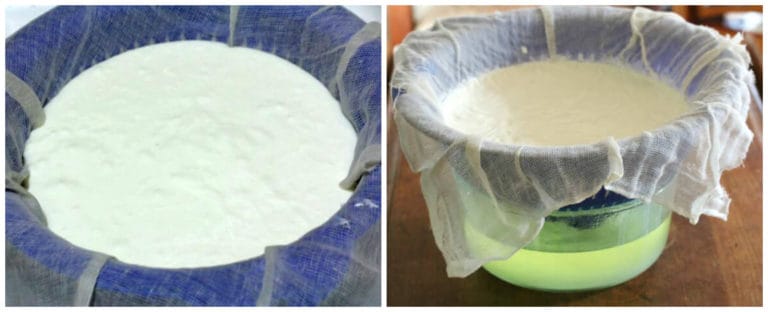
Depending on how thick you want the yogurt, this will take several hours. For thick Greek yogurt, you’ll end up straining it for at least 4 hours. That will also depend on the gauge of the cheesecloth. Set the colander on top of a large glass bowl. If leaving it to strain for several hours, you can put it in the fridge if you prefer and let it strain there.
See the liquid in the glass bowl above right? That’s whey. See the section “How to Use Whey” for ideas.
Store the yogurt covered in the fridge for up to 2 weeks. When you’re ready to make another batch, use some of the previous batch for the starter culture.
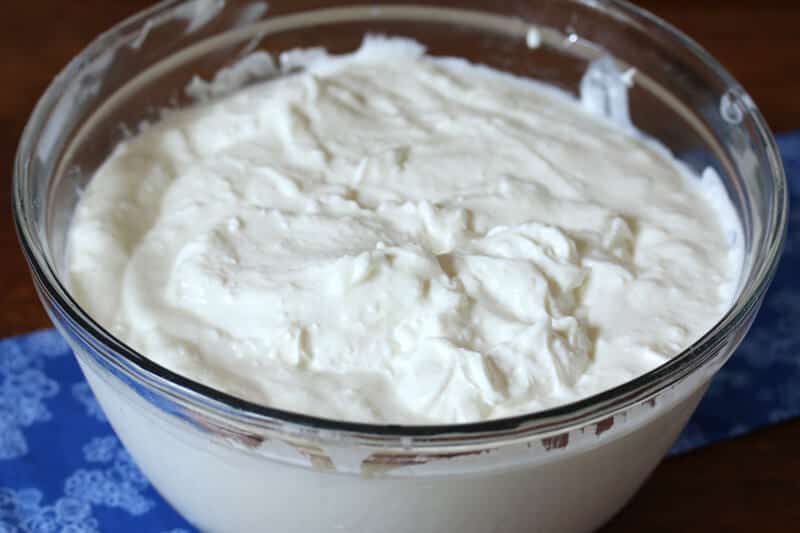
If fully strained to make Greek yogurt, you’ll end up with about 2 quarts (8 cups) of whey and 7-8 cups of Greek yogurt.
You’ll end up with less whey and more yogurt if you strain it less to make regular yogurt.
Cook with it, bake with it, eat it plain or with a variety of mix-ins, whatever your heart desires!
Enjoy!
Be sure to also check out our tutorials for how to make:
- Quark
- Mascarpone
- Sauerkraut
- Collard Kraut

How To Make Yogurt
Ingredients
- 1 gallon whole milk, 2% or skim milk (whole milk is recommended for thickest, creamiest results) (see note about using raw milk) *this method does NOT work with non-dairy alternatives
- 1 cup plain yogurt at room temperature, either from previous batch or store-bought (**The yogurt must have live cultures in it to work. Check the ingredients to make sure they include l. bulgaricus and s. thermophilus.)
- Equipment:
- Slow cooker or Pot
- Thermometer
- Cheesecloth
- Colander
Instructions
- IF USING A STOCK POT: If you're in a hurry or don't have a slow cooker you can use a stock pot. Simply heat the milk in a large stock pot over low to medium heat. Just be sure to stir it regularly, especially as it gets hotter, to prevent the milk from scorching. Then follow the rest of the instructions as written.IF USING A SLOW COOKER: Pour the milk into a slow cooker set to HIGH and close the lid. It will take 2-3 hours before the temperature of the milk is up to 180 degrees F. Check it with an instant-read thermometer. Once it's at 180 degrees, turn off the slow cooker, close the lid, and let the milk cool to 110 degrees F. This will take another 2-3 hours. Once the temperature is between 110 and 115 degrees F, add some of the warm milk to the plain yogurt, stir to combine, and then gently but thoroughly stir the mixture back into the milk in the slow cooker using up and down, left and right motions (not circular).
- Close the lid, wrap the slow cooker or stock pot with a large bath towel, and let it sit undisturbed in a non-drafty place at room temperature (or warmer) for 10-12 hours or overnight. If the environment is too cool the yogurt will not set. During this process the milk will have thickened and the whey will have started separating from the milk.
- Line a colander with a cheesecloth and pour the yogurt into it. Set the colander over a large glass bowl and let it strain at room temperature for several hours, until you've achieved the desired thickness (length of straining time will also depend on the gauge of the cheesecloth. I use this cheesecloth - excellent quality and you get a lot of it for a great price) For thick Greek yogurt plan on at least 4 hours. You'll end up with about 8 cups of whey and 7-8 cups of Greek yogurt.
- Store the yogurt in the fridge in an airtight container, preferably a glass bowl for up to 2 weeks. When ready to make another batch of yogurt, use a cup of the previous batch as the starter culture.
Notes
**You don't have to use the slow cooker method. For a quicker method simply heat the milk in a large stock pot over low to medium heat. Just be sure to stir it regularly, especially as it gets hotter, to prevent the milk from scorching. Then follow the rest of the instructions as written.
Nutrition
First published on The Daring Gourmet June 2017
Katie says
I was originally looking to buy a yogurt maker and then saw a “greek” yogurt maker. I hesitated cause I don’t want or have room for multiple appliances so was searching for to see if one would make both kinds, and came across your blog. It’s now coming to my mind, that I may not need a yogurt maker of any kind since I do have a slow cooker. I am about convenience though and don’t want to go through too much extra work to use my slow cooker and want consistency and good taste. Not sure which would be better, the slow cooker or an actual yogurt maker. My concern with my slow cooker is that it has preset temps at 120 and 180, on up, etc. It doesn’t have an option for 110. What do you suggest? Should I just use a instant thermometer? Will using my slow cooker be as convenient as a maker? Appreciate your recipe, tips, etc. and feedback on this. Thanks.
Kimberly @ The Daring Gourmet says
Hi Katie! Yep, I totally understand juggling between the convenience factor and wanting reliable results. Making yogurt in a slow cooker doesn’t exactly give you the freedom to step out of the house all day and come back to ready-made yogurt. It’s perfect though for days off when you have to fun a few errands and can check back at home after a couple of hours or so to check the temperature. Give it a try with your slow cooker and then make a decision whether or not to get the yogurt maker. Set your slow cooker to 180 to heat up the milk then turn off the slow cooker and follow the directions as outlined. It will take 2-3 hours to get down to 110 and yes, you’ll need to check it with an instant read thermometer. Alternatively you can also use a stock pot and heat the milk that way, stirring constantly towards the end as it reaches 180 to prevent it from scorching. It requires more attentiveness during the heating up step but it also goes much more quickly than the slow cooker. Let us know how it goes if you decide to try it without the yogurt maker!
Linda Odom says
ive tried so hard to read long enough to see if you can use whole, raw milk!!! does anyone know????
also, what is UHT milk?
Kimberly @ The Daring Gourmet says
Hi Linda! Unfortunately no, you can’t make yogurt with raw milk using standard yogurt-making methods or you’ll end up with a very yogurt drink. Our family exclusively drinks raw milk, we get it from a small local farmer down the road from us, but for making yogurt we use the pasteurized stuff. UHT milk is milk that has been so ultra-pasteurized that it doesn’t have to be refrigerated. It’s often sold in cartons and sits on the shelf.
Dee says
I truly enjoyed the kefir texture of my mistake, lol. Made my second batch perfectly!! Love this! Do you have a kefir recipe? Thank you
Kimberly @ The Daring Gourmet says
Hi Dee, that’s fantastic! I do make my own kefir and am planning on publishing an article about it, including some recommendations for the best kefir cultures to use.
Dee says
So mine didnt thicken,but, I have a consistency of kefir. I love the mild flavor of this. I made ranch dressing, my kids loved that!! Going to try again next week.
Kimberly @ The Daring Gourmet says
Keep trying, Dee, and let us know how the next batch goes! I’ve had a couple of batches not thicken before as well and I use it to make fruit-flavored yogurt drinks. Ranch dressing was a great call.
Michelle says
It worked perfectly. I used organic lactose free one percent and whole milk.I had to strain it twice because my cheesecloth wasn’t fine enough. However, no problem I just lined the colander with 3 layers of cheesecloth and restrained it. The yogurt took 7 hours of additional straining g ( after initial 3 hours) to come to the consistency of Greek yogurt. I really appreciate this recipe because I can’t find organization lactose free greek yogurt in the store. We’re eating it with honey, nuts and berries. Yum.
Kimberly @ The Daring Gourmet says
That’s awesome, Michelle! I appreciate the feedback, thank you. And speaking of the difficulty of finding lactose free Greek yogurt in stores, can you imagine how much it would cost if you did?? You’re saving a ton! Happy yogurt eating! :)
Dee says
What happens if you leave it set more than 10-12 hrs?
Kimberly @ The Daring Gourmet says
Hi Dee, it’s no problem if you go a couple of hours or so over.
Kate says
I would really like to try this, we eat containers of yogurt a week here and your recipe seems very sucessful from all the comments! This may be a dumb question but I have to ask- I am lactose intolerant. I eat commercial Greek yogurt and am fine unless the brand adds extra, non-cultured dairy. Do you know if the resulting yogurt is safe for lactose intolerant to eat? If it isn’t, have you or anyone tried it with lactose-free milk? We cook with it all the time but don’t know if the different sugars (broken down ones) would affect the process. THANKS!
Kimberly @ The Daring Gourmet says
Hi Kate, thanks for asking! Yes, you can use lactose-free milk and follow the directions in the same way. As for regular milk, if you’re able to eat commercial Greek yogurt I don’t see why you couldn’t eat this one since there is no extra non-cultured dairy added here either. You won’t know for sure unless you try a little though (depending on how severe your lactose intolerance is). Whichever way you proceed, let us know how it goes!
Martha Palmer says
Why would the yogurt turn out bitter. I have made many batches and had no problems, always been sweet and mild that I eat it just plain, this time It is bitter??? I have never tasted the starter, could it have been soured?? I use the Fage 2% brand. Any idea of what I might have done wrong?
Kimberly @ The Daring Gourmet says
Hi Martha, first of all I’m happy to hear that you’ve made lot of batches with success. For the two batches that turned out bitter, I’m not really sure what could have happened. Was that the first time you used Fage or is that what you have been using all along? It’s possible that different starters will contribute to a different flavor overall.
Martha Palmer says
I have made many batches in the last 4 months, twice the yogurt had a bitter taste, do u have any idea of what I did wrong. Rest of time has been very mild and sweet. Could my starter been old or soured.Also,will frizzing the yogurt kill good bacteria???
Luci says
Hi there, I’ve been wanting to try this recipe and finally got brave today. I read through most of the comments too. My question is: is it ok if the yogurt sits more like 18 hours before straining it? Or do I need to get up at 2 a.m because I didn’t do my calculations right? 😊😜
Kimberly @ The Daring Gourmet says
Hi Luci, yes, 18 hours should be fine. Let us know what you think!
Courtney Cooley says
Hi! So I attempted to make this yesterday and failed. I have milk soup this morning. However …. it’s like a snotty milk soup. There are no curds or separated whey and when I get some with a spoon and pour it off … it’s like a goupy snotty consistency. Any ideas?
Kimberly @ The Daring Gourmet says
Hi Courtney, I’m so sorry it didn’t turn out on your first attempt. There are a few stages in which something could have gone wrong and it’s hard to know which one. If you read through the comments, a few readers have had a failed batch and when they paid closer attention to some of the critical details it turned out perfect the next time. Don’t give up. In the meantime though, no need to throw a ruined batch out – add a bit of sweetener or pureed fruit and you’ve got yourself a lovely yogurt drink!
Janene Barrett says
I hope this isn’t a duplicate question for you. I use My Fitness Pal to control my weight, which it does by counting calories. Do you know how many calories are in the finished Greek yogurt or any other nutritional information? Or do you know where I can find that information?
Kimberly @ The Daring Gourmet says
Hi Janene, I’ve had several readers ask this and there’s no way to know for sure because it’s dependent on how much whey is extracted and that varies from batch to batch. The best you can do is guess.
Linda says
I love this How-To recipe and can’t wait to try it!
Like you, Janene, I’m using an app to count calories to try to drop some weight and counting calories is working for me. I’m losing weight! So for obvious reasons, the calorie count on this wonderful-looking recipe is important to me so I can try it but still stay on track with my weight loss.
Were you able to calculate a ballpark figure for the calories in this finished recipe?
Thanks and good luck with your weight loss goals!
Linda
Janene Barrett says
I ended up using nutrition information from a store bought plain Greek yogurt. I just tried to find one that matched the fat content I’m making, meaning I use whole milk, so I don’t use a low fat or nonfat yogurt from the store for my nutrition content. That was my best guess on how to do it. I’m sure it’s not completely acurrate, because sometimes I get more whey out of a batch, but I figured it was closer than me trying to calculate the calories and nutrition information.
Heidi Pafford says
I was wondering if instead of a yogurt stater if you could use 2 probiotic capsules instead?
Kimberly @ The Daring Gourmet says
Hi Heidi, I’ve never tried that before. If you give it a try please let us know how it goes!
Dee says
Did you try the probiotic capsules. Anxious to know.
sherryl says
Hi, do you have a recipe here for yogurt made with almond milk? Can almond milk yield yogurt cultures? I do have yogurt with the needed live cultures.
Kimberly @ The Daring Gourmet says
Hi Sherryl, I don’t currently have a recipe for almond milk posted. Given the right environment almond yogurt can yield probiotics as well though I don’t know how they compare to the quantity of probiotics in dairy yogurt.
D Blair says
Thank you so very much Kimberly for sharing this recipe. I followed it to the ‘t’ and it turned out perfectly. It’s really delicious. I thought I saw a link somewhere on your site for a yogurt strainer, but now I can’t find it again. I would definitely invest in one of those to make the process easier at the end. Would you be so kind as to share the link or name of the strainer? Thank you.
Kimberly @ The Daring Gourmet says
That’s wonderful to hear, thank you! No, I don’t recall linking to a yogurt strainer anywhere (I’m not aware of any), I just use a cheesecloth. I believe one of my readers mentioned using coffee filters.