Capicola
This post may contain affiliate links. See my disclosure policy.
Succulent, superbly seasoned and flavorful, this easy baked Capicola recipe will take your Italian subs, sandwiches, pizza and snacking to a new level! This homemade capicola is easy to make and your efforts will be amply rewarded – it’s sure to become a favorite!

Do you enjoy a good sandwich from time to time? I mean a really good sandwich filled with succulent, high quality seasoned meat? Then you’ve GOT to make this baked Italian Capicola! And if you’ve always dreamed of making your own charcuterie but have either felt too intimidated or were put off by all the special equipment or all the work involved, this fabulous homemade capicola is for you! This is charcuterie-making that is easy, non-intimidating and thoroughly delicious!
What is Capicola?
Capicola (also known as capocollo) and coppa (more on that below) are both Italian charcuterie standards and use the same cut of pork. This specific cut of meat is highly marbled and comes from the neck of the pig (known as the coppa in Italy) and is selected because of it’s a near perfect ratio of 30% fat to 70% lean. This cut is commonly cooked/baked as well as dry-cured to create two different forms of highly popular charcuterie. This recipe is for baked capicola and is inspired by Olympic Provisions’ version.
What is Coppa?
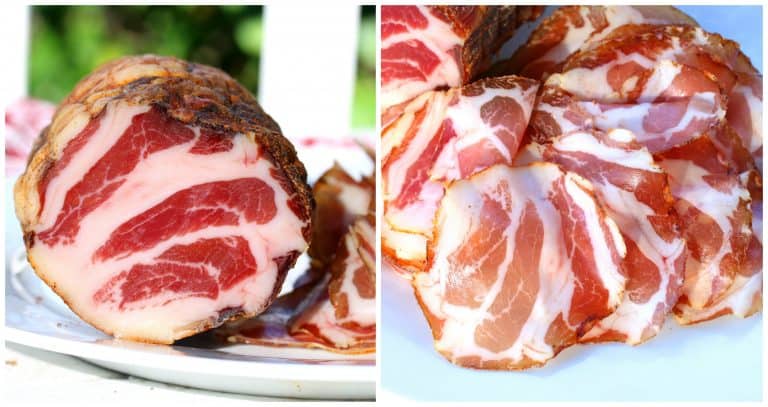
Coppa (named after the cut of meat) is the dry-cured version of capicola. The meat is prepared in a special brine and hung to dry for approximately 2 months depending on its size in a temperature- and humidity-controlled environment where it becomes dry-cured. The coppa is then sliced very thinly (similar to prosciutto). The flavor is complex and flavorful, the texture delicate and almost melt-in-your mouth. Below is a dry-cured coppa I made a few months ago.
Today I’m sharing the cooked (not dry-cured) version of coppa: Capicola. The term capicola is often used interchangeably to also refer to the dry-cured version, so it can be a little confusing. We’re going to use the term capicola throughout the rest of this tutorial to refer to the cooked version.
What You’ll Need
For this tutorial I’m also using a regular pork loin in the event that you have trouble locating the traditional coppa cut of pork (it can be difficult to find butchers who are knowledgable in European cuts, especially less common ones used for specialty charcuterie). It lacks the marbling of the traditional coppa cut and so won’t be as tender/moist but it still thoroughly delicious.
The ingredients for making capicola are minimal and (if you’re just using pork loin) you only need two items you normally may not have in your kitchen: Pink curing salt and size 24 meat netting. The pink salt helps the meat retain its appetizing pink color (instead of just looking like a brownish-gray pork roast once it’s cooked) and the net helps the meat retain its shape while cooking so you can get those beautiful slices.

The process is very easy, there’s frankly very little that could go wrong, and your friends and family will think you’re an absolute pro! Make some delectable Italian subs using this capicola, add some cheese and some homemade Giardiniera if you like (amazing stuff!), and you’ve got one seriously delicious sandwich! It’s also fabulous on pizza.
Making your own coppa is also extremely cost-effective. Coppa in the specialty deli (if you’re lucky enough to find it) comes with a hefty price tag. You can make your own at a fraction of the cost.
Homemade Capicola Recipe
Let’s get started!
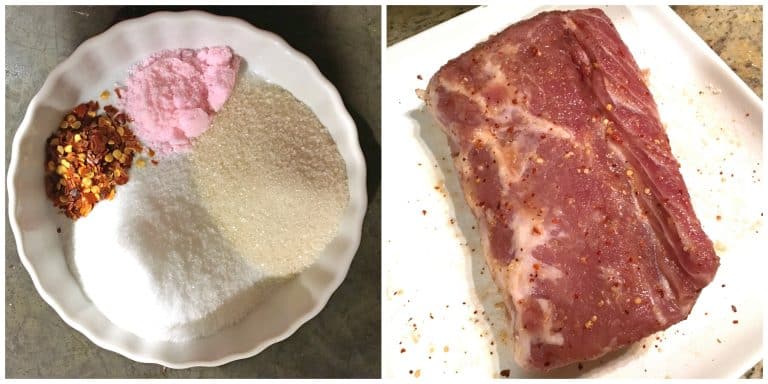
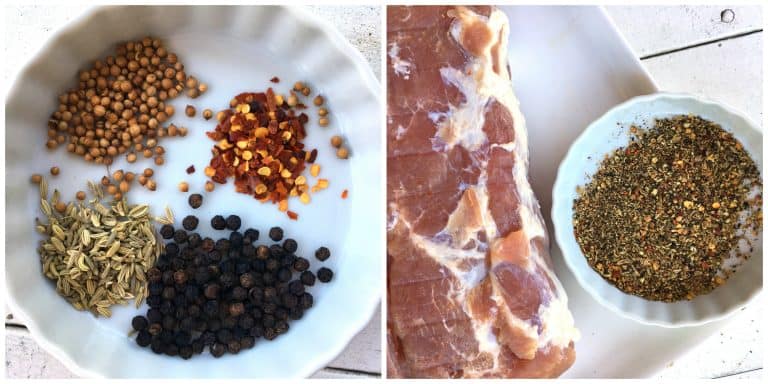
First we’re going to make the cure for our pork. Place the sea salt, sugar, red pepper flakes and pink curing salt in a coffee/spice grinder or use a mortar and pestle to grind them. (It is essential that the pink salt is evenly distributed in the rub.)
Place the pork in a large bowl or on a work surface and massage the rub into the pork, making sure to get every nook and cranny.
Wrap the pork tightly in plastic wrap and refrigerate it for 5 days. After 5 days flip it over so the bottom side is up and refrigerate it for another 5 days.
After 10 days unwrap the meat. It will be firmer to the touch. Thoroughly rinse it under cold water to remove all the spices and set it aside while you prepare the final rub.
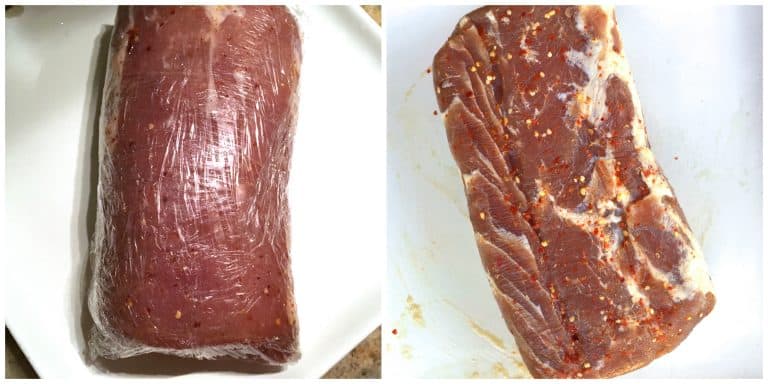
To make the rub, place the fennel seeds, coriander seeds, anise seeds, red pepper flakes and black peppercorns in a coffee/spice grinder or use a mortal and pestle to grind the spices until you get a coarse rub. Lightly blot the pork with a paper towel.
Spread the rub out onto a plate or work surface and roll the pork in it, coating all sides. Use up all the spice rub to coat the meat.
Next you’ll need a #24 netting roll. Cut a piece of netting off the roll that is a few inches longer than your capicola.
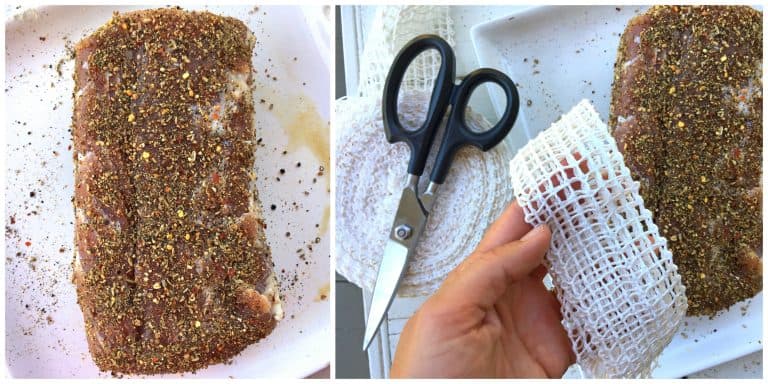
Stretch the netting and feed the capicola through it (unless you have a ham-stuffing funnel, it’s easiest to do this with two people).
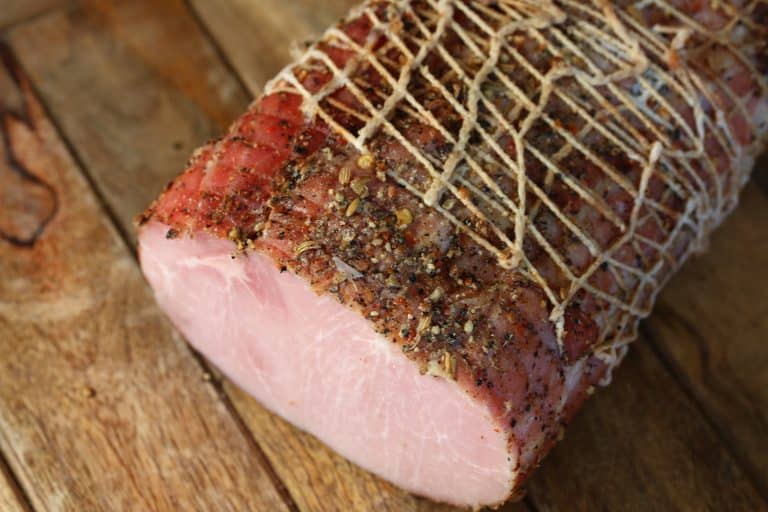
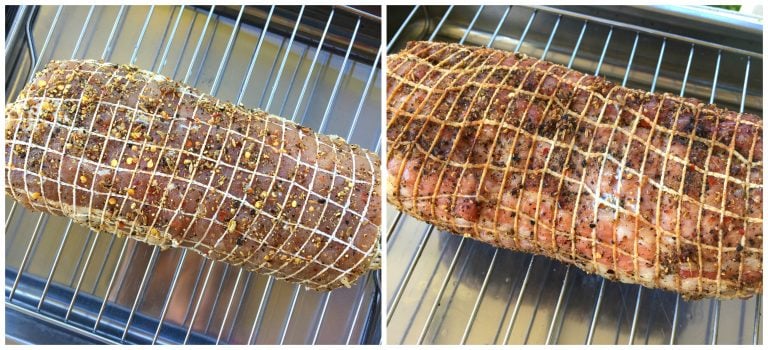
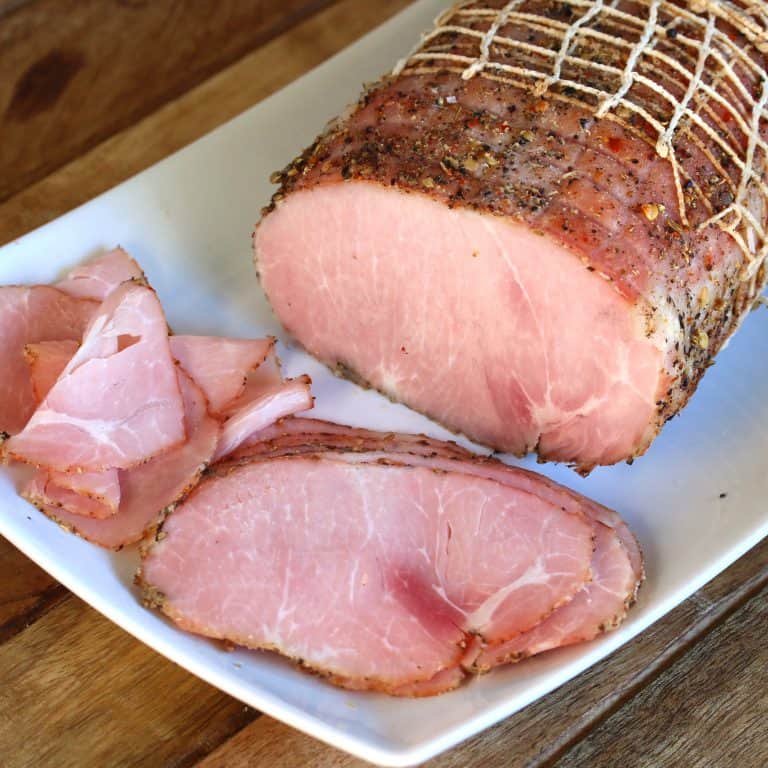
Preheat the oven to 250 degrees F. Fill a pan up with water and place it on the middle rack of the oven. This will create humidity as the pork cooks to keep the pork moist. Place the capicola on a roasting pan fitted with a wire rack and place the pan on the top rack of the oven. Cook the capicola for 1 hour, then turn the pork over so the bottom side is up and bake it for another hour or until the internal temperature reaches 145-150 degrees F. Don’t overcook or the meat will be dry.
BE PATIENT, IT’S NOT READY TO EAT YET! Remove the capicola, place it on a plate and refrigerate uncovered for 4 hours.
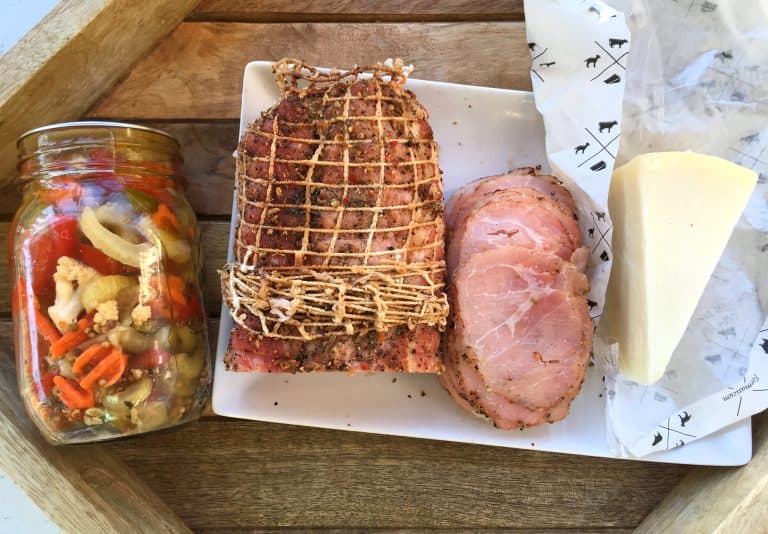
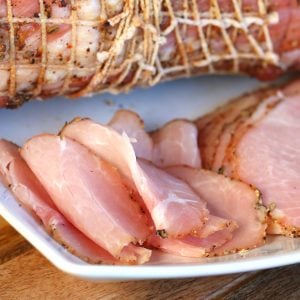
At that point your homemade Italian capicola is ready to eat! Slice it thinly and enjoy it on your sandwiches, pizzas or eaten on its own!
If you want very thinly sliced meat like the deli meat you buy in the store, you’ll need a meat slicer like this Chef’s Choice Electric Meat Slicer.
We love to make Italian subs by adding some capicola, cheese and homemade Giardiniera – it’s out of this world!
To store, keep it wrapped tightly in plastic wrap in the refrigerator where it will keep for up to 3 weeks.
Sliced capicola can also be frozen for up to a couple of months.
Enjoy!
For more homemade charcuterie recipes try my:
- How to Make Bacon
- Homemade Corned Beef
- Porchetta
- Gravlax
- Italian Sausage Recipe
- Mexican Chorizo
- German Bratwurst
- British Bangers
- Breakfast Sausage Recipe
- Pork Rillettes
- Smoked Ham Hocks
- Smoked Ham
- Smoked Cheddar Sausages
- Canadian Bacon
Save This Recipe
Capicola
Ingredients
- For the Curing Rub:
- 3 pounds pork coppa or pork loin (coppa is the traditional and preferred cut (we highly recommend it if you can get one from your butcher), see blog post for description)
- 2 1/2 tablespoons sea salt
- 2 tablespoons sugar
- 1 teaspoon crushed red pepper flakes
- 1 teaspoon curing salt #1 (aka Prague powder) (this is essential for maintaining the pink color of the meat as opposed to brown/gray once it’s cooked)
- For the Seasoning Rub (feel free to tweak according to preference):
- 1 tablespoon coriander seeds
- 1 tablespoon fennel seeds
- 1 1/2 teaspoons black peppercorns
- 3/4 teaspoons anise seeds
- 1/2 teaspoon red pepper flakes
- You’ll also need:
- size 24 meat netting
Instructions
- To make the cure, place the sea salt, sugar, red pepper flakes and pink curing salt in a coffee/spice grinder or use a mortar and pestle to grind them. (It is essential that the pink salt is evenly distributed in the rub.)Place the pork in a large bowl or on a work surface and massage the rub into the pork, making sure to get every nook and cranny.Wrap the pork tightly in plastic wrap and refrigerate it for 5 days. After 5 days flip it over so the bottom side is up and refrigerate it for another 5 days.
- After 10 days unwrap the meat. It will be firmer to the touch. Thoroughly rinse it under cold water to remove all the spices and set it aside while you prepare the final rub.To make the rub, place the fennel seeds, coriander seeds, anise seeds, red pepper flakes and black peppercorns in a coffee/spice grinder or use a mortal and pestle to grind the spices until you get a coarse rub. Lightly blot the pork with a paper towel.Spread the rub out onto a plate or work surface and roll the pork in it, coating all sides. Use up all the spice rub to coat the meat.Next you'll need a #24 netting roll. Cut a piece of netting off the roll that is a few inches longer than your capicola.Stretch the netting and feed the capicola through it (unless you have a ham-stuffing funnel, it's easiest to do this with two people).
- Preheat the oven to 250 degrees F. Fill a pan up with water and place it on the middle rack of the oven. This will create humidity as the pork cooks to keep it moist. Place the pork on a roasting pan fitted with a wire rack and place the pan on the top rack of the oven. Cook the capicola for 1 hour, then turn the capicola over so the bottom side is up and bake it for another hour or until the internal temperature reaches 145-150 degrees F. Don't overcook or the meat will be dry.Be patient, it's not quite ready yet! Remove the capicola, place it on a plate and refrigerate uncovered for 4 hours.
- At that point your homemade Italian capicola is ready to eat! Slice it thinly and enjoy it on your sandwiches, pizzas or eaten on its own! (For professional looking deli meat slices, use an electric meat slicer.) To store, keep it wrapped tightly in plastic wrap in the refrigerator where it will keep for up to 2 weeks.The sliced capicola can also be frozen for up to a couple of months.
Nutrition
Originally published on The Daring Gourmet March 6, 2019 / Recipe inspired by Olympia Provisions

Hi, I’m Kimberly Killebrew and welcome to Daring Gourmet where you'll find delicious originals, revitalized classics, and simply downright good eats from around the world! Originally from Germany, later raised in England, world-traveled, and now living in the U.S., from my globally-influenced kitchen I invite you to tour the world through your taste buds!


I used coarse salt and followed exact measurements. Was a bit too salty but not bad. I would either use less or different salt like sea salt? I didn’t put in pink salt and colour is fine. Loved the process. So easy. Will absolutely do this again . Gonna try venison and a beef. Yummy 😋
Pink prague salt is a preservative used to keep the meat safe during the curing time.
Is it possible to make it this way using the actual coppa muscle?
Absolutely, Martin, that’s the traditional and preferred cut if you can source it.
Thank you Kimberly, for the response. I’ve harvested the coppa before from the bone-in butt. I’ll just have to try your banger recipe and method with the rest of the meat.
That sounds great, Martin, I hope you enjoy both of the recipes and would love your to hear your feedback!
We tried this recipe and really like it, but I am wondering if this can be cooked in a smoker by hanging it or laying it on a rack.
Thank you, Mike, I’m happy you enjoyed it! Yes, this can be made in a smoker. I would follow a similar process for smoking as outlined here: https://www.daringgourmet.com/homemade-canadian-bacon-recipe/
I just finished slicing my capicola (the hardest part) and it’s absolutely delicious! I added extra red pepper and paprika ‘cos we like ours extra hot. In less than 2 weeks I’ve made what would have cost me over $50 worth of deli meat, sliced and in the freezer now. I also like this recipe because it’s cooked, I prefer the texture.
Wonderful! Thanks so much for the feedback, Cindy, I’m thrilled that you enjoyed it! I recently posted a recipe for homemade Canadian Bacon which may interest you as well: https://www.daringgourmet.com/homemade-canadian-bacon-recipe/
Hi, please can you confirm:
At step 3, do you refrigerate straight from the oven or do you let it cool to room temperature ?
Hi Jan, let it cool first.
I just made this & while I tweaked the seasoning (more red pepper less anise) & tied it with twine because I didn’t have netting. It came out so amazing & was absolutely delicious! Thank you so much for this recipe. I have a feeling it is going to be on a regular rotation in our home.
I’m so happy you enjoyed it, Katerina, thank you very much for the feedback!
Ever try this with venison
Hi Paul, I have not but if the same cut from the deer is likewise well-marbled you can certainly use it.