Homemade Bacon
This post may contain affiliate links. See my disclosure policy.
Bacon is simply one of the most delicious foods on the planet and absolutely nothing beats homemade bacon! Learning how to make bacon is easy and you will be positively thrilled at the results!

How to Make Bacon
Before we get to the tutorial on how to make homemade bacon, I have to unleash to poet within. Here it goes…
Ode to Bacon
How do I love thee? Let me count the ways.
I love thee to the depth and breadth and height
My soul can reach, when feeling out of sight
For the ends of being and ideal grace.
I love thee to the level of every day’s
Most quiet need, by sun and candle-light.
I love thee freely, as men strive for right…
…I love thee with the breath, smiles, tears, of all my life….
Okay, yes, Elizabeth Barrett Browning really wrote that poem for her husband, Robert. Not for a piece of cured pork. But really, can anyone prove that bacon wasn’t the object of her affection? Exactly. But whatever the catalyst of her emotions, one thing is indisputable: Bacon is sublime. And by that I mean the literal definition of the word: “Of such excellence, grandeur, or beauty as to inspire great admiration or awe.”
When it comes to bacon you just can’t beat homemade. You have full control over every element: The quality of the pork, the seasonings used, the curing method, the type of wood chips/smoke, the thickness of the slices. There’s no mystery when it comes to making bacon. It is simple and easy and even those minor efforts pay off BIG time!

Before we get to how to make bacon, let’s address a couple of the most common questions: Should I dry cure or should I wet cure the bacon? And what about those nitrates/nitrites? Let’s start with the first question.
Dry Cure vs Wet Cure Homemade Bacon
Some experts insist dry-curing results in a more pronounced flavor and that the bacon fries up more crispy than when using the wet-curing method. Other experts insist on the exact opposite. The battle rages on. The bottom line is that it comes down to personal interpretation and preference. I’ve used both methods and they both yield excellent results. However, the wet cure method is more fool-proof. It will ensure a thoroughly even cure because the meat is completely immersed under the brine, whereas a dry cure can result in “hot spots” where certain areas have a higher concentration of curing salt than others. Nevertheless, I’m including both methods for you to try. Pick one or the other or try them both and see which one you prefer. Now for the next question.
What About Those Nitrates/Nitrites?
Nitrates and nitrites get a bad rap and are commonly associated with processed deli meats, hot dogs and bacon. But they may be one of many examples of things that have been targeted and blown out of proportion by the media. As is typical of medical research, there are so many conflicting studies on this topic with directly opposing conclusions that it’s enough to make one’s head spin. Though the opponents to nitrates may argue, the fact is there is no definitive conclusion one way or the other.
What we do know is that not only have nitrates/nitrites been used for the last 12,000 years, nitrates/nitrites occur naturally in vegetables and in many cases in higher quantities than in cured meats. One source observes that “one serving of arugula, two servings of butter lettuce, and four servings of celery or beets all have more nitrite than 467 hot dogs.“
Another source notes, “those uncured hot dogs or bacon you’ve been conscientiously paying more for? Most are processed using celery or beet juice, whose nitrates turn into nitrites when they react with the saliva in your mouth [and] in many case…contain more nitrites than traditionally cured meats.” The claim to be made “without nitrates or nitrites” is a marketing ploy, and the use of celery or beet juice is the FDA loophole that allows them to make that erroneous claim.
(On an important side note, all the sources I’ve read emphasize strongly the importance of using the right quantities of nitrates and nitrites. Nitrates/nitrites can be toxic if the recommended quantities aren’t observed, so be sure to use exact measurements and correct ratio of curing salt to pounds of meat.)
Now I would never make the claim that bacon is healthy. Nor would I say that it’s perfectly safe to eat an unlimited amount of nitrates and nitrites. But I do personally maintain that a balanced diet that includes “all things in moderation” is a sound and a safe one.
So the question becomes less one of should I use nitrates/nitrites, and instead is one of why should I use them? And the answer to that is the same one that people made 12,000 years ago when they found that meat remained safe to eat when they used it.
Bacon is smoked low and slow within a temperature zone that bacteria can grow and multiply. The use of nitrites in bacon fights harmful bacteria and it also helps preserve the meat’s color. (Imagine grayish-brown bacon or hot dogs…now you know why those manufacturers of “nitrate/nitrite-free” meats still sneak them in, just under a different name.) So nitrates and nitrites help ensure both the safety of the meat as well as its pleasing aesthetics. And the flavor and aesthetics of bacon are very pleasing indeed!
But let’s stop the talkin’ and let’s start smokin’!
Ladies and gents, it’s time to make some homemade bacon!
Homemade Bacon Recipe
As promised, I’m giving you both options for DIY bacon to choose from.
Better yet, try both and see which one you prefer.
Wet Cure Method
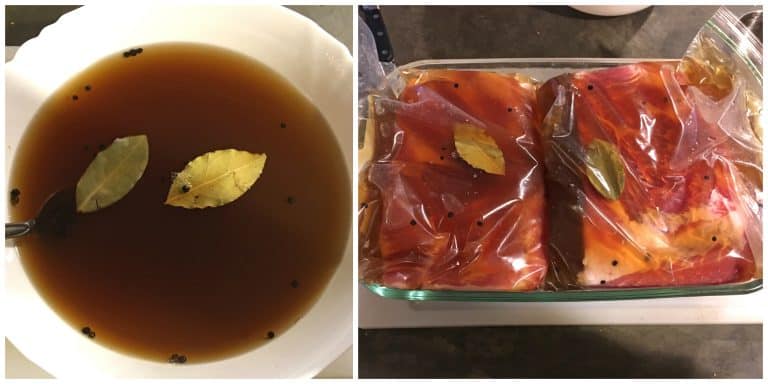
Add all the cure ingredients together in a large bowl and stir. Place the pork belly in gallon ziplock bag or container that just fits the size of the pork belly and pour the brine over it. If using a ziplock bag, place the bag in a container in case there is any leakage. Place it in the refrigerator for 7 days, flipping the bag over (or the pork belly itself if curing it in a container) every 2 days to ensure both sides of the pork belly are equally cured.
**A one-gallon bag will hold a 3-pound pork belly. If you’re following the recipe to use a 5 pound pork belly and plan on using the wet cure method with ziplock bags you can cut the pork belly in half and divide the brine equally between the two bags.
After 7 days the pork belly will have firmed up. Remove the pork belly from the brine, thoroughly rinse it off, and pat dry with paper towels. Some people say you should let the slab of bacon air dry for up to 24 hours before you smoke it. But many experts agree there is no need to do this. These experts argue that in leaving it wet the smoke actually sticks to the bacon better than if it’s dry.
At this point if you like you can rub it down with some cracked peppercorns and, if you want it sweeter, some brown sugar, honey or maple syrup.
Dry Cure Method
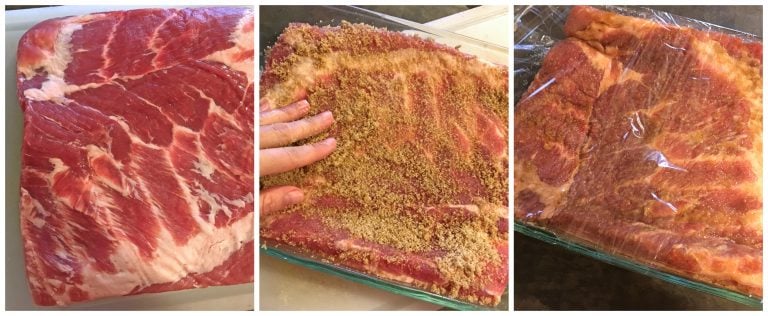
Place all the dry cure ingredients in bowl and stir to thoroughly combine them. It is essential that the pink curing salt is evenly distributed across the whole pork belly. So I like to give the rub a quick buzz through a spice/coffee grinder or you can use a small blender or a mortar and pestle.
Thoroughly and evenly rub down all sides of the pork belly with the dry rub. Place it in a ziplock bag or container (I’m using a casserole dish), with the fatty layer side down, and cover it with plastic wrap. Refrigerate it for 5 days. Flip the bacon over, redistribute the liquid that will have formed (if it’s in a ziplock bag simply turn the bag over and give it a good massage), and refrigerate for another 5 days.
After 10 days the pork belly will have become quite firm and stiff. Remove it from the the container or bag , rinse thoroughly, pat dry with paper towels, and proceed to smoking.

How to Smoke Homemade Bacon
Whether you’re using the wet or the dry curing method, the next step for smoking the bacon is the same.
As already mentioned, it’s also at this point that you can also sprinkle some coarsely ground pepper (if using) onto your wet-brined pork belly and “top off” the pepper on your dry-cured pork belly. You can also sprinkle on some extra brown sugar, maple syrup or honey.
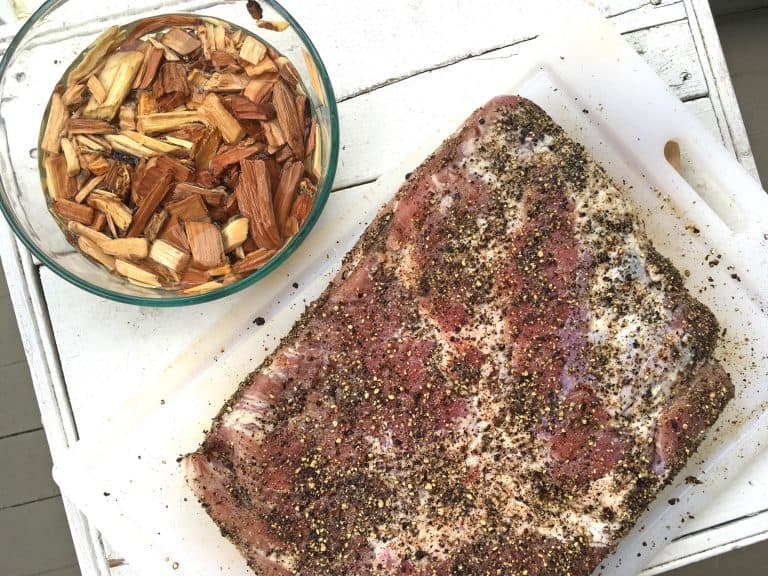
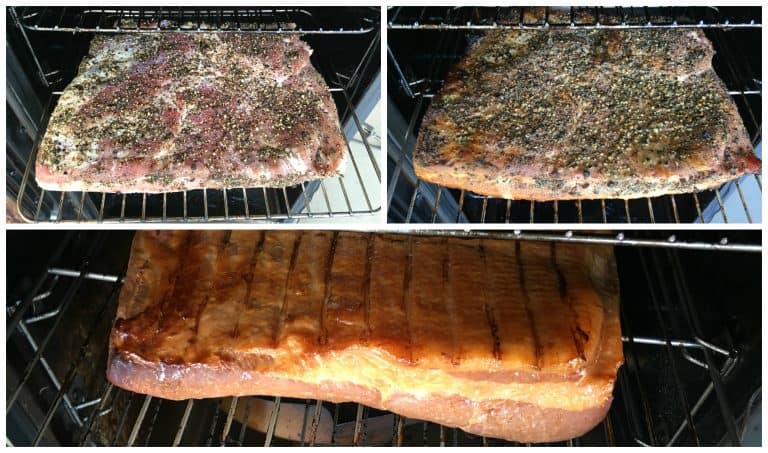
Preheat your smoker to 175-180 degrees F (do not exceed 200 F). I’ve used the Masterbuilt Digital Smoker the past 3 years. I love and highly recommend it. You can buy it online buy it online HERE. You can check out my full review HERE. Smoke the bacon for 3+ hours or until the internal temperature of the bacon reaches 150 degrees F. Add a handful of wood chips a couple of times during the smoking process.
If you’re using a grill, set up it up for 2-zone cooking and smoke the bacon fat side up (as the fat renders it will run down the meat) over indirect heat at 175-180 degrees F (don’t exceed 200 F) for about 3 hours or until the internal temperature of the bacon reaches 150 degrees F. Add a handful of wood chips a couple of times during the smoking process.
You’ll need an instant read thermometer. I absolutely love and recommend my Thermapen. For a cheaper alternative I have also used and recommend this one.
What kind of wood chips to use?
This comes down to personal preference. Hickory is the tried and true gold standard but cherry and apple are also excellent.
Once the bacon reaches an internal temperature of 150 degrees F, transfer the bacon to a plate and immediately place it in the fridge to cool down.
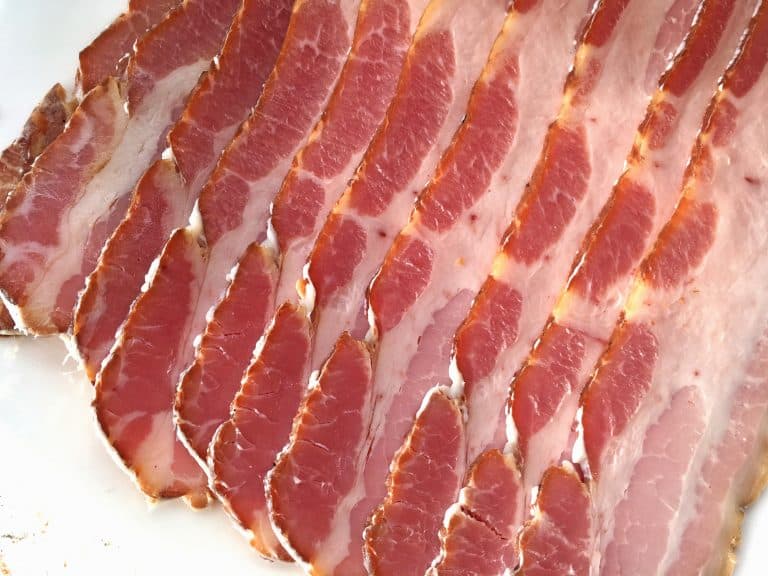
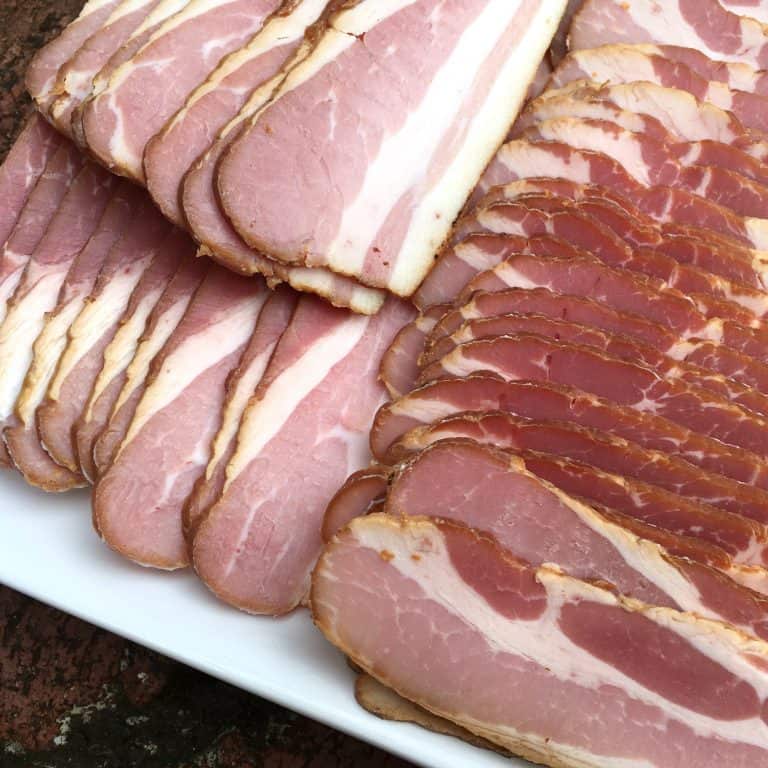
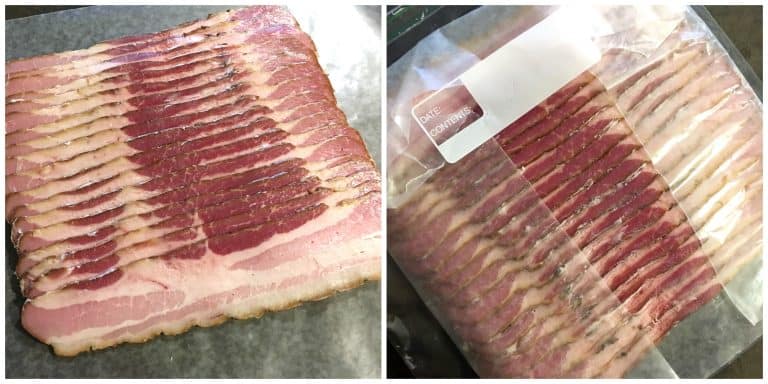
Slicing and Storing the Bacon
All you really need is a good sharp knife. But if you want those perfectly uniform, professional slices of bacon, you’ll need a meat slicer. Whichever you use, always slice across the grain.
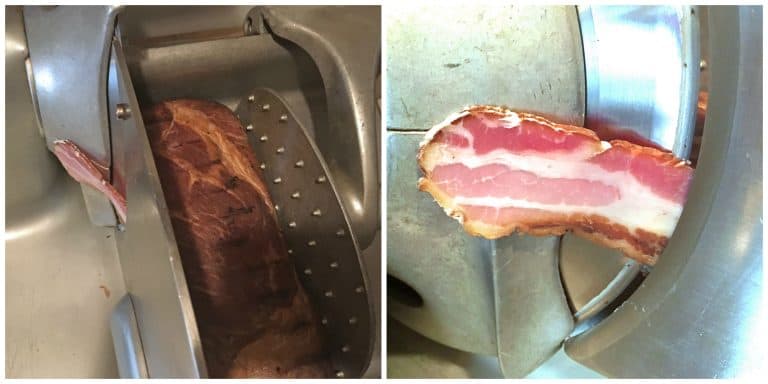
We found our 1970’s commercial Hobart slicer ten years ago on Craigslist. It has some imperfections to be sure, but it was a steal of a deal. For a meat slicer that won’t break the budget and that has excellent reviews, check out the Chef’s Choice Electric Meat Slicer.
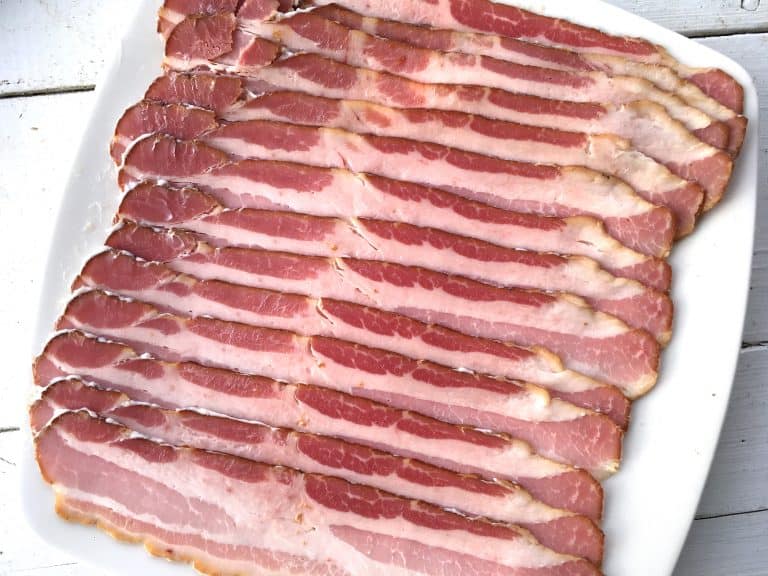
If you plan on using the bacon within 2 weeks, wrap it in several layers of plastic wrap followed by an outer layer of foil and keep it refrigerated. If you’re not going to use it within 2 weeks you can freeze it for up to 3 months.
To Freeze the Bacon: You can either use a vacuum sealer like Food Saver that will ensure its freshness, or you can do what I do (because my bacon never lasts beyond a couple of months anyway before it’s gobbled up): Lay the slices out on wax paper in the same fashion as store-bought bacon and place another sheet of wax paper over it. Fold the sides around the bacon. Place the wrapped bacon in a ziplock bag. I usually freeze the bacon in small amounts, the amount I know I usually need for one use. If you prefer the pieces not to stick together you can cut strips of was paper and place them between each slice of bacon.
When you’re ready to use it, simply remove the bacon from the freezer and let it thaw.
With your homemade bacon ready to go, now it’s time to EAT IT! Oh, and for an extra indulgent treat, use this homemade bacon to make Candied Bacon and Peach Bacon Jam!
Enjoy!

For more homemade charcuterie recipes try my:
- Canadian Bacon
- Italian Sausage Recipe
- Mexican Chorizo
- Homemade Corned Beef
- German Bratwurst
- British Bangers
- Breakfast Sausage Recipe
- Smoked Ham Hocks
- Smoked Ham
- Smoked Cheddar Sausages
- Italian Capicola
Save This Recipe

Homemade Bacon
Equipment
- Instant read thermometer (I love and recommend my Thermapen)
Ingredients
- For the Wet Cure Method:
- 5 pounds pork belly , skin removed
- 6 cups cool water
- 1/2 cup kosher salt
- 1/2 cup packed dark brown sugar (optional, if you want a sweet bacon)
- 2 teaspoons Prague powder #1 (measure carefully)
- 2 bay leaves
- 1 teaspoon whole black peppercorns
- For the Dry Cure Method:
- 5 pounds pork belly , skin removed
- 1/4 cup kosher salt
- 1/4 cup packed dark brown sugar (optional, if you want a sweet bacon)
- 1 teaspoon Prague powder #1 (measure carefully)
- Coarsely crushed black peppercorns (optional and amount according to personal preference)
Instructions
- **REFER TO BLOG POST FOR A COMPREHENSIVE TUTORIAL AND STEP-BY-STEP PROCESS****You can vary the flavors according to your preferences (see Recipe Notes) but do not adjust the salt or Prague powder amounts**
- For the Wet Cure Method:Add all the cure ingredients together in a large bowl and stir. Place the pork belly in gallon ziplock bag or container that just fits the size of the pork belly and pour the brine over it. If using a ziplock bag, place the bag in a container in case there is any leakage. Place it in the refrigerator for 7 days, flipping the bag over (or the pork belly itself if curing it in a container) every 2 days to ensure both sides of the pork belly are equally cured.**A one-gallon bag will hold a 3-pound pork belly. If you’re following the recipe to use a 5 pound pork belly and plan on using the wet cure method with ziplock bags you can cut the pork belly in half and divide the brine equally between the two bags.
- After 7 days the pork belly will have firmed up. Remove the pork belly from the brine and thoroughly rinse it off. Some people say you should let the slab of bacon air dry for up to 24 hours before you smoke it. But many experts agree there is no need to do this. These experts argue that in leaving it wet the smoke actually sticks to the bacon better than if it's dry. At this point if you like you can rub it down with some cracked peppercorns and, if you want it sweeter, some brown sugar, honey or maple syrup. Proceed to smoking (see below).
- For the Dry Cure Method:Place all the dry cure ingredients in bowl and stir to thoroughly combine them. It is essential that the pink curing salt is evenly distributed across the whole pork belly. We recommend using a spice/coffee grinder, a small blender or a mortar and pestle. Thoroughly and evenly rub down all sides of the pork belly with the dry rub. Place it in a ziplock bag or container (like a casserole dish), with the fatty layer side down, and cover it with plastic wrap. Refrigerate it for 5 days. Flip the bacon over, redistribute the liquid that will have formed (if it's in a ziplock bag simply turn the bag over and give it a massage), and refrigerate for another 5 days. After 10 days the pork belly will have become quite firm and stiff. Remove it from the the container or bag, rinse thoroughly, and pat dry with paper towels. At this point if you like you can rub it down with some cracked peppercorns and, if you want it sweeter, some brown sugar, honey or maple syrup. Proceed to smoking.
- To Smoke the Bacon:Preheat your smoker to 175-180 degrees F (do not exceed 200 F). (We use and love the Masterbuilt Digital Smoker). Smoke the bacon fat side up (as the fat renders it will run down over the meat) for 3+ hours or until the internal temperature of the bacon reaches 150 degrees F. (We use and recommend this instant read thermometer.) Add a handful of wood chips a couple of times during the smoking process. (Good options include hickory, apple or cherry.)If you're using a grill, set up it up for 2-zone cooking and smoke the bacon over indirect heat at 175-180 degrees F (don't exceed 200 F) for about 3 hours or until the internal temperature of the bacon reaches 150 degrees F.Once the bacon reaches an internal temperature of 150 degrees F, transfer the bacon to a plate and immediately place it in the fridge to cool down.
- To slice the bacon, slice it across the grain. You can use a large sharp knife or, for perfectly uniform/professional slices use a meat slicer.
- To store the bacon: If you plan on using the bacon within 2 weeks, wrap it in several layers of plastic wrap followed by an outer layer of foil and keep it refrigerated. If you’re not going to use it within 2 weeks you can freeze it for up to 3 months. To freeze the bacon: You can either use a vacuum sealer like Food Saver or you can lay the slices out on wax paper in the same fashion as store-bought bacon and place another sheet of wax paper over it. Fold the sides around the bacon. Place the wrapped bacon in a ziplock bag. If you prefer the pieces not to stick together you can cut strips of was paper and place them between each slice of bacon. When you’re ready to use it, simply remove the bacon from the freezer and let it thaw.
Notes
Nutrition
Originally published on The Daring Gourmet April 1, 2019

Hi, I’m Kimberly Killebrew and welcome to Daring Gourmet where you'll find delicious originals, revitalized classics, and simply downright good eats from around the world! Originally from Germany, later raised in England, world-traveled, and now living in the U.S., from my globally-influenced kitchen I invite you to tour the world through your taste buds!


Thank you for sharing your recipes. 🤠🦅
Can I use oven instead of smoker?
Hi Jeff, unfortunately an oven won’t smoke the bacon or result in it tasting like bacon, it will just end up being cooked pork belly.
This made some really awesome bacon! Will continue making it as written and I really like rubbing it down with the coarse black pepper. Thanks for a great recipe, Kimberly!
I’m so happy to hear that, Chad, thanks so much for the feedback!
So you say keep ratio of pink curing salt & salt ratios the same. Is that the same to each other, to the liquid, both??
Hi Tanya, that’s referring to the ratio of salt to pounds of meat.
Bacon turned out nice, but salt level too high in my opinion. If I do it again, less salt
Hi Howard, did you follow the instruction to thoroughly rinse off the cured pork belly before smoking it?
I just made a 5lb slab using the dry brine method. Smoked on my pellet smoker at 180° for 4 hours (150°) internal. Absolutely delicious! Well done on the recipe. I made it exactly as written
That’s awesome, Scott! I’m thrilled that you enjoyed and appreciate the feedback, thank you!
I am new to this. Today is day 9. Do I smoke it on day 10 or 11? Also is it normal for the white fat to have yellow spots at this stage and a little hairy? I can send a picture of what it currently looks like.
Hi John, it sounds like you used the dry cure method so you’ll smoke it on day 11 – be sure to thoroughly rinse it first to eliminate the excess salt. I’m not sure about the yellow spots, it sounds like the fat may have developed some rancidity. The hairiness is concerning, that sounds like mold. And that’s odd to happen when meat has been thoroughly salted and is curing because the salt inhibits the growth of mold. That suggests that the salt in the rub was not evenly distributed and that the bacon wasn’t thoroughly/evenly rubbed down with the mixture and so mold was able to develop.
Thank you. Could I use more salt next time?
Hi John, you don’t need more salt (over-salted won’t taste good), it just needs to be evenly distributed in the rub and then rubbed onto the pork belly evenly.
I was able to get rid of the hairy mold but not the yellow spots. I’m wondering if I should start fresh.
Hi John, everyone’s going to have their own opinion on this but unlike hard cheeses where mold can generally be cut off and the cheese can still be eaten, the spores from mold on raw meat can penetrate deeper and beyond the surface, so I personally would not risk it and would start over. I know it’s a really hard thing to have to throw away a bad batch – I’ve experienced this myself as have most people who make their own charcuterie. We learn from practice and from our mistakes and become better at the craft as a result.