Homemade Corned Beef
This post may contain affiliate links. See my disclosure policy.
Your complete guide on how to make corned beef completely from scratch! Tender, juicy, and oh so flavorful, this homemade corned beef recipe is easy and fool-proof and is sure to become your go-to from now on! Instructions are provided for cooking it on the stovetop, oven, slow cooker and Instant Pot!

There is a tremendous satisfaction that comes from making your own cured meats right at home. Home curing is something I’ve been doing for years – everything from sausages and hams to dry-cured salamis and prosciutto. I love it! And whether you’re making homemade bacon, smoked ham, Canadian bacon, capicola or salmon gravlax, or this homemade corned beef, making your own cured meats not only means saving money, it means you’re getting a far better quality product that you have full control over. It’s made from scratch with quality ingredients, without junky fillers and additives, and with a flavor that will make you vow never to touch the store-bought stuff again!
What is Corned Beef?
Corning meat is a seasoning and preservation process that was historically used to prevent bacterial growth before the days of refrigeration. The term “corn” dates backed to Anglo-Saxon times when it referred to large granules of salt that were rubbed onto the meat. Thus if meat was corned it was preserved and essentially pickled, not with vinegar but with salt. Tough, lean cuts of beef are used and the corning process and slow cooking breaks down the tough muscle fibers and collagen to create tender meat with a distinct flavor that comes from pickling spices. Beef brisket is the most commonly used cut of meat and corned beef is the traditional dish for St. Patrick’s Day.
Wet Cure vs Dry Cure: Which is Best?
The surest and most fool-proof method for making corned beef is the wet cure method. Having the brisket completely submerged under the brine means that the flavors and curing salt will evenly and fully penetrate the meat. In contrast, dry cures are difficult to apply completely evenly and this results in some portions being saltier than others as well as what is known as “hot spots”, or discolored areas that were exposed to higher or lower concentrations of the curing salt. It is also telling that commercially-produced corned beef is made using the dry cure method for one reason only: It saves space. And space costs money. But with small homemade batches we have the advantage of plenty of space to do it right, to do it the best way, which is the wet curing method.
Another advantage of using the wet cure method is that it’s more forgiving if you have to let your meat cure a little longer than planned. As a general rule, with wet curing you can let the meat cure for up to 25% longer than the recommended time, giving you an added grace period. Don’t let it cure beyond this though to avoid the risk of contamination.
Is Curing Salt Necessary?
Yes. For two reasons: Safety and aesthetics. Curing salt prevents bacteria formation during the long brining process, ensuring the end product is safe to eat. Curing salt is also what gives corned beef its characteristic pink color. Without it, the meat would grayish brown.
But what about those store-bought cured meats that are labeled “uncured” or “nitrate/nitrite free”? They’re using a common and misleading FDA labeling loophole with the small-print qualifier “except for those naturally occurring in celery powder.” Instead of using curing salt, these manufacturers use concentrated celery powder, which is chemically identical and contains similar if not higher levels of nitrates, to achieve the same effect of color preservation and bacteria inhibition without having to use the same verbiage to disclose that. In other words, yes, that “uncured”, “nitrate/nitrite” free bacon, corned beef or sausages that you’re paying a premium for are indeed cured with nitrates/nitrites.
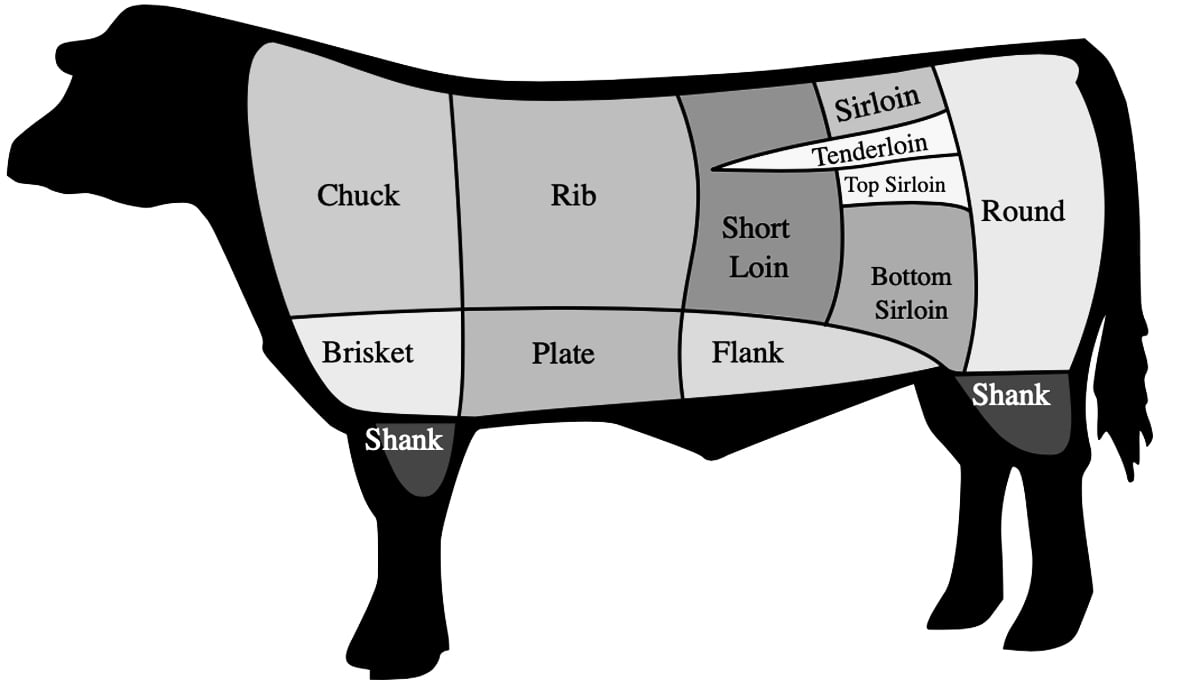
What’s the Best Cut of Beef Brisket?
A whole beef brisket is made up of two main muscles known as the flat and the point. The flat is rectangular in shape and is lean while the point is irregular shaped, thicker, and fattier. Briskets can be sold either whole, with both the flat and the point in place, or they can be sold separately. Most commonly, the briskets you’ll find in the store are the brisket flats. And that’s because flats are easier to slice, give you uniform slices, they cook evenly because they’re a consistent width throughout, they are used in more traditional dishes, and are leaner while still being tender and flavorful. A brisket flat is the standard cut for corned beef. But if you have a whole brisket, by all means use it.
Alternate Cuts for Corned Beef
Can corned beef only be made with brisket? Not at all. Technically any cut of beef can be corned. But for best results you’ll want to choose one that is similarly lean and collagen-rich and lends itself to low and slow cooking. Other suitable choices include top or bottom round, flank and tri-tip. These cuts are perfect for low and steady cooking, breaking down the collagen until the meat is fork tender (e.g. flank for Ropa Vieja, round for Sauerbraten and Tri-Tip Roast).
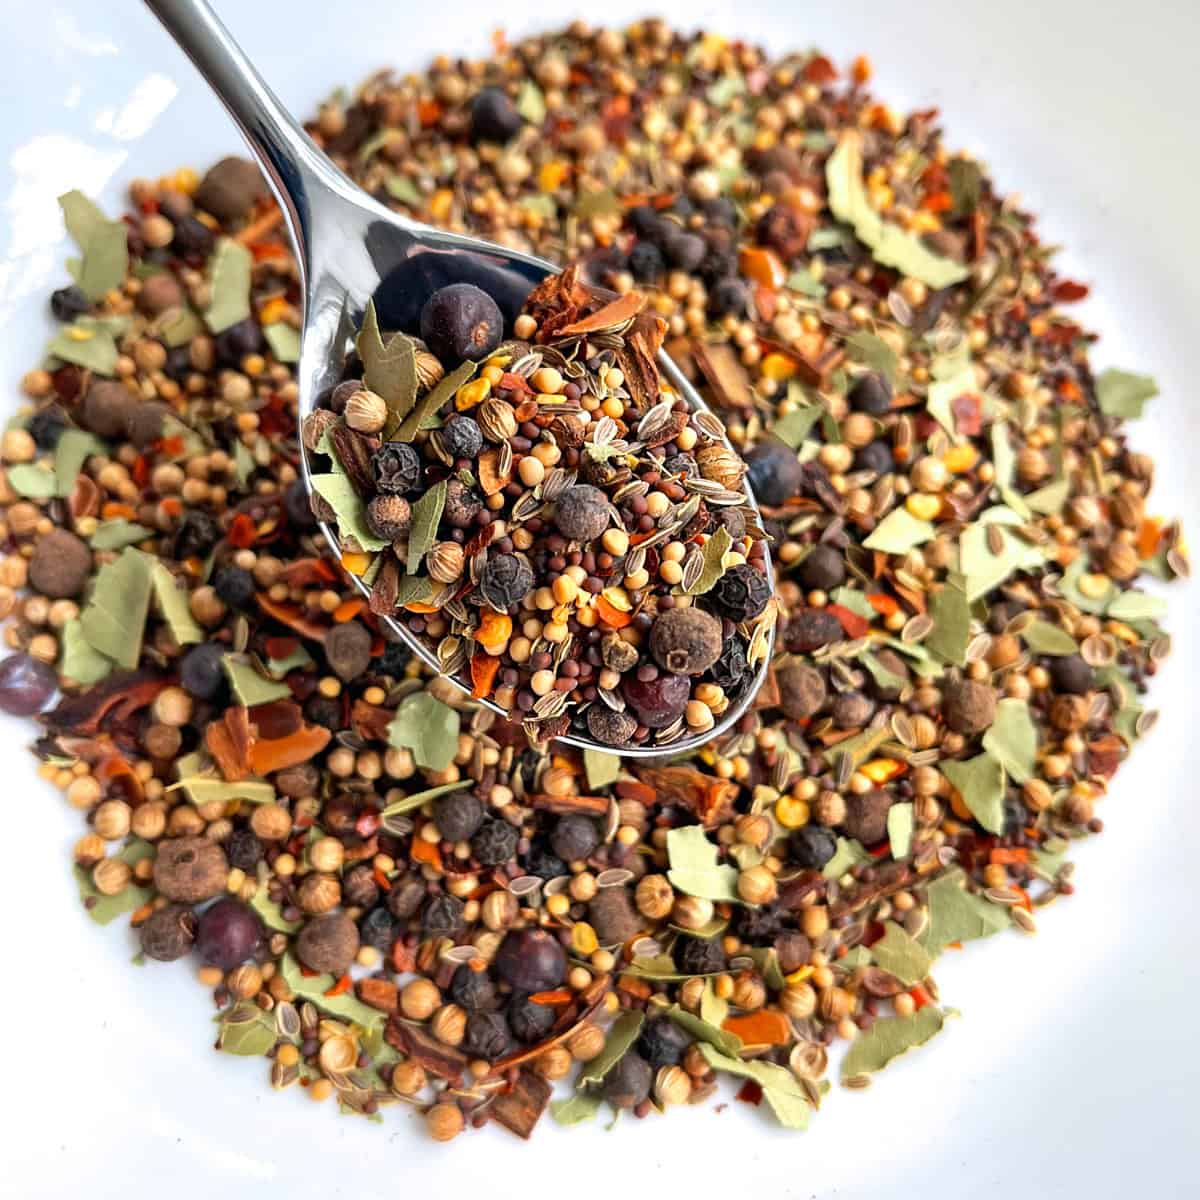
What’s the Best Pickling Spice?
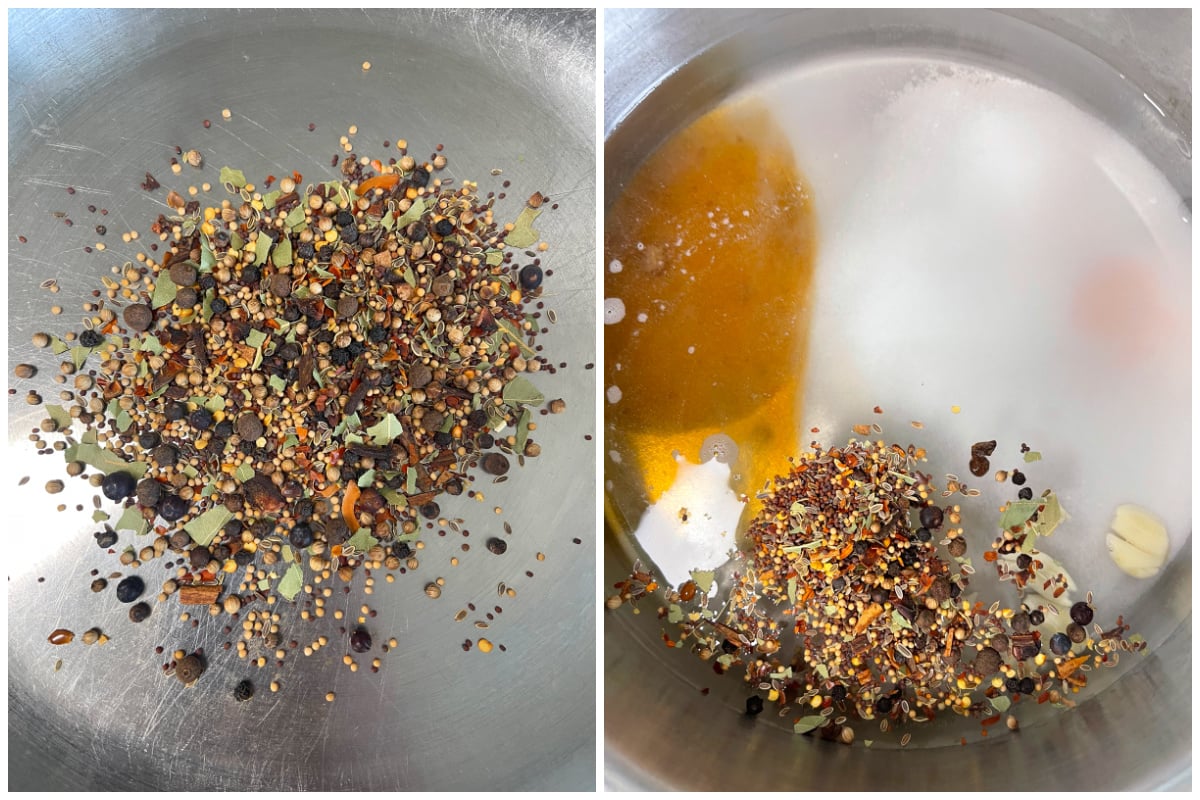
The best pickling spice is homemade. Homemade will ensure that your spices are fresh and vibrant. But not only that, store-bought blends tend to be limited in their flavor scope and incorporate just the bare bone basics. For the best corned beef you’ll want the best pickling spice blend, and that means a blend that incorporates the most flavors and in the right ratios. Check out my gourmet Pickling Spice to use to make your homemade corned beef.
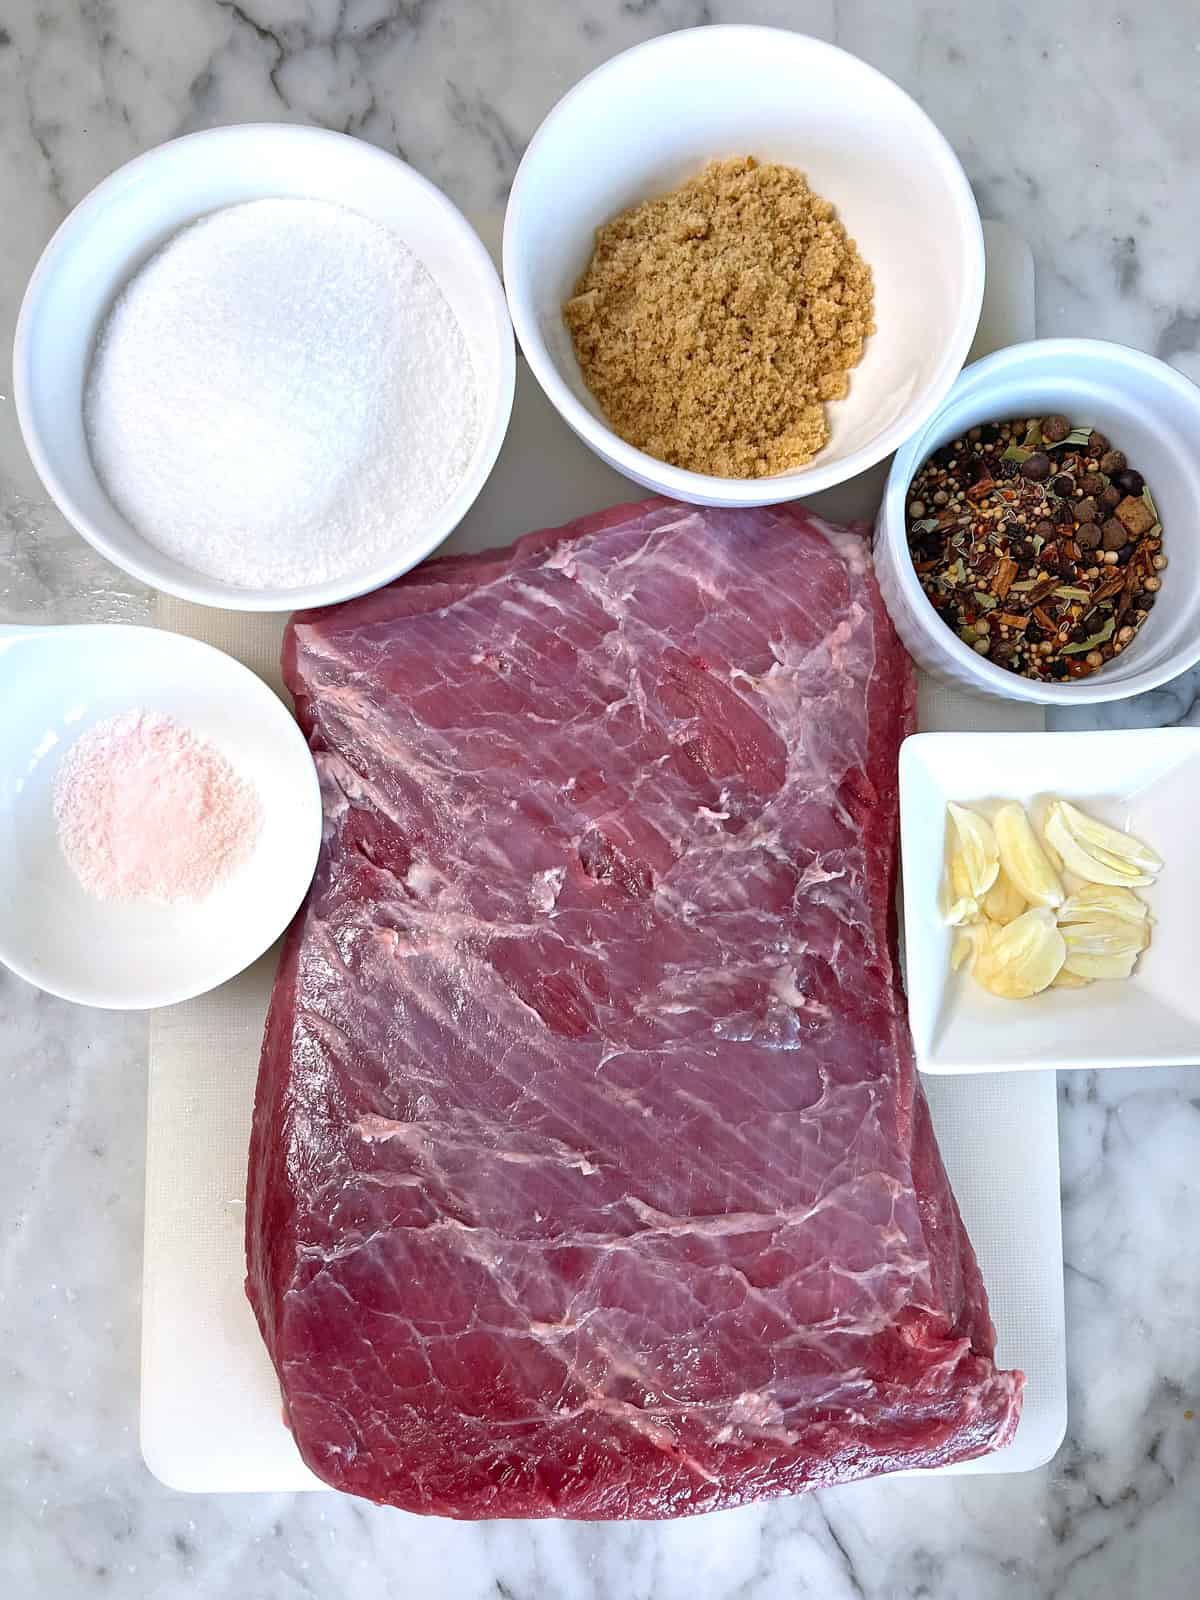
Homemade Corned Beef Ingredients
Homemade corned beef just takes a small handful of ingredients and some patience and before long you’ll have a masterpiece at your dinner table. Here’s what you’ll need to make it:
- Beef Brisket: As noted in the section above about the best cut of beef brisket, you can use a whole brisket or a brisket flat. The latter is the standard choice for corned beef. It’s lean, rectangular in shape, slices easily and gives you uniform slices. However, you can use either a whole brisket or a brisket flat.
- Pickling Spice: As mentioned above, your corned beef is only as good as your pickling spice, so you use a really good one. And that means homemade, because the spices will be fresher and because you’ll be including more ingredients than what comes in your typical store-bought pickling spice blend. Make this gourmet homemade Pickling Spice. You’re going to use the pickling spice twice: in the brine for the cure and then again when it’s time to cook the corned beef. This homemade pickling spice blend will infuse your corned beef with the best flavor possible.
- Salt: Avoid table salt which contains additives and can negatively impact the cure and flavor. I recommend kosher salt. If using regular grain kosher salt and measuring in cups, you’ll need one cup; if using kosher crystal salt (I use Diamond Crystal Kosher Salt), you’ll need about 1 3/4 cups because it’s flaky and takes up more volume.
- Curing Salt: You’ll need pink curing salt (this is not the same as Himalayan pink salt), specifically pink curing salt #1, also called Prague Powder #1. (Do not confuse this with pink curing salt #2 which is used for low and slow dry-cured meats like salami.) See discussion above about why curing salt is essential to use.
- Brown Sugar: This contributes flavor and a touch of sweetness.
- Garlic: For a flavorful dose of aromatics.
Beyond this you’ll just need water for the wet brine. While it isn’t necessary and may make only a minor difference, I recommend using distilled water if you have it because tap water can contain additives that have the potential of impacting the flavor of your corned beef.
How to Make Corned Beef
Let’s get started!
In a dry skillet over medium-high heat, toast the pickling spices for 3-4 minutes or until very fragrant. Be careful not to scorch the spices.
In a large pot, add the water along with the toasted pickling spices, kosher salt, pink salt, brown sugar and garlic and bring it to a boil. Stir it until the sugar and salt is dissolved.
A note about the water: Tap water can contain additives that have the potential of impacting the flavor of your corned beef. While it isn’t necessary and may only make a minor difference, if you have distilled water I recommend using that.
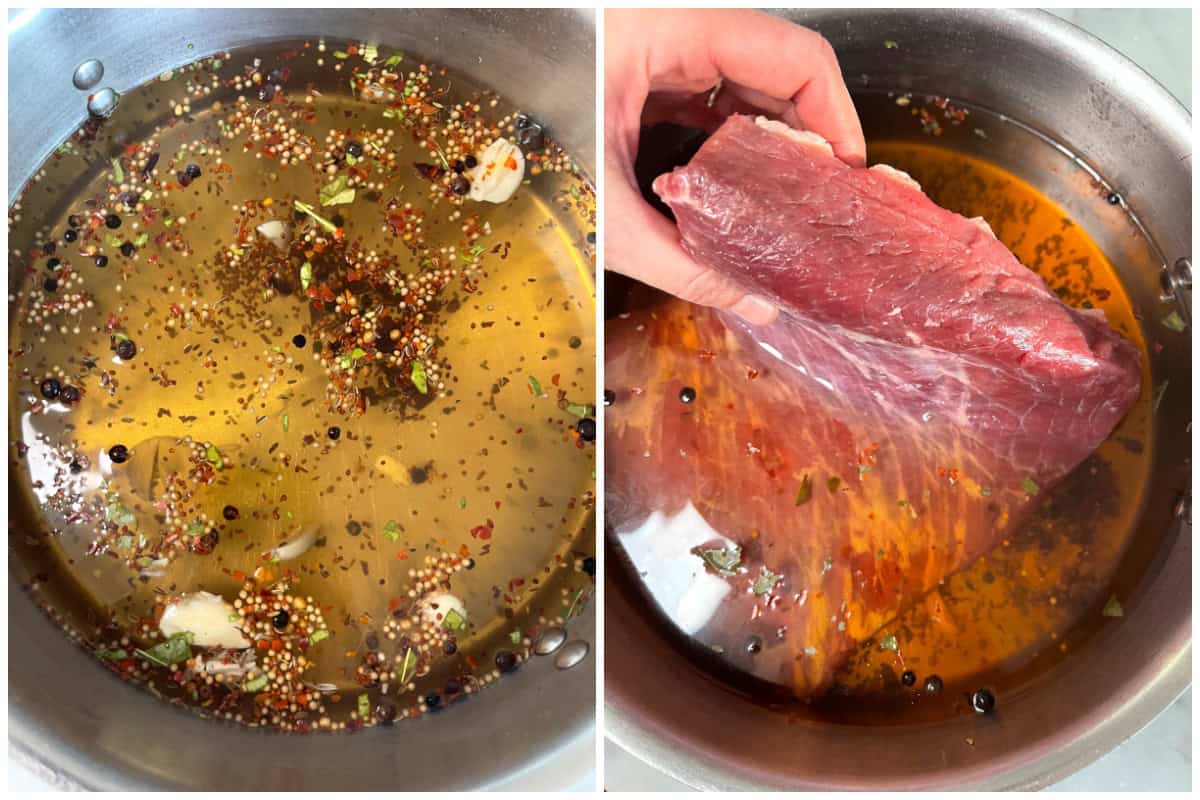
Remove from the heat and let the brine cool completely. You can speed up this process by only boiling half of the water and adding the other half (chilled) afterwards. But to allow the heat to more fully extract the flavors from the spices, I recommend letting it cool down slowly.
Once the brine is fully cooled, place the beef brisket in the brine so that it is completely submerged under the liquid. You don’t at any point want any portion of the beef to rise above the level of the liquid. Place something like a heavy cup or plate on top of the brisket to keep it weighted down. Cover and refrigerate for 5-7 days, flipping the brisket over once or twice during that time.
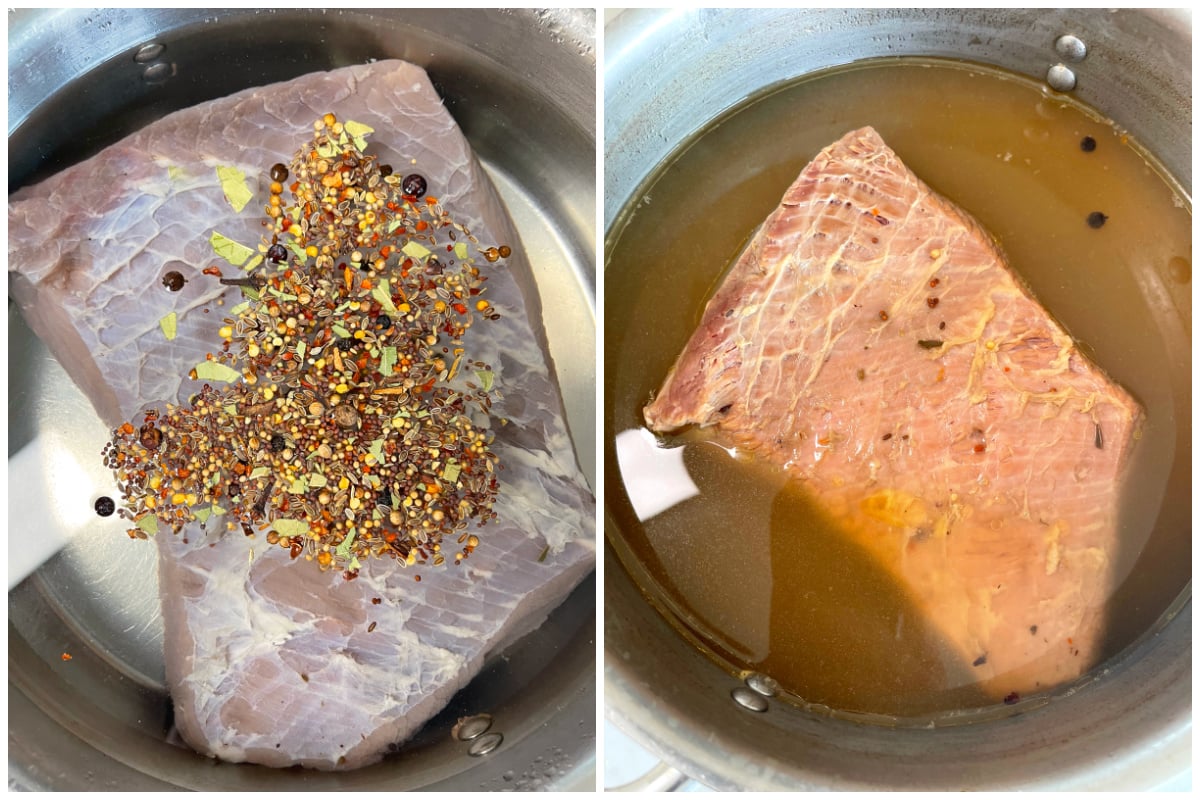
Remove the brisket from the brine and discard the brine.
Very thoroughly rinse the entire brisket under a running faucet.

How to Cook Corned Beef
There are multiple ways you can go about cooking your homemade corned beef, all with excellent results. Below are instructions for cooking it on the stovetop, in the oven, in a slow cooker, and in the Instant Pot.
- Stovetop method: Place the cured brisket in a pot just large enough to hold it and add enough water or low sodium beef broth to cover the brisket by 1-2 inches. Add 2 tablespoons of pickling spice and bring it to a boil. Reduce to heat heat to low, cover, and very gently simmer (just barely bubbling) for 3-4 hours or until the brisket is fork-tender (length of time will depend on the cut, simmering temperature, and how long the brisket was brined). Aim for an internal temperature of 190-200 F/ 88-93 C to ensure the temp is high enough to break down connective tissues for a fork-tender result. Check it occasionally to see if the water level gets too low and needs replenishing. Note: If you’d like to boil your cabbage, potatoes and carrots with the corned beef, add those during the last 40 minutes or so of cooking.
- Oven Method: Preheat the oven to 325 F/ 160 C. Follow the stovetop method using an oven-proof pot and bring it to a boil. Cover an transfer the pot to the oven. Cook for about 4 hours or until the corned beef is fork tender (aim for an internal temperature of 190-200 F/ 88-93 C). Check on the water level occasional and replenish as needed. Note: If you’d like to boil your cabbage, potatoes and carrots with the corned beef, add those during the last 40 minutes or so of cooking.
- Slow Cooker Method: Place the cured brisket in the slow cooker, cover with 1-2 inches of water or low sodium beef broth and add the pickling spice. Cook on LOW for 8-10 hours or on HIGH for 4-5 hours, or until the corned beef is fork-tender. Aim for an internal temperature of 190-200 F / 88-93 C. If adding cabbage, potatoes and carrots, add these to the slow cooker during the last 2 hours of cooking.
- Instant Pot Method: Place the cured brisket on the rack in the Instant Pot. Add 4 cups of water or low sodium beef broth and the pickling spice. Close and lock the lid. Pressure cook on HIGH for 90 minutes followed by a natural release. Remove the corned beef. If using the Instant Pot to cook your vegetables, add the cabbage, potatoes and carrots to the Instant Pot (you can use the liquid from cooking the corned beef if desired), close and lock the lid, and cook on HIGH for 3 minutes followed by a quick release.
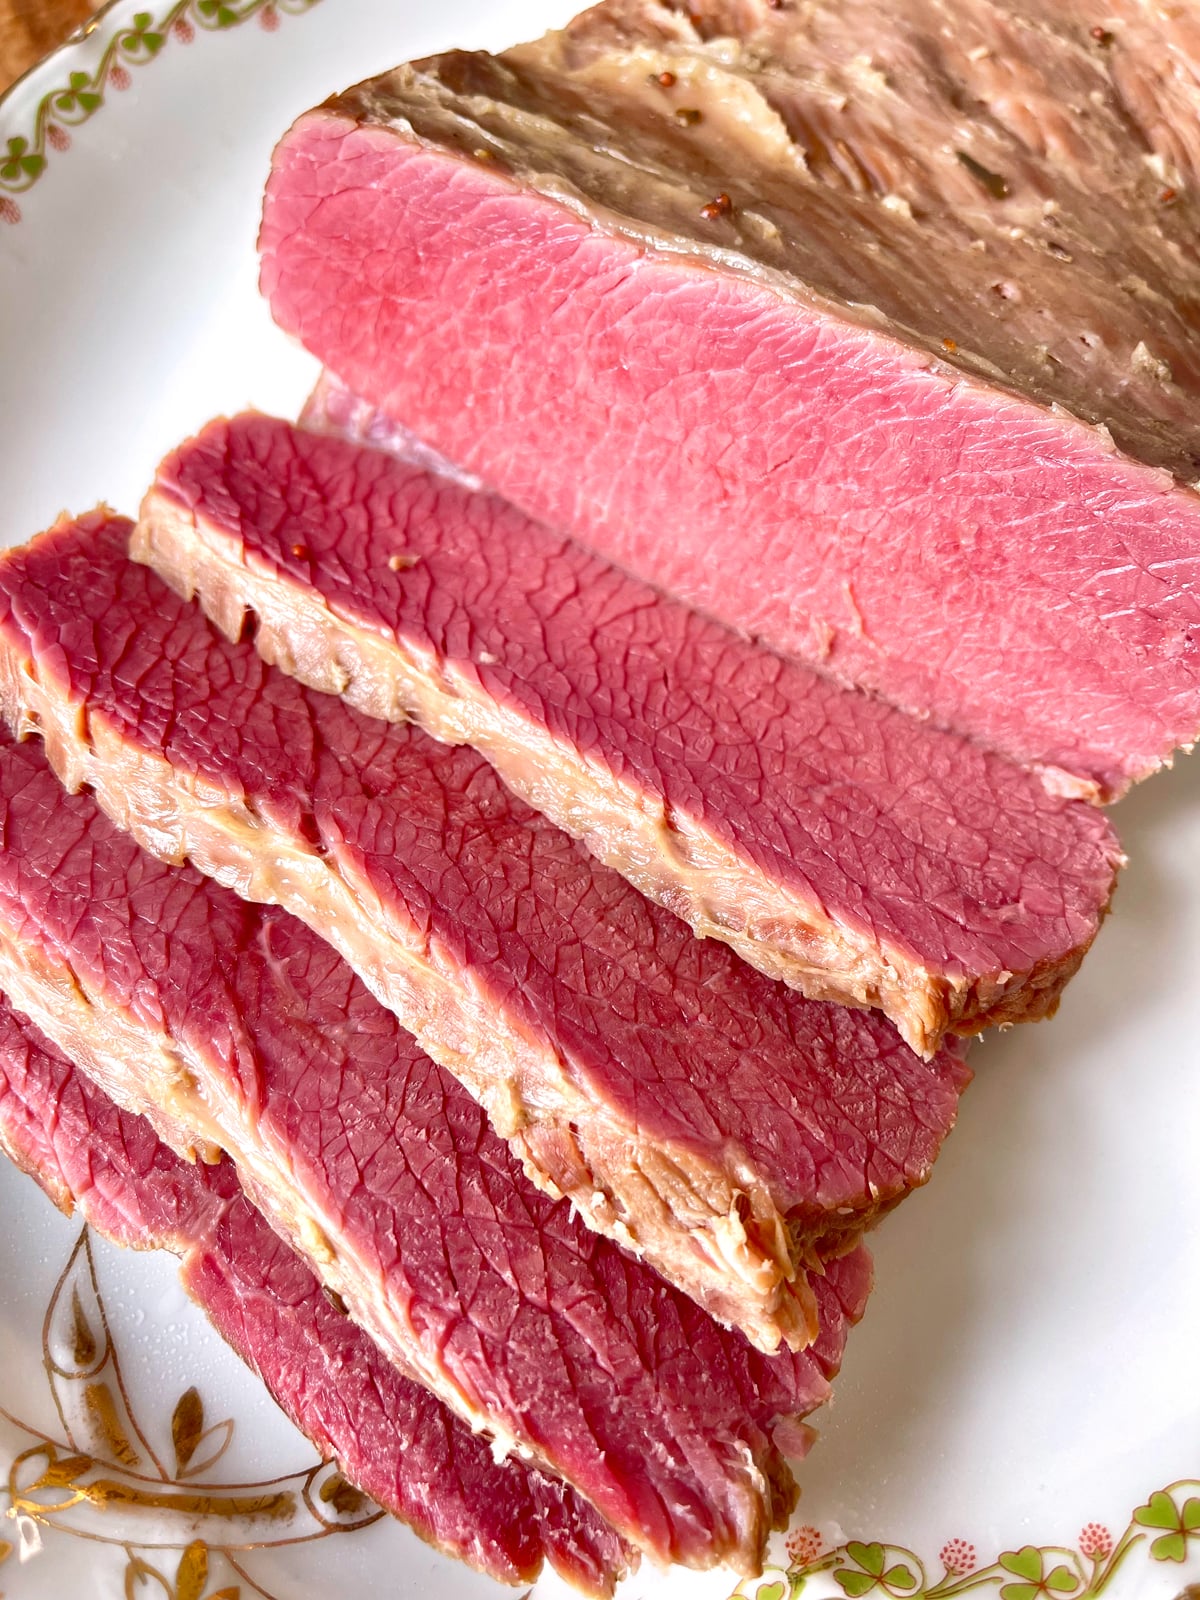
How to Slice Corned Beef
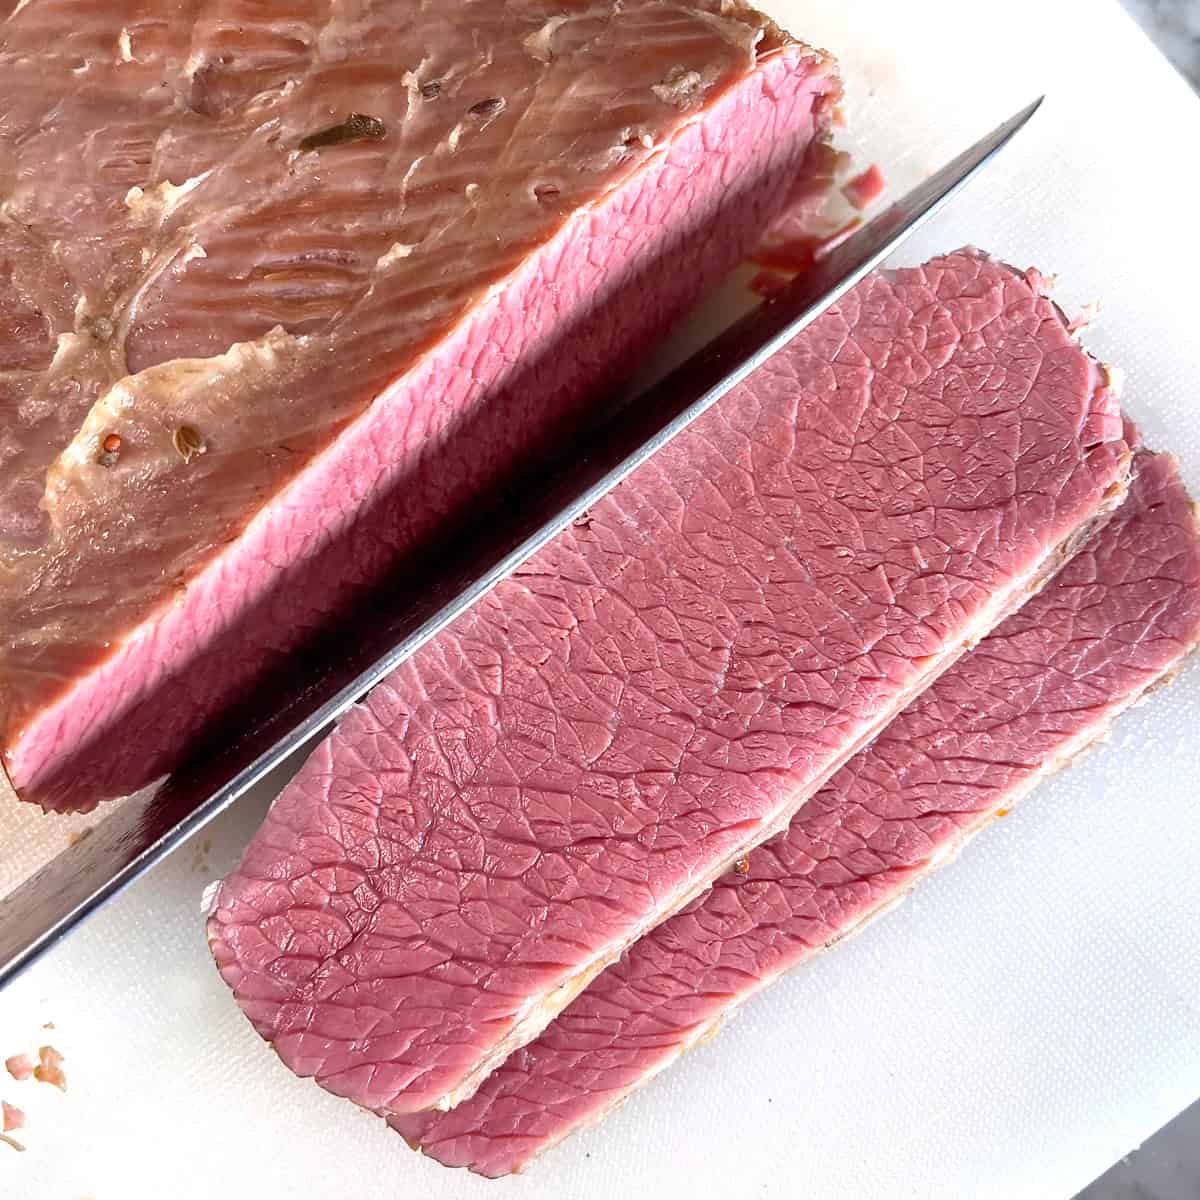
Very simply: You cut across the grain. Always. Otherwise your corned beef will be tough and chewy.
To slice the corned beef, place it on a cutting board. Make note of the direction of the lines running through the meat. You’ll want to slice the corned beef in the opposite direction that those lines are running. This is referred to as cutting across the grain. If you’re using a whole brisket, it has two sections (the point and the flat) that have grains that run in different directions. To make cutting easier, cut the point from the flat and then proceed with slicing each section separately.
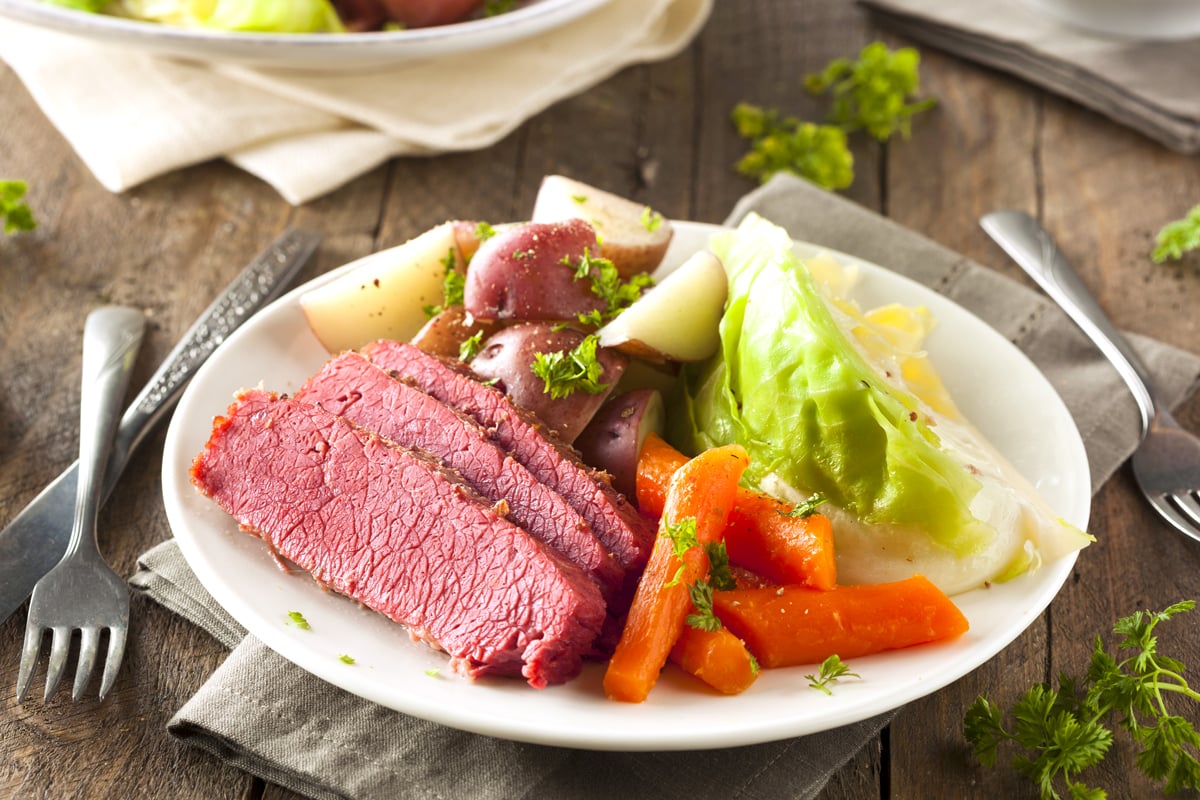
If you’re serving the corned beef for dinner with cabbage and potatoes, cut the slices about 1/4 inch thick or slightly thicker. If you’re slicing it to make corned beef sandwiches, slice it about 1/8 inch thick.
Storage and Reheating
This homemade corned beef will keep in the fridge, wrapped tightly, for 5-7 days. Reheat it gently in a covered container to retain moisture. It can also be frozen for up to 4 months (let thaw slowly in the fridge).
What to Serve With Corned Beef
Whether serving it or St. Patrick’s Day, for breakfast or brunch, or on sandwiches, corned beef can be enjoyed in a variety of ways. Here are a few ideas:
- Colcannon: A traditional Irish side. See my recipe for Colcannon.
- Mashed or Boiled Potatoes: Check out my Mashed Potatoes with Parsnips.
- Boiled or Sauteed Cabbage: Simple and very traditional.
- Carrots and/or Parsnips: I love these roasted.
- Irish Soda Bread: Great for soaking up the juices. Check out my Irish Soda Bread.
- Grainy Mustard or Horseradish Sauce: Either of these make delicious choices. See my recipe for Horseradish Sauce.
- Corned Beef Sandwiches: Check out my Reuben Sandwich recipe!
- English Muffins: Serve it like an Egg McMuffin with a fried egg and cheese. See my Sourdough English Muffins.
- Fried or Poached Eggs: Serve for breakfast or brunch.
- Corned Beef Hash: The perfect way to use up leftovers.
Enjoy!
Save This Recipe
Homemade Corned Beef
Ingredients
- 5 pound beef brisket , trimmed of excess fat if needed
- 1 gallon water , preferably distilled but not critical
- 1/4 cup gourmet pickling spice blend (click link for recipe)
- 250 grams kosher salt (about 1 3/4 cups kosher Diamond Crystal Salt or 1 cup of Morton kosher salt)
- 2 teaspoons pink curing salt , aka Prague Powder #1
- 1/2 cup packed brown sugar
- 4 cloves garlic , crushed
- 2 tablespoons gourmet pickling spice blend , for cooking
- Guinness beer , optional (you can supplement some of the cooking water or broth with Guinness)
Instructions
- In a dry skillet over medium-high heat, toast the pickling spices for 3-4 minutes or until very fragrant. Be careful not to scorch the spices. In a large pot, add the water along with the toasted pickling spices, kosher salt, pink salt, brown sugar and garlic and bring it to a boil. Stir it until the sugar and salt is dissolved. Remove from the heat and let the brine cool completely. You can speed up this process by only boiling half of the water and adding the other half (chilled) afterwards. But to allow the heat to more fully extract the flavors from the spices, I recommend letting it cool down slowly.
- Once the brine is fully cooled, place the beef brisket in the brine so that it is completely submerged under the liquid. You don't at any point want any portion of the beef to rise above the level of the liquid. Place something like a heavy cup or plate on top of the brisket to keep it weighted down. Cover and refrigerate for 5-7 days, flipping the brisket over once or twice during that time.
- Remove the brisket from the brine, discard the brine, and very thoroughly rinse the entire brisket under a running faucet. Place the brisket in a pot just large enough to hold it and add enough water or low sodium beef broth (or some Guinness beer if using) to cover the brisket by 1-2 inches. Add 2 tablespoons of pickling spice and bring it to a boil. Reduce to heat heat to low, cover, and very gently simmer (just barely bubbling) for 3-4 hours or until the brisket is fork-tender (length of time will depend on the cut, simmering temperature, and how long the brisket was brined). Aim for an internal temperature of 190-200 F/ 88-93 C to ensure the temp is high enough to break down connective tissues for a fork-tender result. Check it occasionally to see if the water level gets too low and needs replenishing. NOTE: If you'd like to boil your cabbage, potatoes and carrots with the corned beef, add those during the last 40 minutes or so of cooking.Transfer the corned beef to a cutting board and slice it against the grain, about 1/4 inch thick or slightly thicker if serving with cabbage and potatoes or 1/8 inch thick if using for sandwiches.
Notes
- Oven Method: Preheat the oven to 325 F/ 160 C. Follow the stovetop method using an oven-proof pot and bring it to a boil. Cover an transfer the pot to the oven. Cook for about 4 hours or until the corned beef is fork tender (aim for an internal temperature of 190-200 F/ 88-93 C). Check on the water level occasional and replenish as needed. Note: If you’d like to boil your cabbage, potatoes and carrots with the corned beef, add those during the last 40 minutes or so of cooking.
- Slow Cooker Method: Place the cured brisket in the slow cooker, cover with 1-2 inches of water or low sodium beef broth and add the pickling spice. Cook on LOW for 8-10 hours or on HIGH for 4-5 hours, or until the corned beef is fork-tender. Aim for an internal temperature of 190-200 F / 88-93 C. If adding cabbage, potatoes and carrots, add these to the slow cooker during the last 2 hours of cooking.
- Instant Pot Method: Place the cured brisket on the rack in the Instant Pot. Add 4 cups of water or low sodium beef broth and the pickling spice. Close and lock the lid. Pressure cook on HIGH for 90 minutes followed by a natural release. Remove the corned beef. If using the Instant Pot to cook your vegetables, add the cabbage, potatoes and carrots to the Instant Pot (you can use the liquid from cooking the corned beef if desired), close and lock the lid, and cook on HIGH for 3 minutes followed by a quick release.
Nutrition

Hi, I’m Kimberly Killebrew and welcome to Daring Gourmet where you'll find delicious originals, revitalized classics, and simply downright good eats from around the world! Originally from Germany, later raised in England, world-traveled, and now living in the U.S., from my globally-influenced kitchen I invite you to tour the world through your taste buds!


I’m extremely happy with the results of this corned beef recipe. Nothing’s worse than spending a lot of money on ingredients, like a brisket, just to have mediocre results. This corned beef was moist and so flavorful, I can honestly say it’s the best I’ve had. I will be making this from now on.
I’m so thrilled to hear that, Corey, thank you very much!
Made this recipe today after brining for 6 days. Spices are amazing. But I’d definitely double the salt for the brining next time. And add 150g brown sugar.
Thanks so much for the feedback, Nejat, I’m happy you enjoyed it! By all means, it can be made sweeter and saltier per personal preference, but I’d be very hesitant to double the salt, that’s VERY salty.
I haven’t tried this yet; I have yet to source the Prague powder #1. I am in Australia and we might use an alternative name for it. However, I did make your Hungarian Goulash, which was excellent and which a woman I know of Hungarian descent said that her grandmother would climb out of the grave for and if it is anyway near as good, it will be excellent. Cheers, Jeff.
Oh I’m so glad, Jefferson, thank you very much! For the Prague powder, it’s also simply called pink curing salt #1 (as opposed to #2 which is strictly used for dry-cured meats).