Hutzelbrot (German Fruit and Nut Bread)
This post may contain affiliate links. See my disclosure policy.
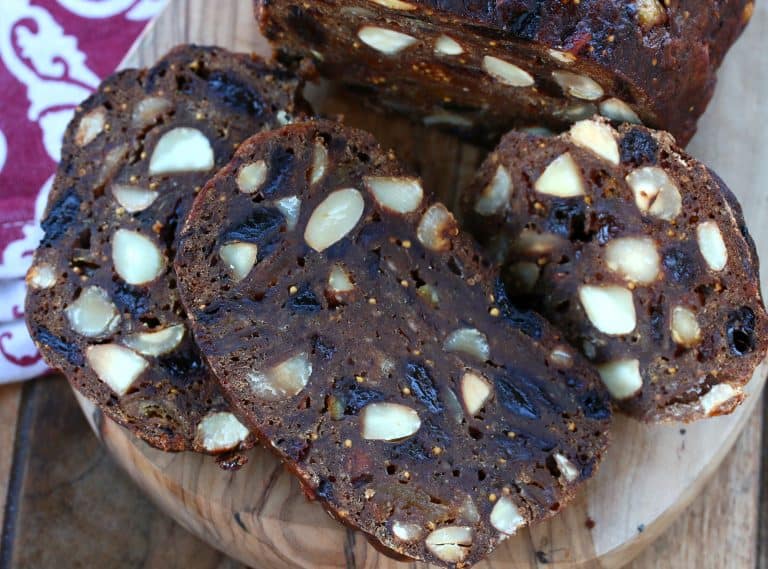
A very old, very traditional and rustic recipe, this old-fashioned German fruit and nut bread is deliciously dense, chewy, moist and flavorful. This authentic Hutzelbrot recipe is a labor of love that’s worth every effort!

What is Hutzelbrot?
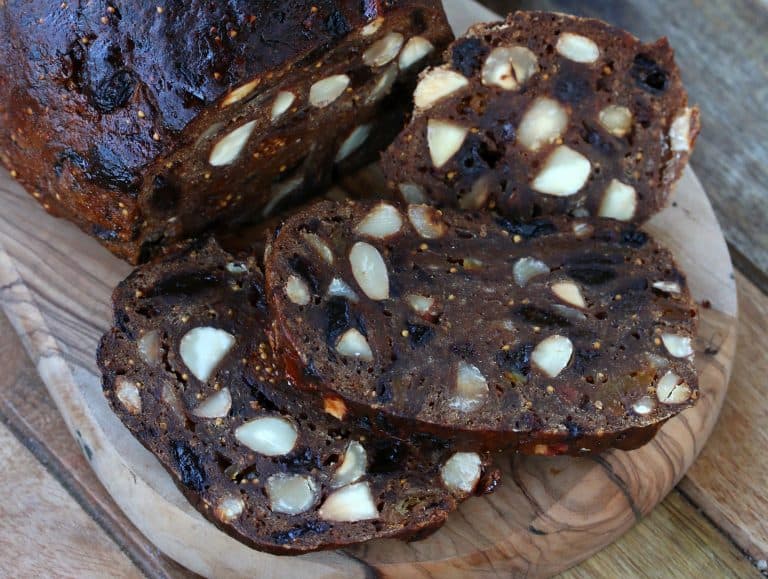
This is a very old-fashioned, very rustic bread from where I grew up in the Swabia region of southern Germany. Schwäbischer Hutzelbrot is also known as Kletzenbrot, Früchtebrot, Bierewecke or Schnitzbrot. But whatever name you call it by, it is a very dense and chewy, fruity, nutty bread with aromatic spices. It is a sweet Winter bread that keeps well.
You could say that Hutzelbrot is a forerunner of what we know as fruitcake today. Fruitcake has a very long history, dating back to Roman times, though the fruitcake of today bears little resemblance to its ancestors. Today we think of fruitcake as that cloyingly sweet, rum-soaked stuff that’s studded with artificially colored candied fruits that taste more like chemicals than anything botanical. But Hutzelbrot stands as an example of earlier days when fruitcake (or more accurately fruit bread) was something virtuous and noble.
Packed with a large quantity and variety of dried fruits, nuts, spices and incorporating whole grains, Hutzelbrot is very different – and special – from the fruit cakes or breads of today.
German Fruit Bread Ingredients
The star ingredient of Hutzelbrot is pears. “Hutzeln”, the bread’s namesake, is the old Swabian dialect for dried pears. Farmers would harvest their pears in the fall, a portion of which would be dried to last until the following season. These dried pears would be used in a variety of sweet and savory dishes such as stews or reconstituted to use in baked goods. Hutzelbrot is one of the most famous uses of Hutzeln.
What really defines Swabian Hutzelbrot is its large quantity of dried fruits and nuts in relation to the flour. The flour is secondary and the amount that is added is just enough to hold the dense fruit-nut mass together. The result is a remarkably dense, chewy, moist and flavorful fruit bread unlike any other.
Before we begin, I have to say Hutzelbrot is definitely a labor of love. Not only is it time-consuming to prepare and chopped the dried fruits and toasted nuts, there is a lot of waiting time involved – so patience is also required. You can save yourself time though be prepping some of the things in advance. For example, the soaked, drained and chopped dried fruits can be made at least a day ahead and refrigerated and the nuts can be toasted and chopped in advance as well. That way all you have left to do the next day is mix the dough together…and then the waiting period begins to let the dough go through various rises. And then of course there’s yet another wait time…letting the bread “ripen” for at least a few days (ideally two weeks) to get the best flavor and texture results.
But though a labor of love and a test of patience, the effort is worth it!
Hutzelbrot Recipe
Let’s get started!
Place the dried fruits (except for the raisins) in a pot and pour the water over them. Bring it to a boil, reduce the heat, cover and simmer for 15 minutes. Turn off the heat and let it sit for at least 3 hours. NOTE: Depending on how soft your dried plums are, you may not need to simmer them, just add them for the soak. Also, if your dried pears are on the softer side you can reduce the length of simmer time.
NOTE: While the dried pears are the featured fruits of Hutzelbrot (“Hutzel” means pear) and should be used generously, feel free to adjust the ratios of the other dried fruits or substitute them according to your preference. You can also include dried apples.
Once the fruits have sat at least 3 hours, pour them into a colander over a bowl to collect all of the liquid. Let it strain for a sufficient amount of time to ensure as much of the liquid is drained out as possible. Reserve the fruit liquid, you’ll need it later.
NOTE: Depending on how thirsty your dried fruits were, if you find you don’t have enough liquid for the 1 1/2 cups you’ll need for the dough plus extra for brushing the loaves later on, add a little extra water to it now.

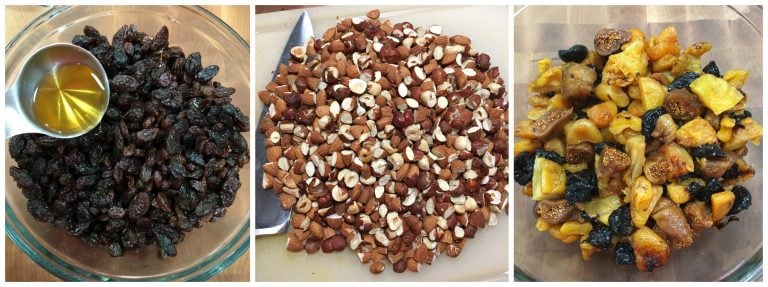
While the dried fruits are cooling, place the raisins in a bowl and stir in the rum so the raisins soak it all up.
Toast the whole almonds and hazelnuts in the oven until fragrant (be careful not so scorch them) and once cooled chop them very coarsely (basically just in half). Coarsely chop the drained dried fruits.
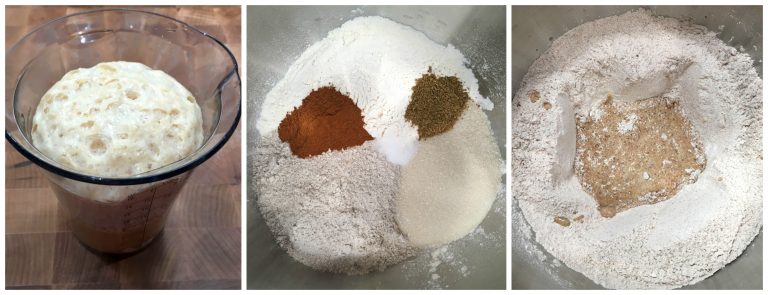
Heat 1 1/4 cups of the reserved fruit water (keep the rest for later) until just lukewarm. Stir the yeast into it along with a couple teaspoons of the sugar. Let the mixture sit for about 15 minutes until very frothy.
While the yeast mixture is sitting, add the flours, sugar, salt, ground anise seed and cinnamon to the bowl of a stand mixer and stir to combine. Make a well in the center and pour the yeast mixture in. Using the dough hook, knead the mixture until it comes together and then knead for about 6 minutes.
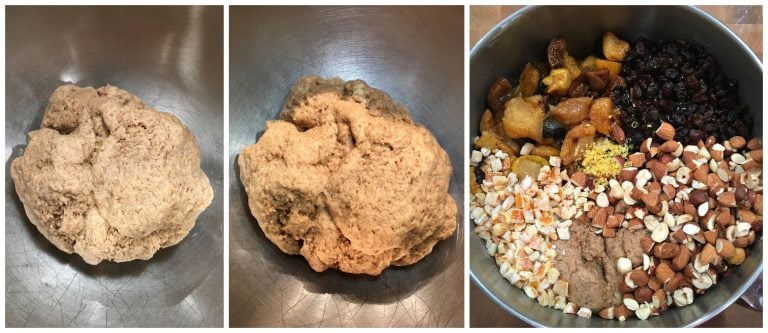
The dough will be very firm. Lightly spray the bowl and put the dough ball back in. Loosely cover it with plastic wrap and let it rest in a warm place for 30 minutes. The dough will not rise much, it will just get slightly puffy.
Add the chopped dried fruits, raisins, candied lemon and orange peels, chopped toasted nuts and lemon zest.
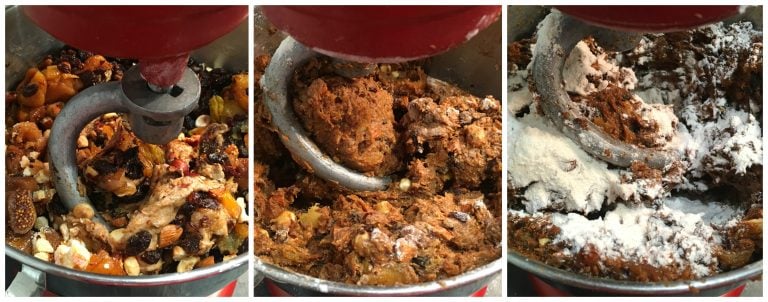
Again using the dough hook, knead the mixture until it is thoroughly combined. The fruits will become mushier and incorporate into the dough and depending on how much liquid was drained out of the dried fruits, the dough may be very wet. It’s going to look super messy and mushy, but don’t panic! Continue adding a little flour at a time until the dough is manageable. You do NOT want it to become stiff and dry, it needs to remain soft and moist but not too wet. You want to reduce the moisture just until the dough is manageable enough to turn out onto a work surface where you will continue to add a little more flour as needed.
NOTE ABOUT STAND MIXERS: Mine is 6 QT and everything fit. If your stand mixer is smaller it will need to be mixed in two batches which is fine because everything will get dumped out on the work surface and mixed together again.
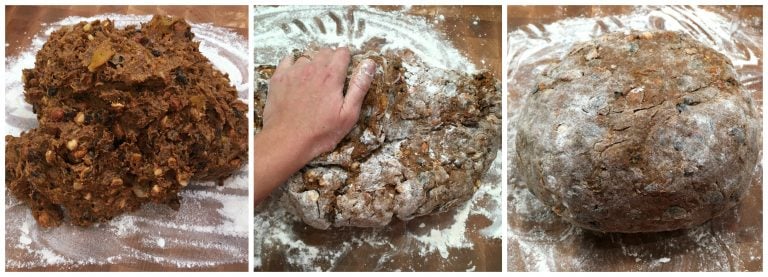
Turn the dough out onto a generously floured work surface. (I’m not even going to pretend that it looks appetizing, because it doesn’t!) Use your hands to knead the dough to make sure all the ingredients are evenly incorporated, adding more flour as needed until you’ve got a round dough ball that is soft and malleable but not sticky on the outside.
Place the dough ball into a lightly sprayed large bowl and cover loosely with plastic wrap. Let it rest at room temperature for about 2 hours. It will not rise very much, it will just become a little puffy. Punch it down in the center, cover with plastic wrap and place it in the refrigerator overnight. This will improve the flavor of the yeast dough and also enable to flavors of the fruits and spices to develop and fully penetrate the dough.
NOTE: If you’re in a hurry, you can skip the overnight refrigeration step (though we recommend it). After letting the dough rest at room temp for 2 hours, follow the steps to form the Hutzelbrot loaves, and let them rest for another 60-90 minutes until slightly puffy, brush with the fruit juice and bake as instructed.
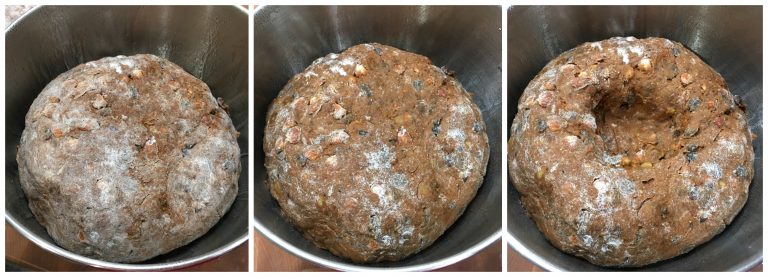
The next day, remove the dough from the fridge and let it sit at room temperature for 4-5 hours. Again, it won’t rise a whole lot but it will become puffier. Cut the dough ball into 4 equal portions. Note the pictures below: Though it won’t rise a lot, the dough will be nice and puffy when you cut into it.
Note: Don’t make the loaves any larger, you want to ensure the inside is fully baked before the outside burns.
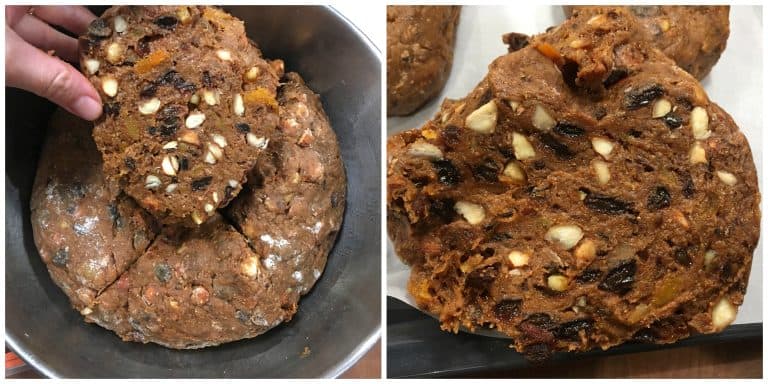
Form each piece into oval-shaped loaves and place them on a lined baking sheet. NOTE: If you prefer, you can divide them further to make 8 smaller loaves (in which case I recommend forming them into little round loaves) and reduce the baking time.
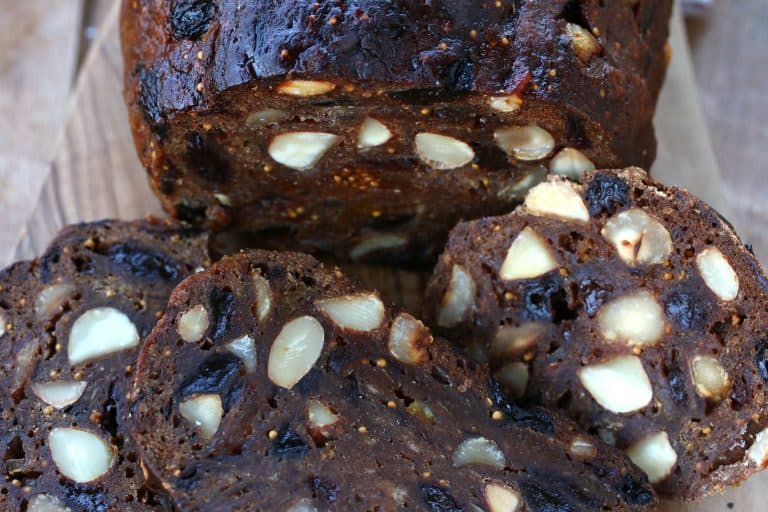
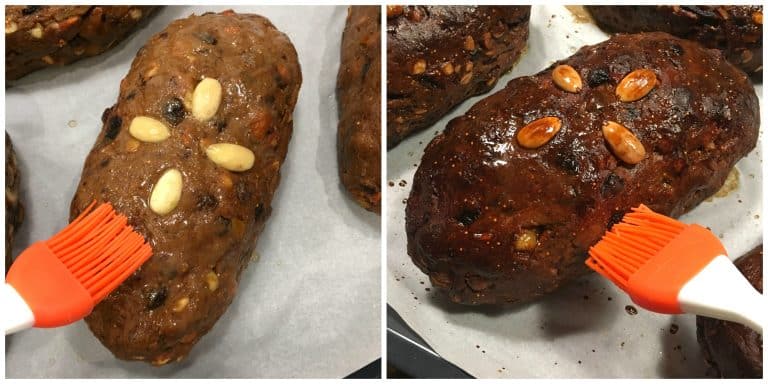
Place the whole, blanched almonds on top in the traditional manner as pictured below. Loosely lay some plastic wrap over the top and let the loaves rest in a warm place for 60-90 minutes until just slightly puffy.

Preheat the oven to 350 degrees F.
Brush each loaf all over with the reserved fruit juice, saving half of it for later. Bake the loaves on the middle rack for about an hour until very dark brown but not burnt. Pick one up with a dish towel and knock on the bottom to see if it sounds fairly hollow.
Remove the loaves from the oven and, while still hot, poke them all over with a toothpick and brush them with the remaining fruit juice. Let them cool completely and then wrap them tightly in plastic wrap and then foil to let them age for a few days (traditionally it was for a couple of weeks) before eating. Note, if you’re letting them age for more than a few days you can transfer them to the fridge but they will get hard in the cold temperature. You can microwave the slices for a few seconds to soften them up.
Slice, spread with a little butter. (I like it best heated up for a few seconds in the microwave.)
Enjoy!

For more traditional German Christmas goodies try our:
- Stollen (Christmas Bread)
- Pfeffernüsse (Iced Gingerbread Cookies)
- Lebkuchen (Nürnberger Elisenlebkuchen)
- Springerle
- Printen (Aachener Gingerbread)
- Speculoos (Gingerbread Shortcrust Cookies)
- Vanillekipferl (Vanilla Crescent Cookies)
- Zimtsterne (Cinnamon Star Cookies)
- Bethmännchen (Marzipan Cookies)
- Heidesand (Browned Butter Shortbread Cookies)
- Magenbrot (Gingerbread Bites)
- Kokosmakronen (Coconut Macaroons)
- Haselnussmakronen (Hazelnut Macaroons)
Save This Recipe
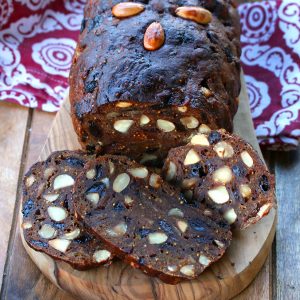
Authentic Hutzelbrot (German Dried Fruit & Nut Bread)
Ingredients
- 16 ounces (500 grams) dried pears
- 12 ounces (350 grams) dried figs
- 8 ounces (250 grams) dried apricots
- 8 ounces (250 grams) dried plums
- 4 cups (950 mL) water
- 16 ounces (500 grams) raisins
- 3 tablespoons rum
- 3 teaspoons dry active yeast
- 2 1/2 cups (350 grams) all-purpose flour
- 1 1/2 cups (150 grams) medium to dark rye flour
- 3/4 cup (150 grams) granulated sugar (Hutzelbrot is not meant to be overly sweet; add more sugar if desired)
- 1/4 teaspoon salt
- 2 tablespoons ground cinnamon
- 1 1/2 tablespoons ground or finely crushed anise seed (NOT the same as star anise)
- 8 ounces (250 grams) whole hazelnuts
- 8 ounces (250 grams) whole almonds
- 2 ounces (60 grams) candied orange peel , chopped
- 2 ounces (60 grams) candied lemon peel , chopped
- Homemade Candied Orange & Lemon Peel (click link for recipe) (STRONGLY recommended to make your own)
- zest of one lemon
- 16 whole, blanched almonds (for decorating) (to blanch, bring the almonds to a boil in some water, rinse and squeeze to remove the skins)
Instructions
- Place the dried fruits (except for the raisins) in a pot and pour the water over them. Bring it to a boil, reduce the heat, cover and simmer for 15 minutes. Turn off the heat and let it sit for at least 3 hours. Pour them into a colander over a bowl to collect all of the liquid. Let it strain for a sufficient amount of time to ensure as much of the liquid is drained out as possible. Reserve the fruit liquid, you’ll need it later. (See NOTE)
- While the dried fruits are cooling, place the raisins in a bowl and stir in the rum so the raisins soak it all up.
- Toast the whole almonds and hazelnuts in the oven until fragrant (be careful not so scorch them) and once cooled chop them very coarsely (basically just in half). Coarsely chop the drained dried fruits.
- Heat 1 1/4 cups of the reserved fruit water (keep the rest for later) until just lukewarm. Stir the yeast into it along with a couple teaspoons of the sugar. Let the mixture sit for about 15 minutes until very frothy.
- While the yeast mixture is sitting, add the flours, sugar, salt, ground anise seed and cinnamon to the bowl of a stand mixer and stir to combine. Make a well in the center and pour the yeast mixture in. Using the dough hook, knead the mixture until it comes together and then knead for about 6 minutes. The dough will be very firm. Lightly spray the bowl and put the dough ball back in. Loosely cover it with plastic wrap and let it rest in a warm place for 30 minutes. The dough will not rise much, it will just get slightly puffy.
- Add the chopped dried fruits, raisins, candied lemon and orange peels, chopped toasted nuts and lemon zest to the dough. Using the dough hook, knead the mixture until it is thoroughly combined. The fruits will become mushier and incorporate into the dough and depending on how much liquid was drained out of the dried fruits, the dough may be very wet. Continue adding a little flour at a time until the dough is manageable. You do NOT want it to become stiff and dry, it needs to remain soft and moist but not too wet. You want to reduce the moisture just until the dough is manageable enough to turn out onto a work surface where you will continue to add a little more flour as needed.
- Turn the dough out onto a generously floured work surface. Use your hands to knead the dough to make sure all the ingredients are evenly incorporated, adding more flour as needed until you’ve got a round dough ball that is soft and malleable but not sticky on the outside.Place the dough ball into a lightly sprayed large bowl and cover loosely with plastic wrap. Let it rest at room temperature for about 2 hours. It will not rise very much, it will just become a little puffy. Punch it down in the center, cover with plastic wrap and place it in the refrigerator overnight. This will improve the flavor of the yeast dough and also enable to flavors of the fruits and spices to develop and fully penetrate the dough.NOTE: If you’re in a hurry, you can skip the overnight refrigeration step (though we recommend it). After letting the dough rest at room temp for 2 hours, follow the steps to form the Hutzelbrot loaves, and let them rest for another 60-90 minutes until slightly puffy, brush with the fruit juice and bake as instructed.
- The next day, remove the dough from the fridge and let it sit at room temperature for 4-5 hours. Again, it won’t rise a whole lot but it will become puffier. Cut the dough ball into 4 equal portions (though the dough won’t have risen much, it will be nice and puffy when you cut into it). Don’t make the loaves any larger, you want to ensure the inside is fully baked before the outside burns. Form each piece into oval-shaped loaves and place them on a lined baking sheet. NOTE: If you prefer, you can divide them further to make 8 smaller loaves (in which case I recommend forming them into little round loaves) and reduce the baking time.Place the whole, blanched almonds on top in the traditional manner (see pictures). Loosely lay some plastic wrap over the top and let the loaves rest in a warm place for 60-90 minutes until just slightly puffy.
- Preheat the oven to 350 degrees F.Brush each loaf all over with the reserved fruit juice, saving half of it for later. Bake the loaves on the middle rack for about an hour until very dark brown but not burnt. Pick one up with a dish towel and knock on the bottom to see if it sounds fairly hollow.Remove the loaves from the oven and, while still hot, poke them all over with a toothpick and brush them with the remaining fruit juice. Let them cool completely and then wrap them tightly in plastic wrap and then foil to let them "ripen" for a few days (traditionally they're left to ripen in a cool place for 2 weeks) before eating. That will ensure the best flavor and texture. Note, if you're letting them age for more than a few days you can transfer them to the fridge but they will get hard in the cold temperature. You can microwave the slices for a few seconds to soften them up.
- Slice, spread with a little butter and enjoy! (I like it best heated up for a few seconds in the microwave.)
Notes
Nutrition
Originally published on The Daring Gourmet December 15, 2018

Hi, I’m Kimberly Killebrew and welcome to Daring Gourmet where you'll find delicious originals, revitalized classics, and simply downright good eats from around the world! Originally from Germany, later raised in England, world-traveled, and now living in the U.S., from my globally-influenced kitchen I invite you to tour the world through your taste buds!


I’m excited to be making this this week. I candied the orange and lemon peels— do they get chopped at some point before getting added to the dough?
Hi Laura, yes that’s correct. Happy baking!
My mother made Huzelbrot every Christmas & her recipe came from my great great grandmother which she brought over with her from Germany (Prussia back then) I’m now 87, (giving age for timeline). I have made it also over the years but my recipe is different from yours. My recipe does not have any citrus, candied or not, just dried fruit, molasses, nuts. I so loved seeing this recipe come to life on the internet as it is such a family thing. Since I have been making it this old way I’m going to continue because it is far less work but just had to share because of the excitement of seeing this old recipe. Have you ever heard of snekenoodle? Not sure of spelling,
It is a sweet dough with concord grapes inside & rolled up to look like cinnamon rolls…
Hi Sandra, thanks for sharing. Yes, it’s definitely not an easy to find recipe anymore but rather it’s one of those age-old, near-forgotten traditional classics that’s up to us to revive and make sure is never forgotten completely. By the way, my Oma and Opa are from Schlesien and Pommern. Yes, Schneckennoodle. “Schnecken” translates as snail and they’re basically cinnamon swirls/rolls. I’ve never seen them made with grapes, that would not be typical at all in Germany, but raisins yes. They’re also made with nut fillings and cinnamon.
Oh my. All my life my grandmother and mother made hutzelbrot (calling it Hutzel Bread), extolling its glories and talking about how the recipe had been in the family for more than five generations going back through the German side. None of the kids in my generation cared for it and we used to laugh about the hutzel bread making sessions that would produce a dozen or so loaves at a time, which mostly went into the freezer to be enjoyed by the old guard throughout the year since us kids turned out noses up at it. Such fun memories. I have never heard of this bread anywhere else. Now that I am the old guard in the family, I suppose I should try making it (the family recipe is nearly identical) to see if my tastes have changed.
Not sure about the ratios in this recipe… my fruit released almost no liquid so I added liquid and then had to add an obscene amount of flour to get this to come together at all. I don’t have high hopes.
Thank you for this recipe! I spent a summer in Rothenburg ob der Tauber ages ago, where I fell in love with this bread. I’d stop and buy some from the little bakery on the central square and eat it all week. NO ONE, until now, has had any idea what I was talking about when I tried to find a recipe. This sounds identical, and the history you provide has me feeling hopeful. Can’t wait to try it!!! Vielen Dank!!!
Do you recommend using a pizza stone to bake the bread?
Hi Linda, I don’t use one but you can certainly can.