Authentic Aebleskiver
This post may contain affiliate links. See my disclosure policy.
A traditional Aebleskiver recipe (aka ebelskivers) producing that delightfully crispy exterior and light and fluffy interior that make these Danish pancake balls so beloved! Made the popular Danish way with cardamom and lemon zest. Enjoy them year-round for breakfast, tea time, on special occasions, or as a welcome treat any time of the day!
For another fabulous and traditional Danish dessert be sure to try my Risalamande (Danish rice pudding)!
Aebleskiver in one form or another are popular throughout Scandinavia and where I grew up in Germany. In the Netherlands they’re known as Poffertjes. In Norway they’re called Munker. In Northern Germany they’re known as Pförtchen or Förtchen. And where I’m from in Southern Germany, in Swabia, we have something similar called Nonnenfürzle, translated literally as “nun’s little farts” because they’re so light and delicate! A funny parallel is that the Munker in Norway were also called munkboller, “monk’s balls” :) All of these variations use yeast as the leavening agent while aebleskiver use baking soda and/or powder. Earlier aeblesiver recipes used yeast as well but somewhere along the line the Danish shifted away from yeast and today the vast majority of Danes make them without.
What are Aebleskiver?
Commonly mispronounced “ay-bleh-skee-ver”, the correct pronunciation is more like “ay-bl–skew-er“, without the “bleh” or the “v” sound. Aebleskiver is plural, aebleskive is singular, and outside of Denmark they’re sometimes spelled ebelskivers. Aebleskiver are sphere-shaped pastry balls with a texture simliar to pancakes but fluffier and airier. Hence they’re also known as Danish pancake balls.
The Danish name Æbleskiver translates to “apple slices”, an unusual name but hearkens back to when pieces of apple were traditionally added to the batter, usually a small piece in the center. Much like the Apfelküchle (fried apple rings) I grew up with in Germany, the concept is the same and involves using up stored apples that are past their prime and have become soft. Though some Danes still include apple in their aebleskiver, the vast majority do not. In fact, Danish aebleskiver virtually never include fillings of any kind. Instead, in Denmark they are commonly flavored with ground cardamom and lemon zest.
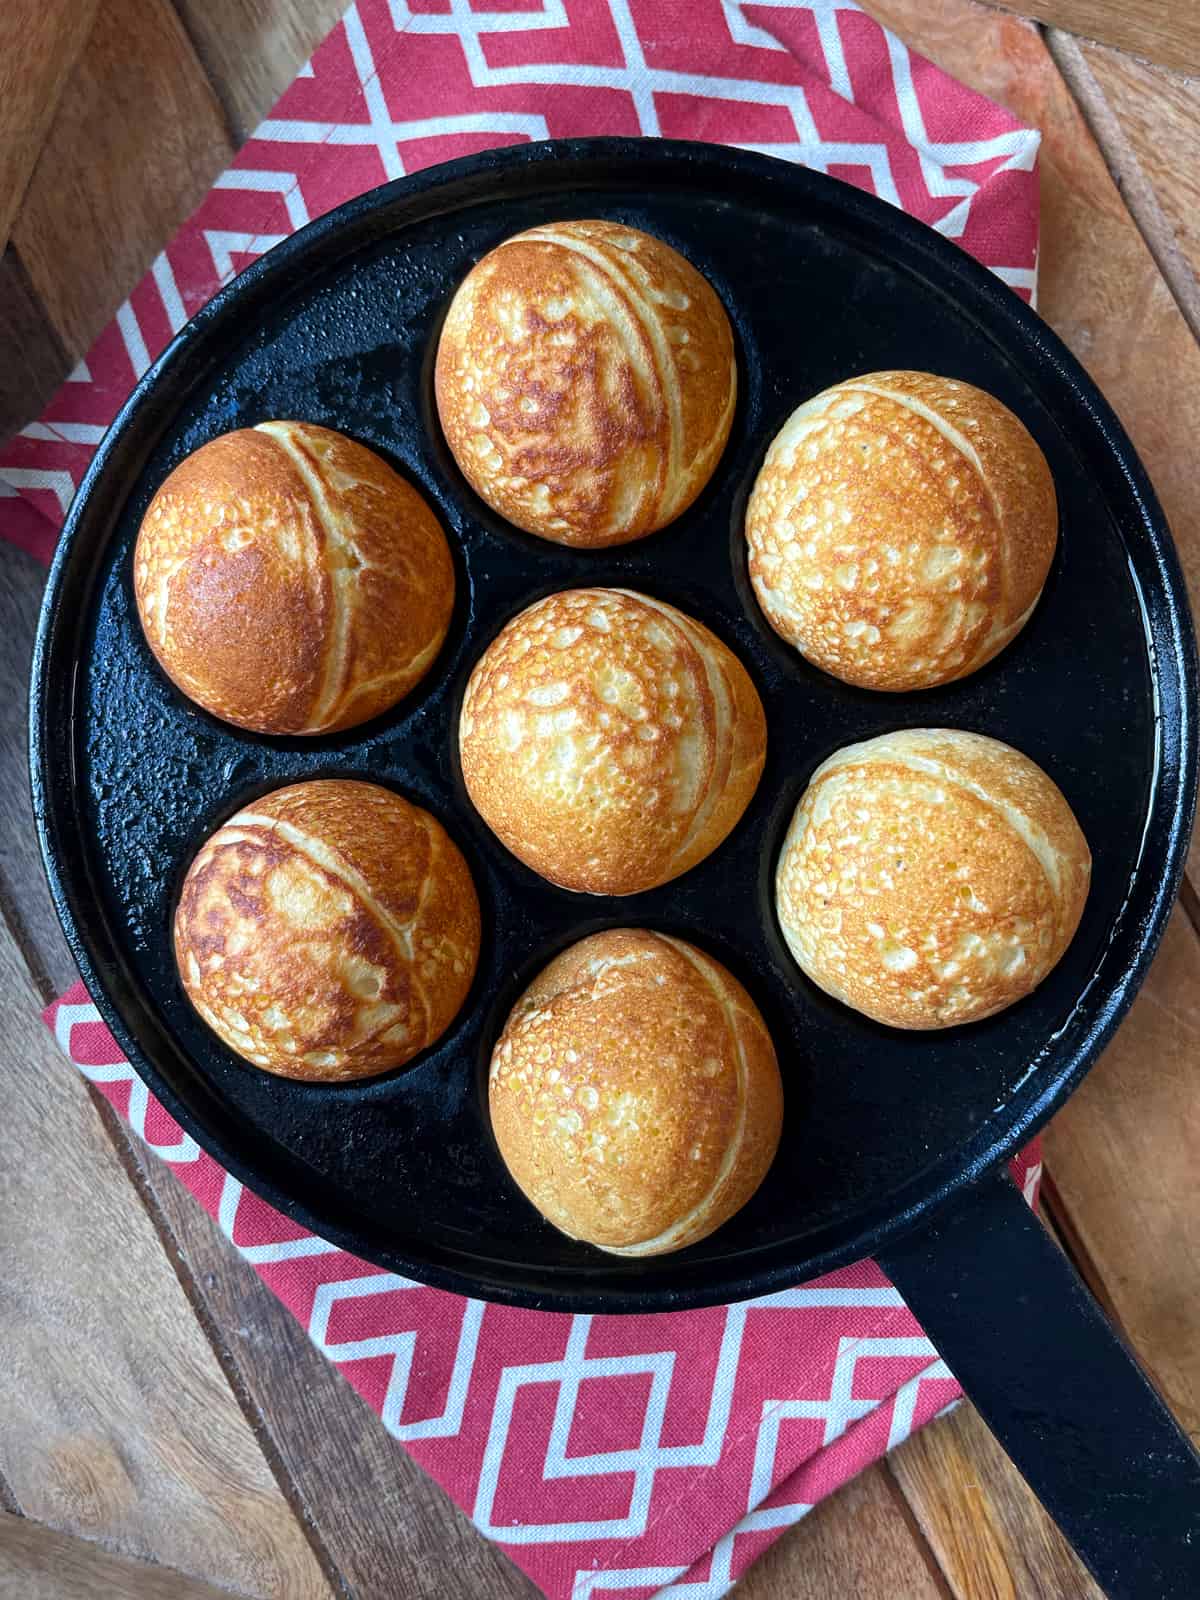
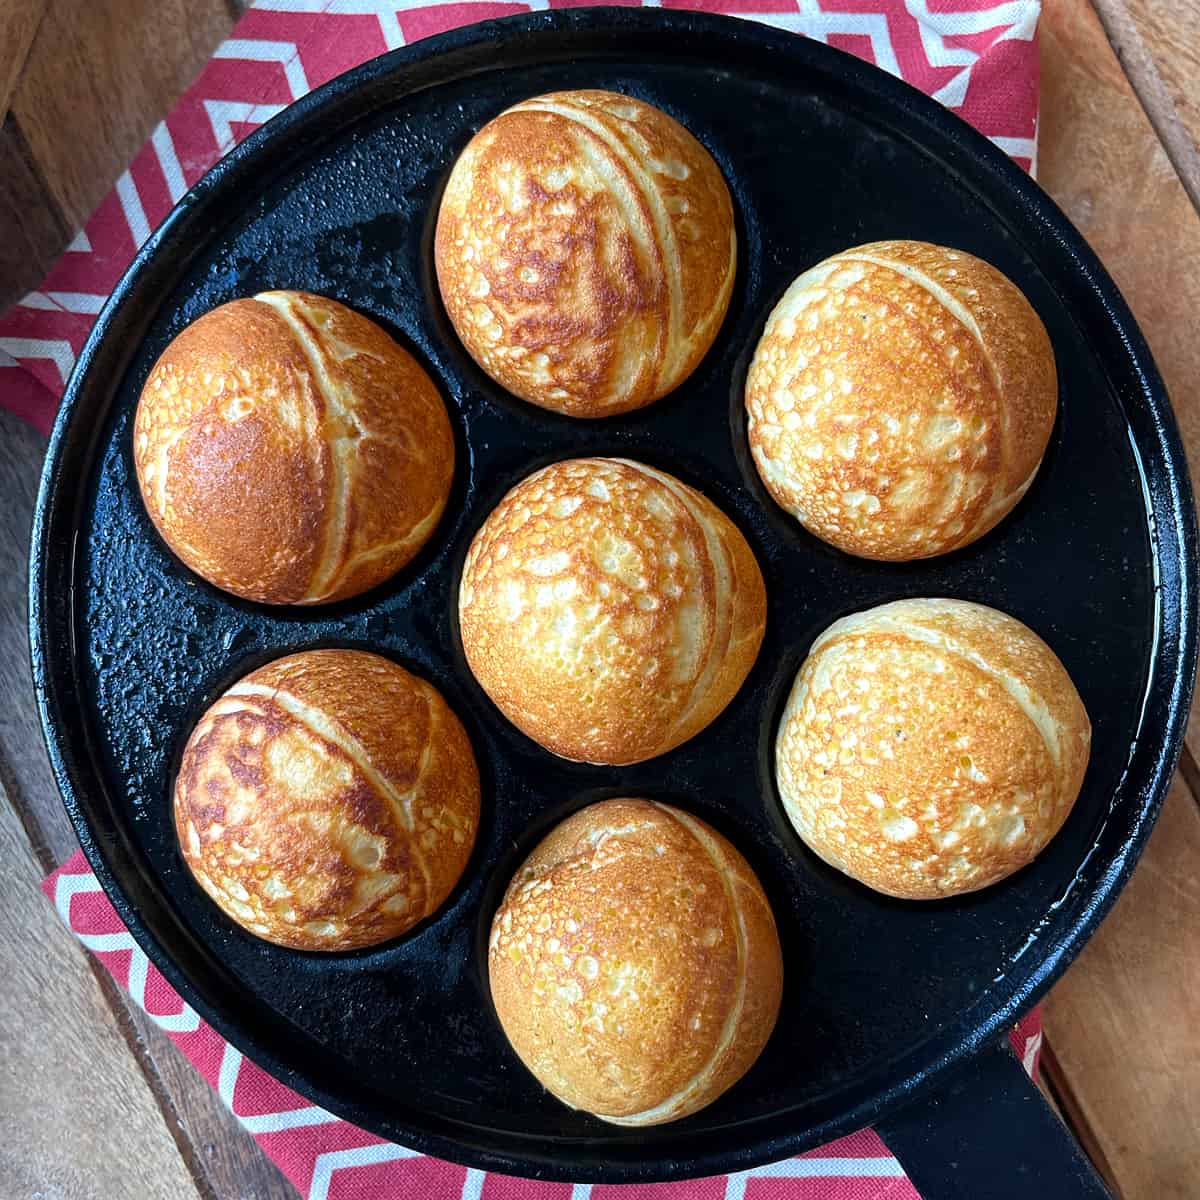
The process of making aebleskiver requires a special aebleskiver pan, traditionally made of cast iron, that has several deep speherical indentations in it, roughly 2 inches in diameter. The batter is poured into these indentations and a knitting needle, the traditional tool of choice, is used to turn the batter as it cooks to form balls. The pastry balls are served hot dipped in jam and powdered sugar. Aebleskiver is a traditional and beloved down-home treat that you won’t typically find in restaurants in Denmark, but they’re served up by street vendors, enjoyed at birthdays and other celebrations, and are made in practically every home as an important part of Danish culture. They’re enjoyed year-round but are particularly popular during the Christmas season and are served as breakfast, dessert, or a tea-time treat. And many Danes will insist on a mug of hot Glögg (Danish mulled wine) to accompany them.
Where Did They Originate?
The exact origins of æbleskiver are unknown, but it’s believed they originated during the Middle Ages. There are a few theories, the most popular of which is that they were created by the Vikings returning from battle with dented shields: they would place these battered shields over the fire and pour the batter into the indentations. Unfortunately as fun as that theory is, it’s nonsense because the vikings didn’t use metal shields, their shields were all made of wood. Their exact origin remains a mystery and whether these fried pastry balls should be attributed to Denmark (aebleskiver), Norway (munker) , the Netherlands (poffertjes), or Germany (pförtchen) is anyone’s guess, but one thing is certain: they’re delicious!
Aebleskiver have also been embraced in North America where they are served at numerous Danish heritage events. When we lived in Seattle while my husband was going to medical school we attended the Nordic festival at the National Nordic Museum in Ballard, an event that has been held for going on 50 years. My husband’s Danish great aunt Elsie was a regular volunteer there through her late 80’s. Though I had been to Denmark previously, it was here that I had my first aebleskiver.
How to Make Aebleskiver
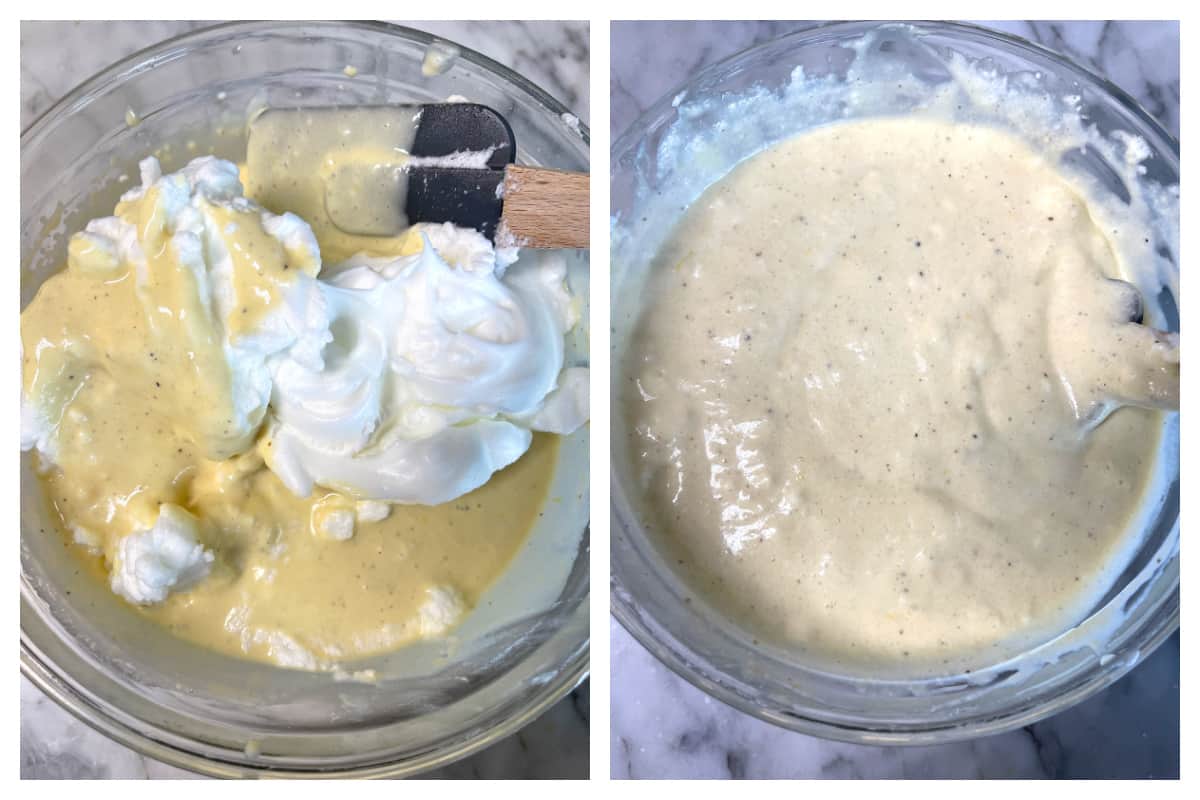
Making aebleskiver is simple but the technique of turning them takes a little practice. But even then it isn’t difficult to conquer. When the conditions are right the batter will turn with ease. The batter is made by whisking together the flour, sugar, baking soda, egg yolks, buttermilk, cardamom and lemon zest, and then stirring in the melted butter. Lastly, stiffly beaten egg whites are folded in. This batter is then poured into the wells of a special aebleskiver pan where they cook and are periodically turned to form into balls.
Baking Soda or Baking Powder – Which One to Use?
Some recipes call for baking soda, others for baking powder, and some call for both. Baking soda requires an acid to “activate” it. The buttermilk in the recipe accomplishes that and through the chemical change that takes place neutralizes the flavor of the baking soda (i.e., no bitter taste). Baking powder does not require an acid to activate it and so it is typically used when there is no acid present. So including both baking soda and baking powder in this recipe is unnecessary and redundant.
Like most original Danish recipes, I use and recommend baking soda for a couple of reasons:
- As a leavener, baking soda is 3-4 times more powerful than baking powder, giving your aebleskiver a faster and fuller rise during the cooking process.
- Baking soda helps baked goods brown better, giving your ebelskivers a nicely browned, delicately crispy exterior.

Pro Tips for Making Aebleskiver
Once you get the hang of it, making aebleskiver is a breeze and so much fun! But there are some important keys to remember; the conditions need to be right and there is a technique involved. I’ll go into more detail in the pictured tutorial below. To summarize:
- Some recipes beat the whole egg into the batter while others separate the eggs and beat the whites. For that crispy exterior and light and fluffy interior texture, I recommend beating the egg whites separately until they’re stiff and then folding them into the batter.
- The aebleskiver pan must be non-stick or the batter will stick to it no matter what you do. Cast iron is traditional, and it’s what I use, but make sure that the pan has been seasoned. For information on seasoning or re-seasoning your cast iron pan, there are a ton of how-to videos on YouTube.
- Make sure to pre-heat the pan before adding the batter. Flick a few drops of water in the pan and if they immediately sputter your pan is ready.
- Make sure the pan isn’t too hot or it will cook the outside of the aebleskiver too quickly, leaving the inside raw. You generally want to keep the pan at a steady medium-low to medium heat but this will require some experimenting and adjusting as you learn how your particular stovetop and cookware work in tandem.
- Be sure to add butter or oil to the moulds (butter produces a better flavor). This will give your ebelskivers that nicely browned, crispy exterior.
- Add the batter almost to the very top. This will help ensure that there is enough batter to fill the interior of the balls as you’re turning them so that you don’t end up with a hollow interior.
- When you turn the ebelskivers, they should slide very easily. If they don’t slide easily they’re either not yet cooked enough, the pan isn’t seasoned enough (if you’re using cast iron), or there isn’t enough butter/oil in it.
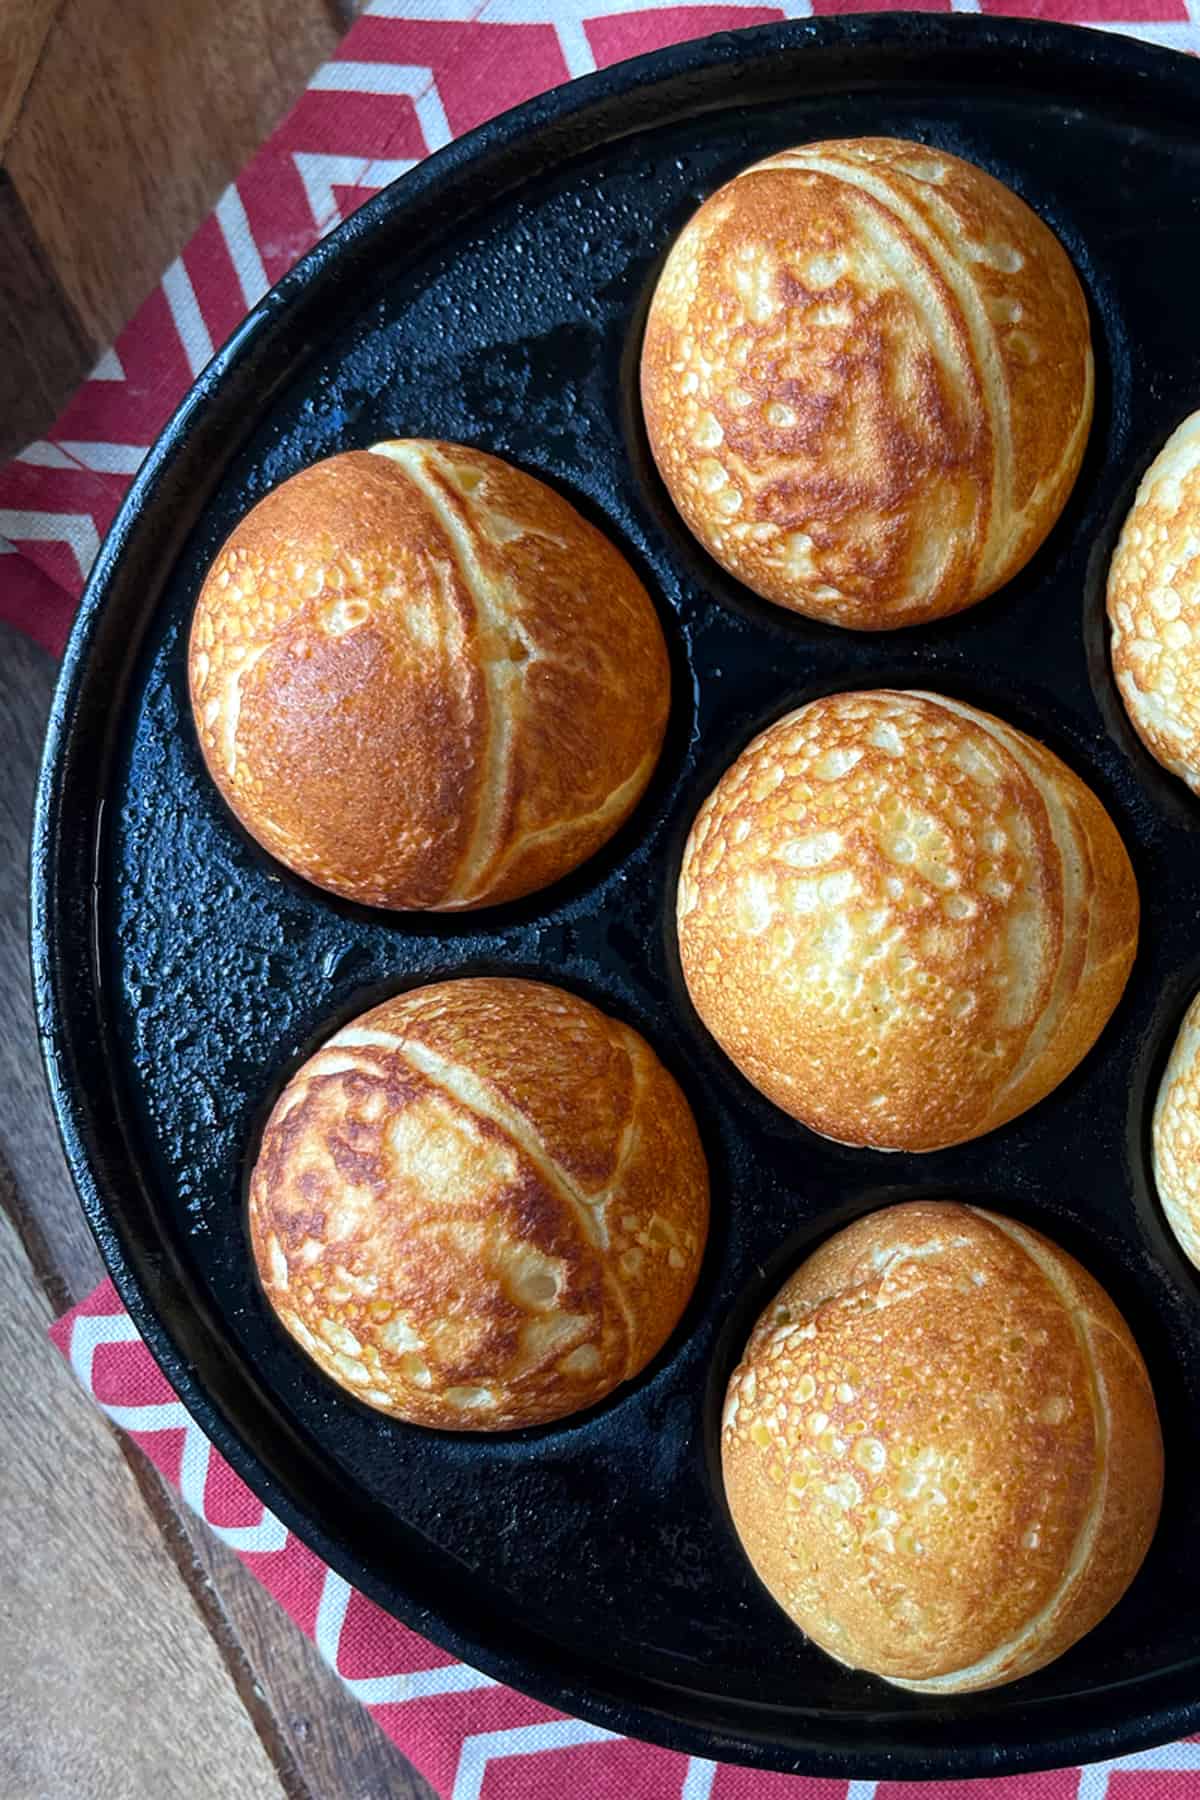
- To get those perfectly round balls you need to turn each aebleskive at least 3, preferably 4 times.
- To prevent your aebleskiver from having unsealed/open portions on the very bottom because there wasn’t enough batter to go around, a common trick Danes implement is to pipe or spoon in some extra batter just before the last turn. This will ensure that the very bottom of the ball is sealed shut.
How to Make Perfectly Round Ebelskivers
To get those perfectly round balls you have turn, turn, turn and turn (and can even play the song by The Byrds while you do so :) At least 3 turns but preferably 4. That will ensure you get those perfect little spheres (more details in the pictured tutorial below). However, you may still have occasions where you get something like in the picture below, where it’s perfectly round but not fully closed up on the bottom. There is a solution to that, a trick that I’ve seen several Danish cooks employ: use a piping bag or small spoon to add a little extra batter to the center of the aebleskiver just before the final turn when you rotate them upside down from where they started. This will cause the fluid batter to move to the very bottom, sealing up that aebleskiver as well as bulking up the center so that it isn’t hollow.
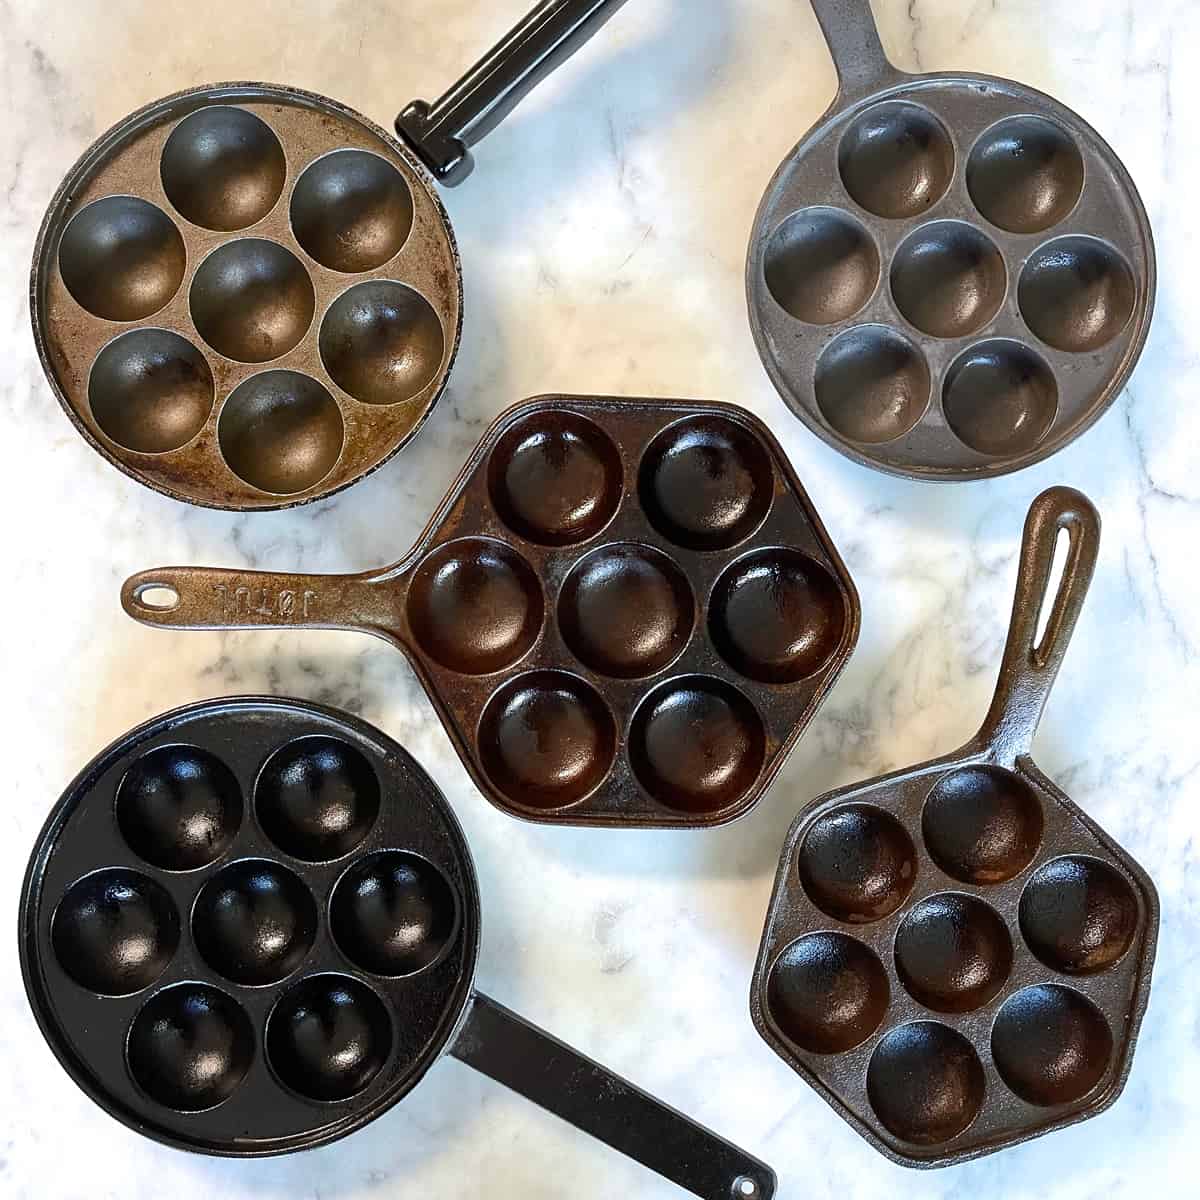
How to Choose an Aebleskiver Pan
There are a variety of aebleskiver pans on the market, some made of cast iron, some from aluminum, and others are made from carbon steel. Some are made with non-stick coatings to make things easier while others, i.e. cast iron, come seasoned or need to be seasoned to form a natural non-stick coating. Traditional aebleskiver pans are cast iron and that is what I use and recommend. They have superior heat retention properties so there is no “ebb and flow” and dealing with varying temperatures as you’re making one batch after the other. I also use cast iron because I avoid anything “non-stick” like the plague. Cast iron aeblesiver pans are made and available for both gas stoves and electric stoves but these different types aren’t necessary; I have both a gas stove and an induction stove and I use the same cast iron pan on both of them. A great place to find cast iron aeblekiver pans is on eBay. And for aebleskiver pans on Amazon that are 1) cast iron, 2) don’t have non-stick coating, and 3) are a reputable brand, this Norpro deluxe pan and this Norpro pan are nice options (the second one looks slightly shallower so may not produce as round of balls though I’m not certain of that).
Here are a few of mine that I’ve collected over the years in Northern Germany and since moving to the U.S.. I also have a nearly 100 year old Griswold cast iron pan not pictured that I’m in the middle of restoring. Yes, I have a minor obsession. But I figure at least two of them will go to my children one day, so I feel fully justified :)
Aebleskiver Recipe
Let’s get started!
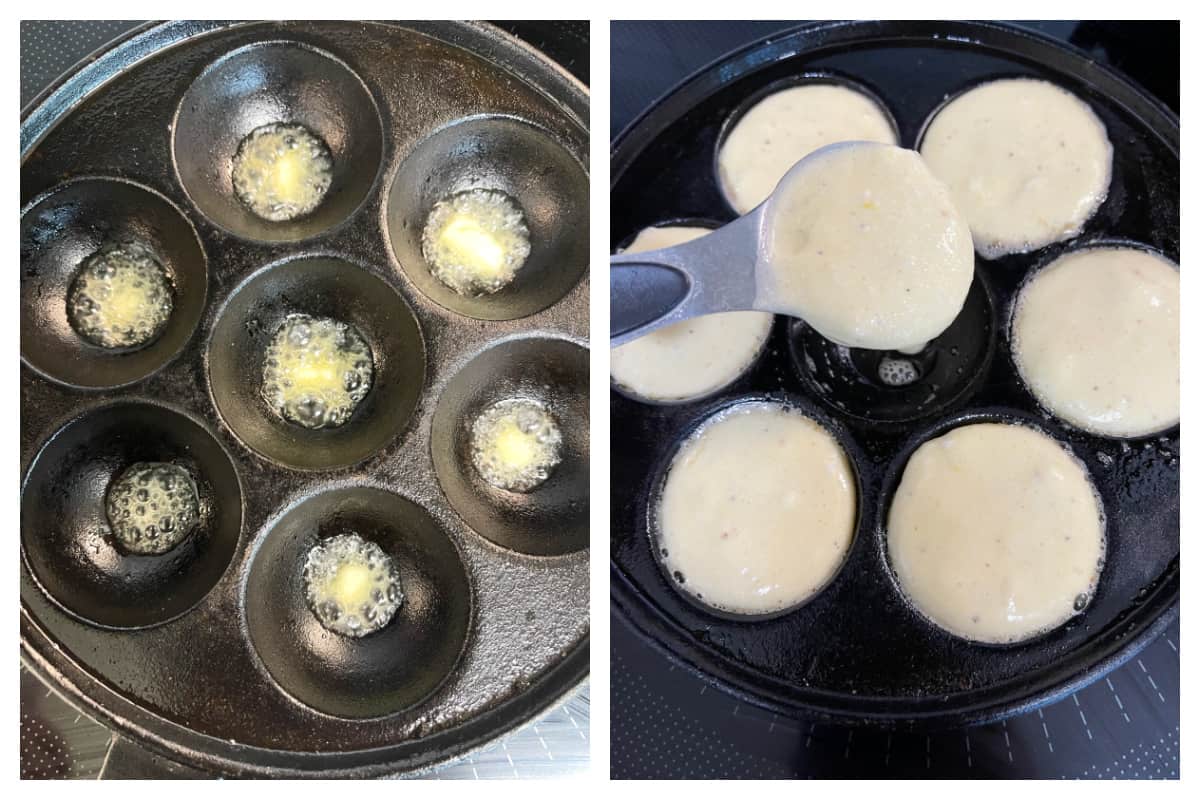
Start heating your aebleskiver pan over medium-low to medium heat.
In a large mixing bowl, stir together the flour, sugar, baking soda, ground cardamom and salt. Add the egg yolks, lemon zest, vanilla, and buttermilk and mix until smooth.
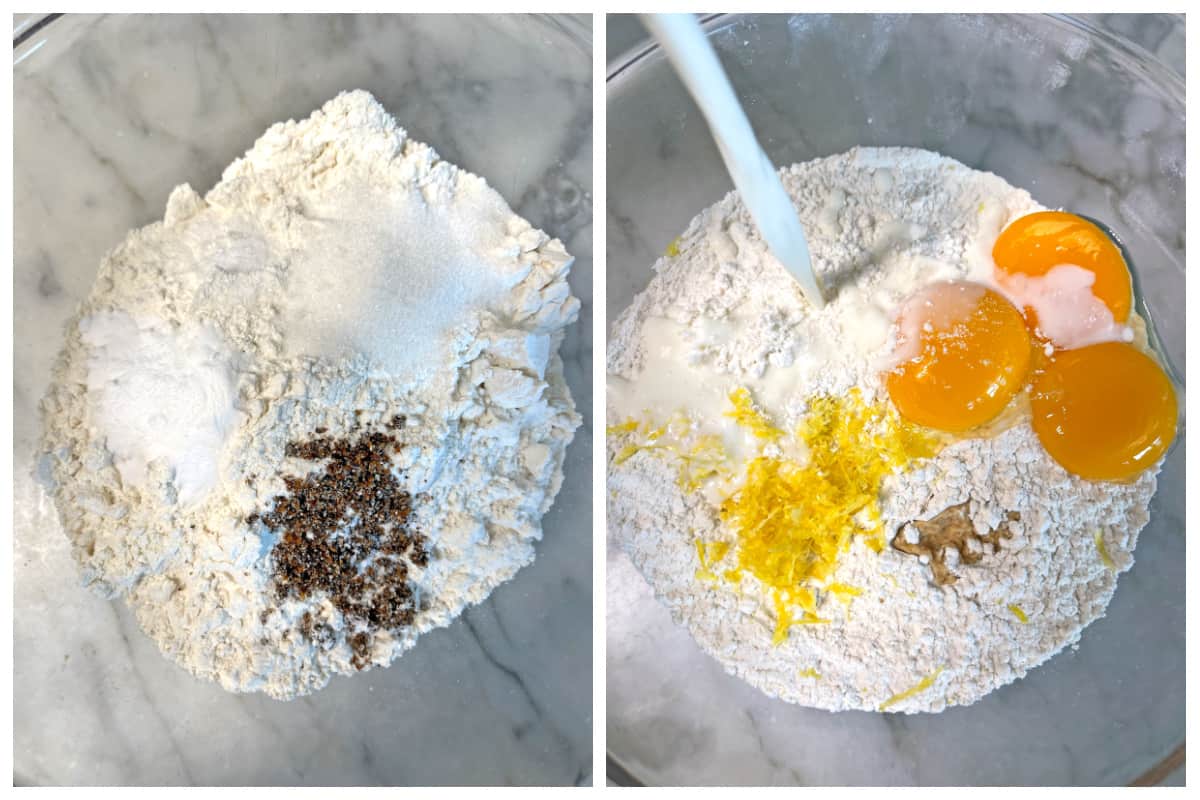
Add the melted butter (not super hot) and mix until combined.
In a separate bowl, beat the egg whites until stiff peaks form.
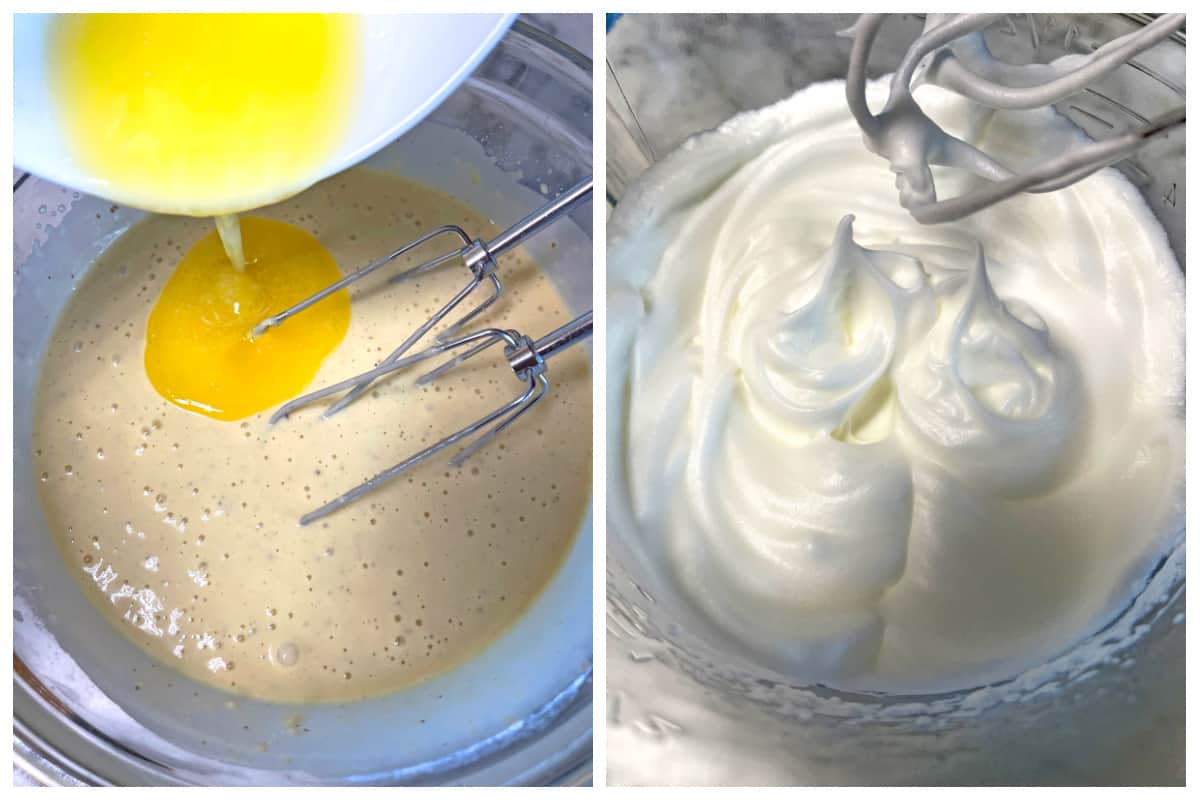
Fold the egg whites into the batter.
Gently break up any large lumps but it’s fine if a few small ones remain.
Place a little butter into each of the wells of the pan. Butter produces the best flavor but you can use oil instead.
Once hot (medium-low to medium heat) pour the batter into each well, filling them nearly full. Depending on your pan, that’s around two tablespoons of batter.
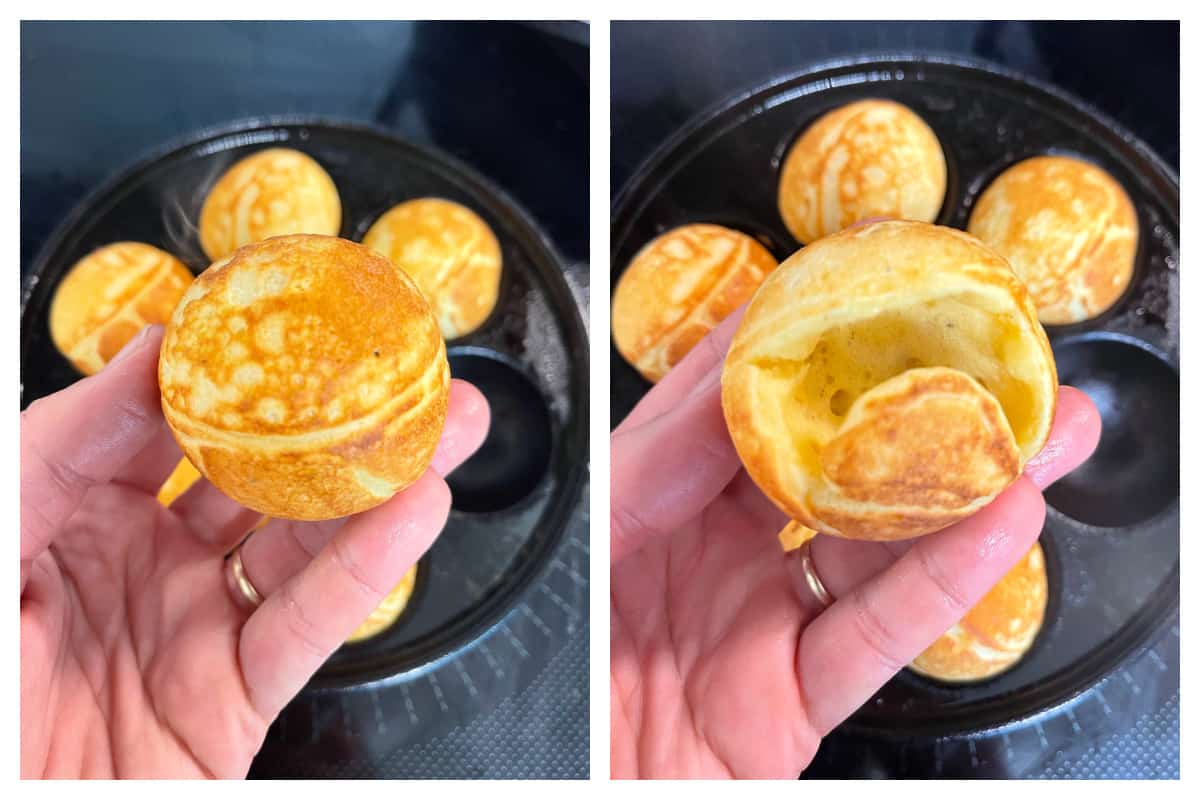
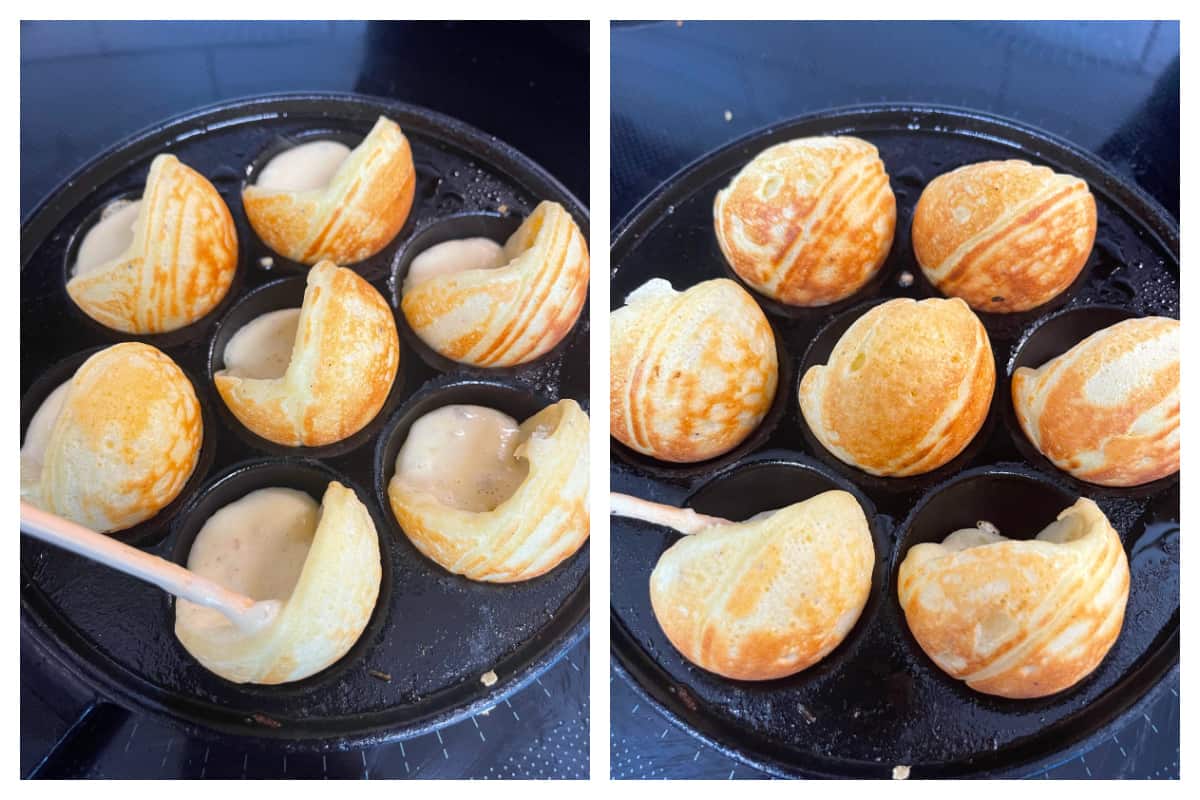
Let the batter cook until it begins to bubble around the edges. Use a wooden or metal skewer (the traditional tool is a knitting needle) to push against the side of each well and gently turn each aebleskive 90 degrees. As you do this the batter will spill into the bottom of the well.
Note: When you attempt to turn the aebleskiver, it should slide very easily. If it doesn’t slide easily it’s either not yet cooked enough, the pan isn’t seasoned enough (if you’re using a cast iron pan), or there isn’t enough grease in it. Additionally, there’s often something about the first round that never goes quite as well as all the subsequent rounds. Once you have that initial “film” built up from the first round, it all goes smoothly from there.
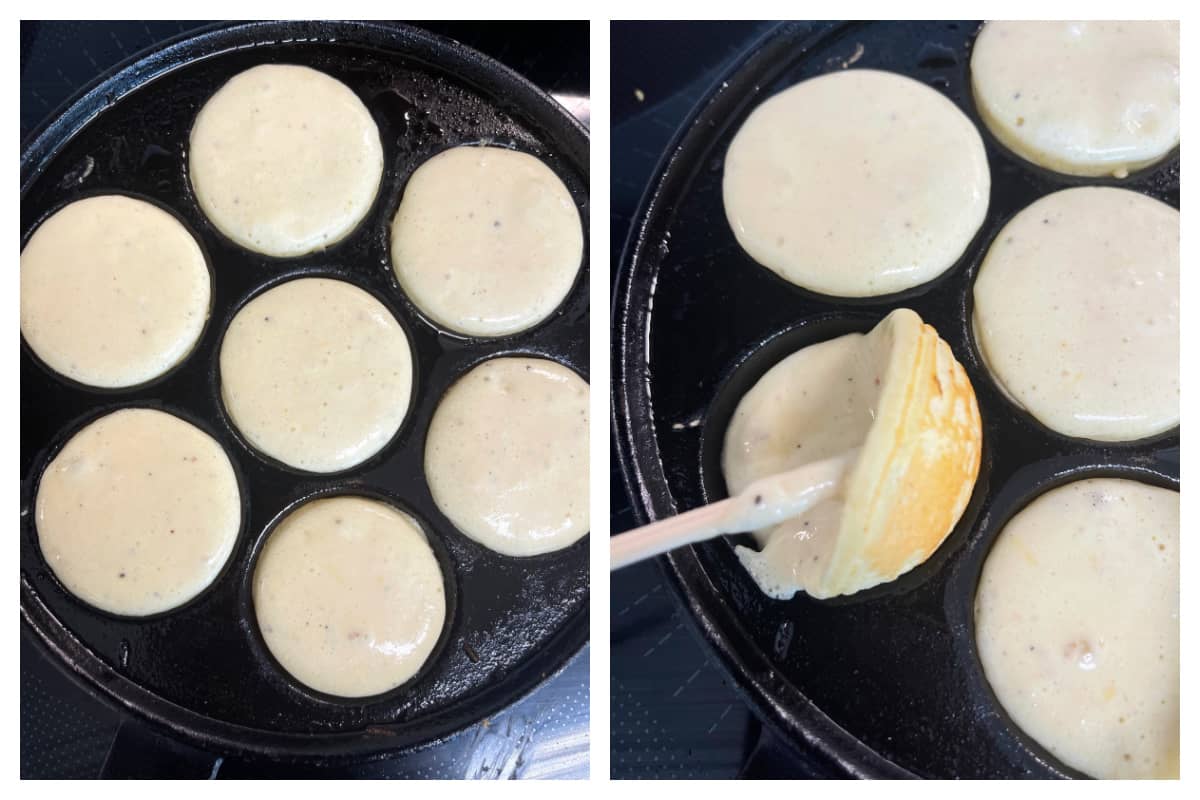
Once the batter begins to bubble around the edges, give it another 90 degree turn (I place the skewer at the “corner” of the aebleskiver at the level of the pan and turn it so that corner is now at the top).
Repeat this step again, giving the aebleksiver another turn.
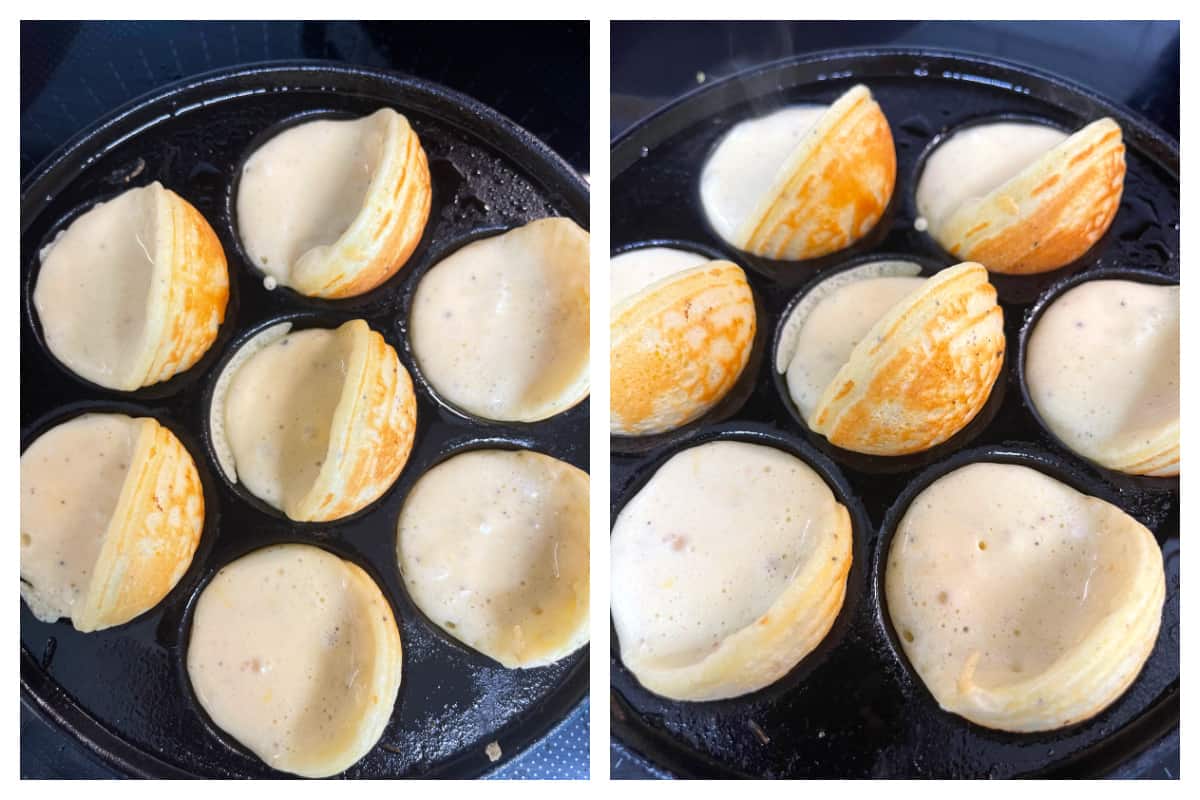
At this point you can then finish the aebleskiver with one final turn or you can first “top off” the aebleskiver by piping or spooning a little extra batter into the center before making the final turn. This will ensure that the very bottom of the ball is sealed.
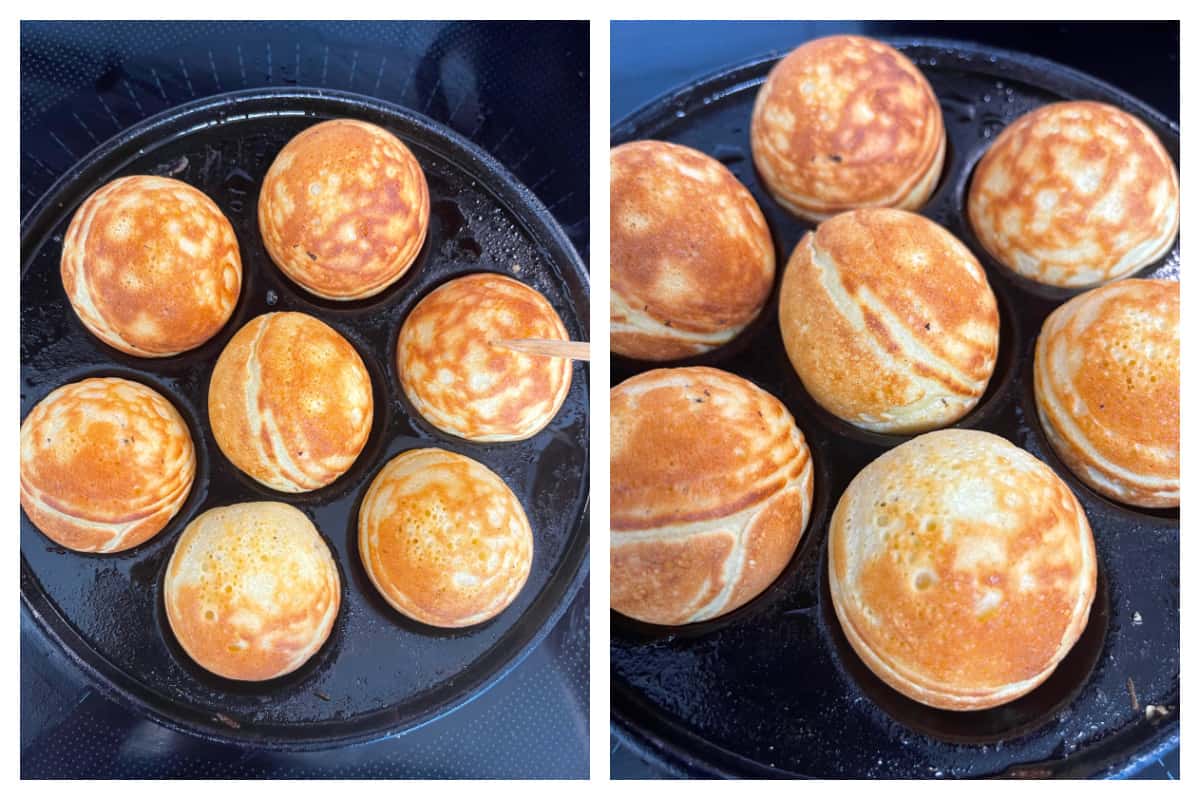
Give the aebleskiver the final turn to complete the full sphere.
If your aebleskiver are not quite as browned as you like, you can continue to rotate them until they’re browned to your liking.
Round #2
And just so you have a very clear visual of the process, let’s go through one more round together.
Left pic: Turn 1. Right pic: Turn 2.
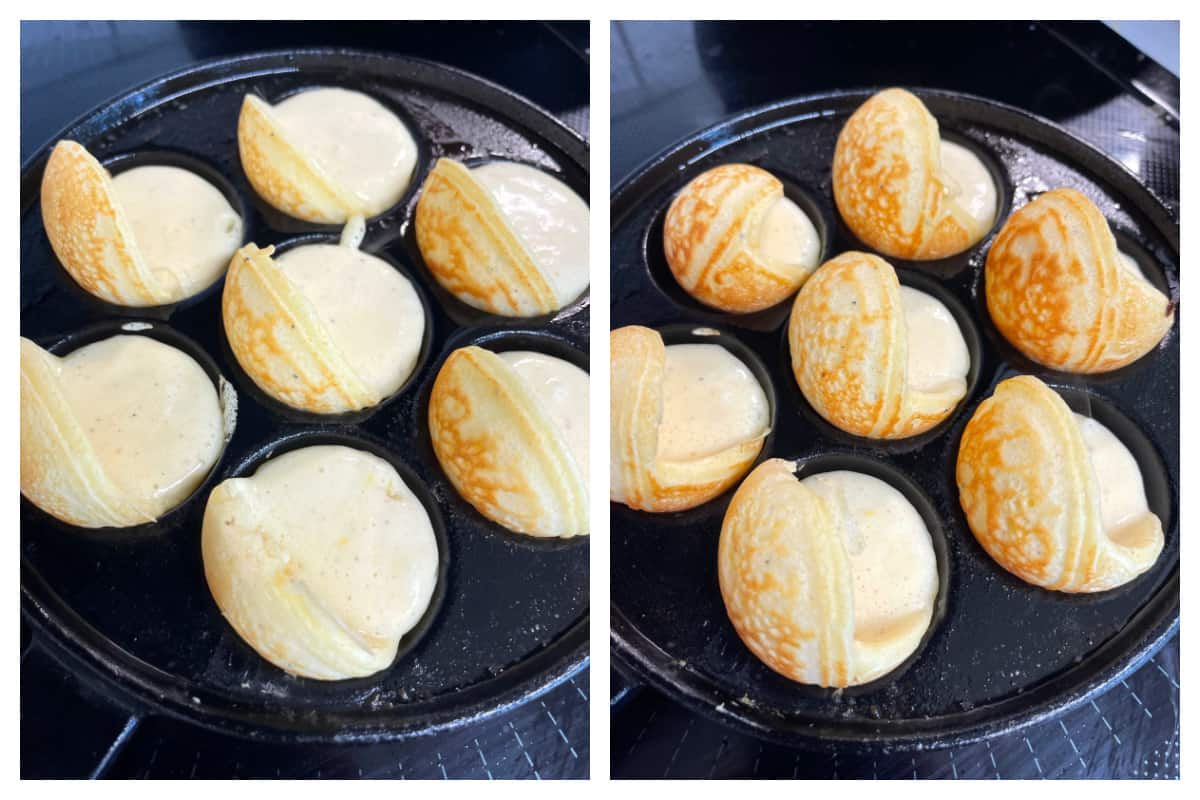
Left pic: Turn 2. Right pic: Turn 3.
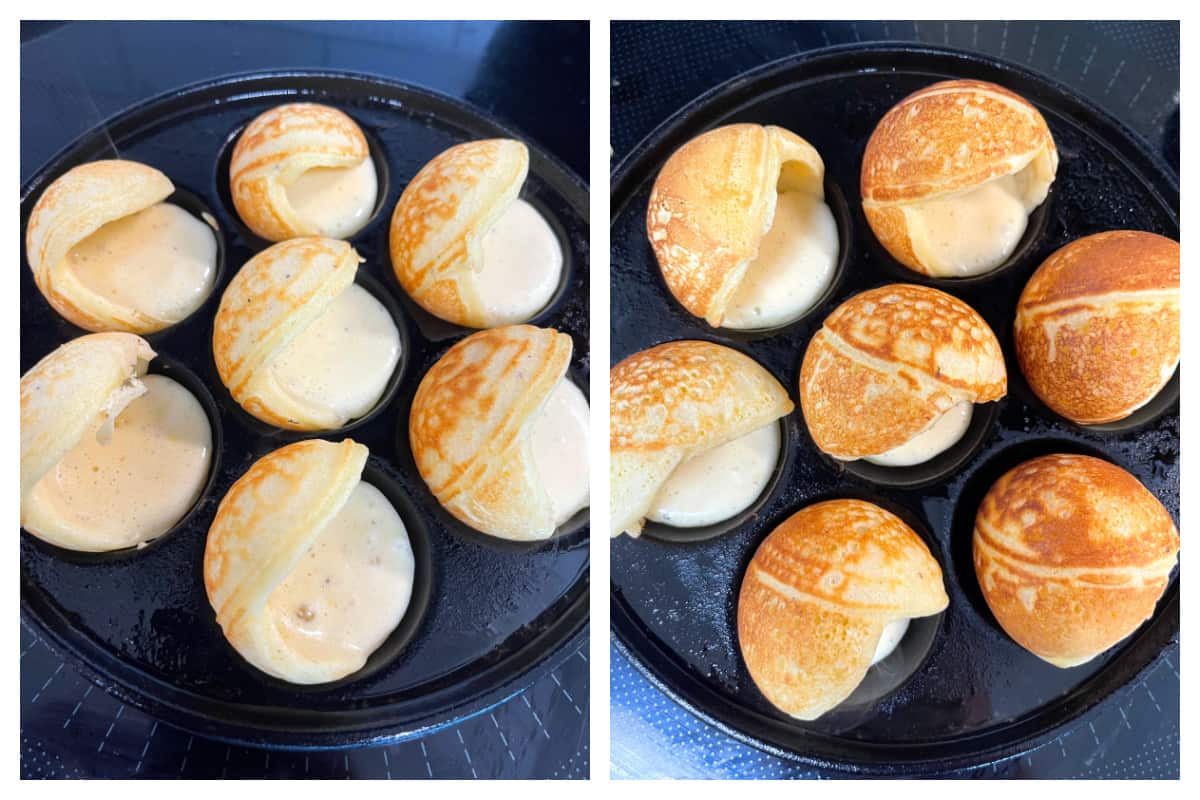
Final turn.
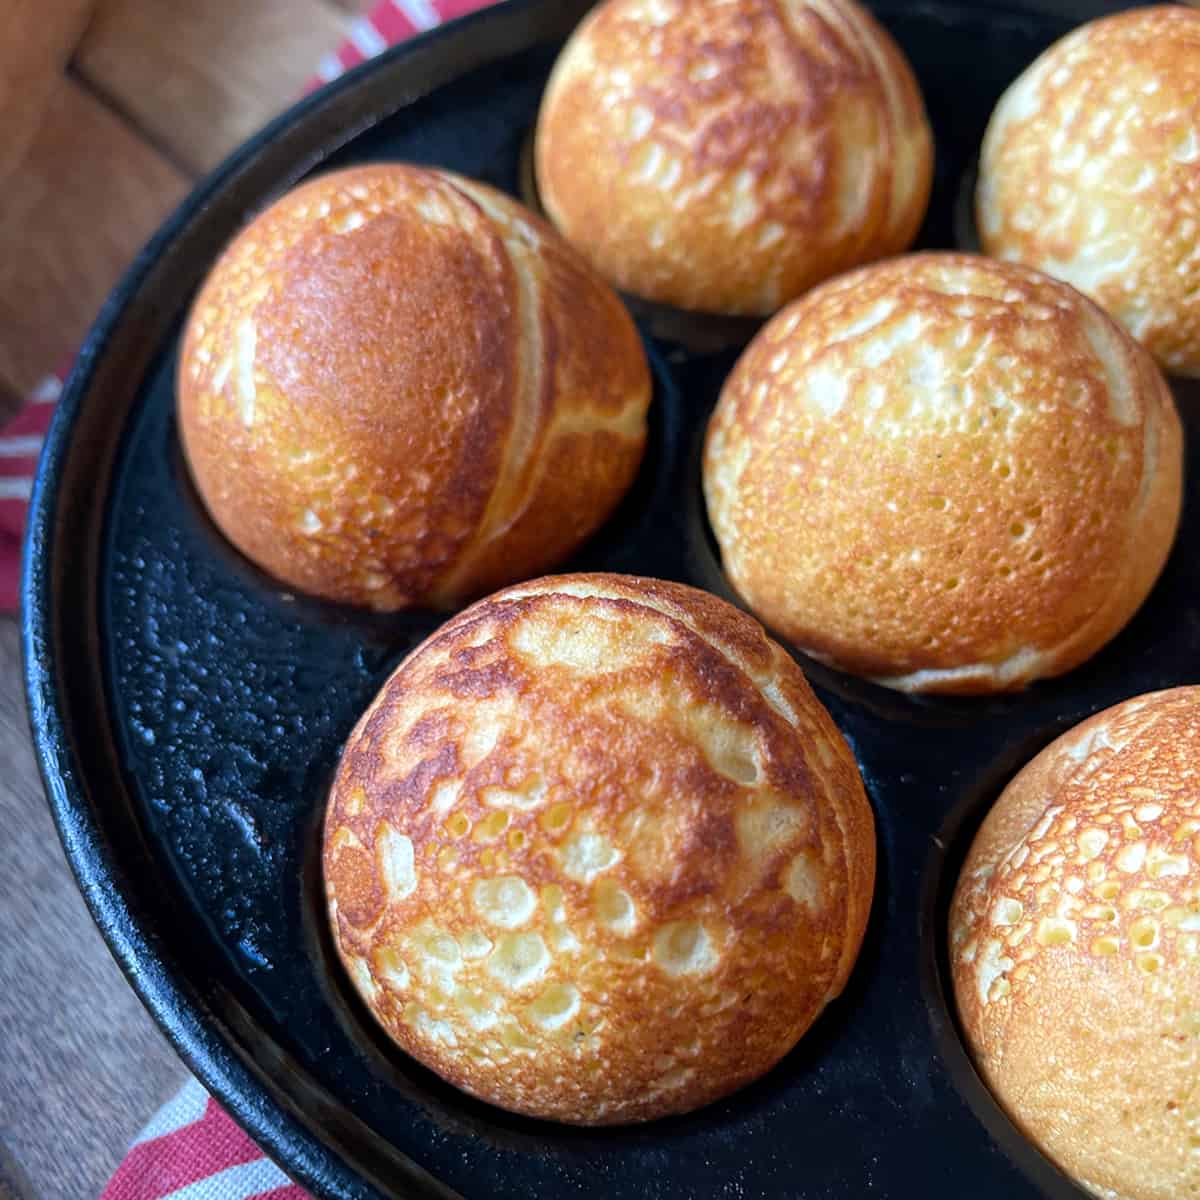
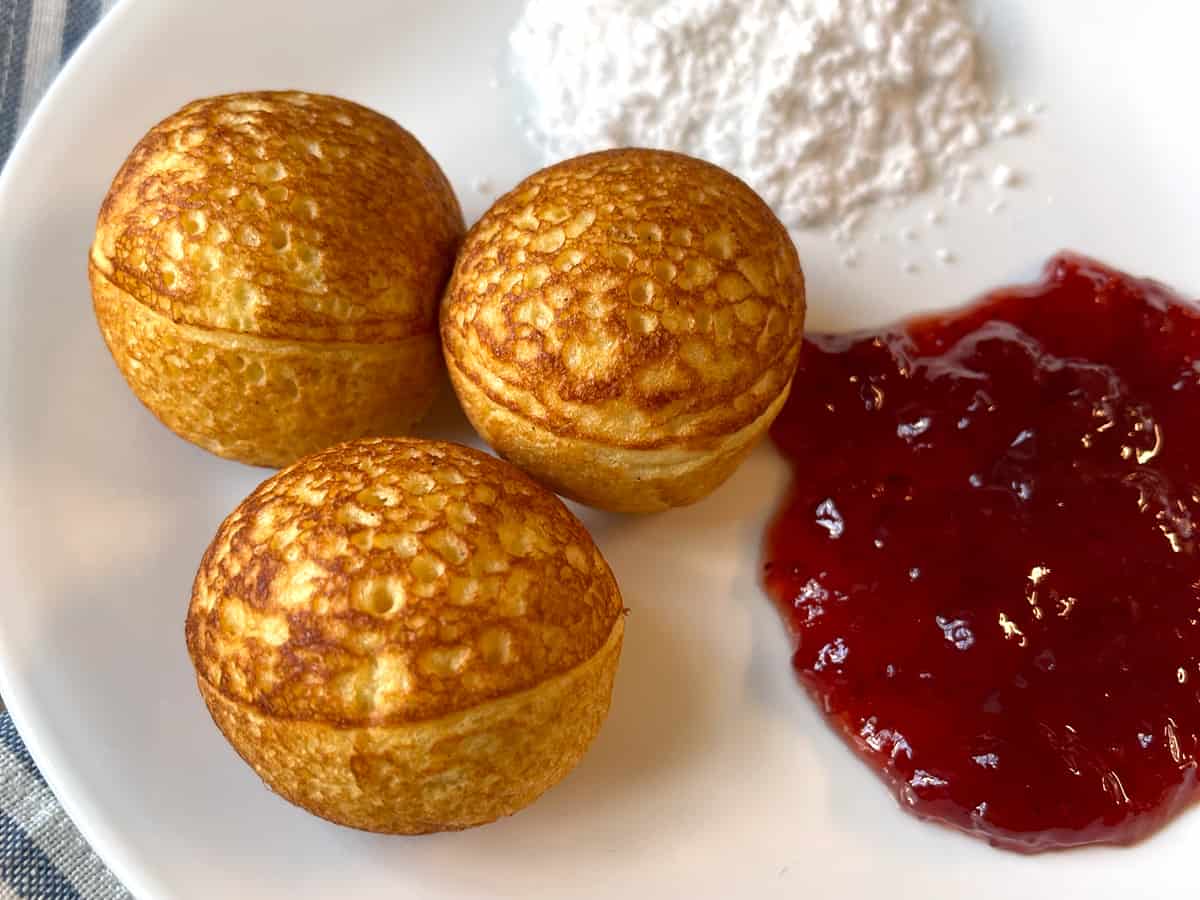
Perfectly round aebleskiver, ready to serve!

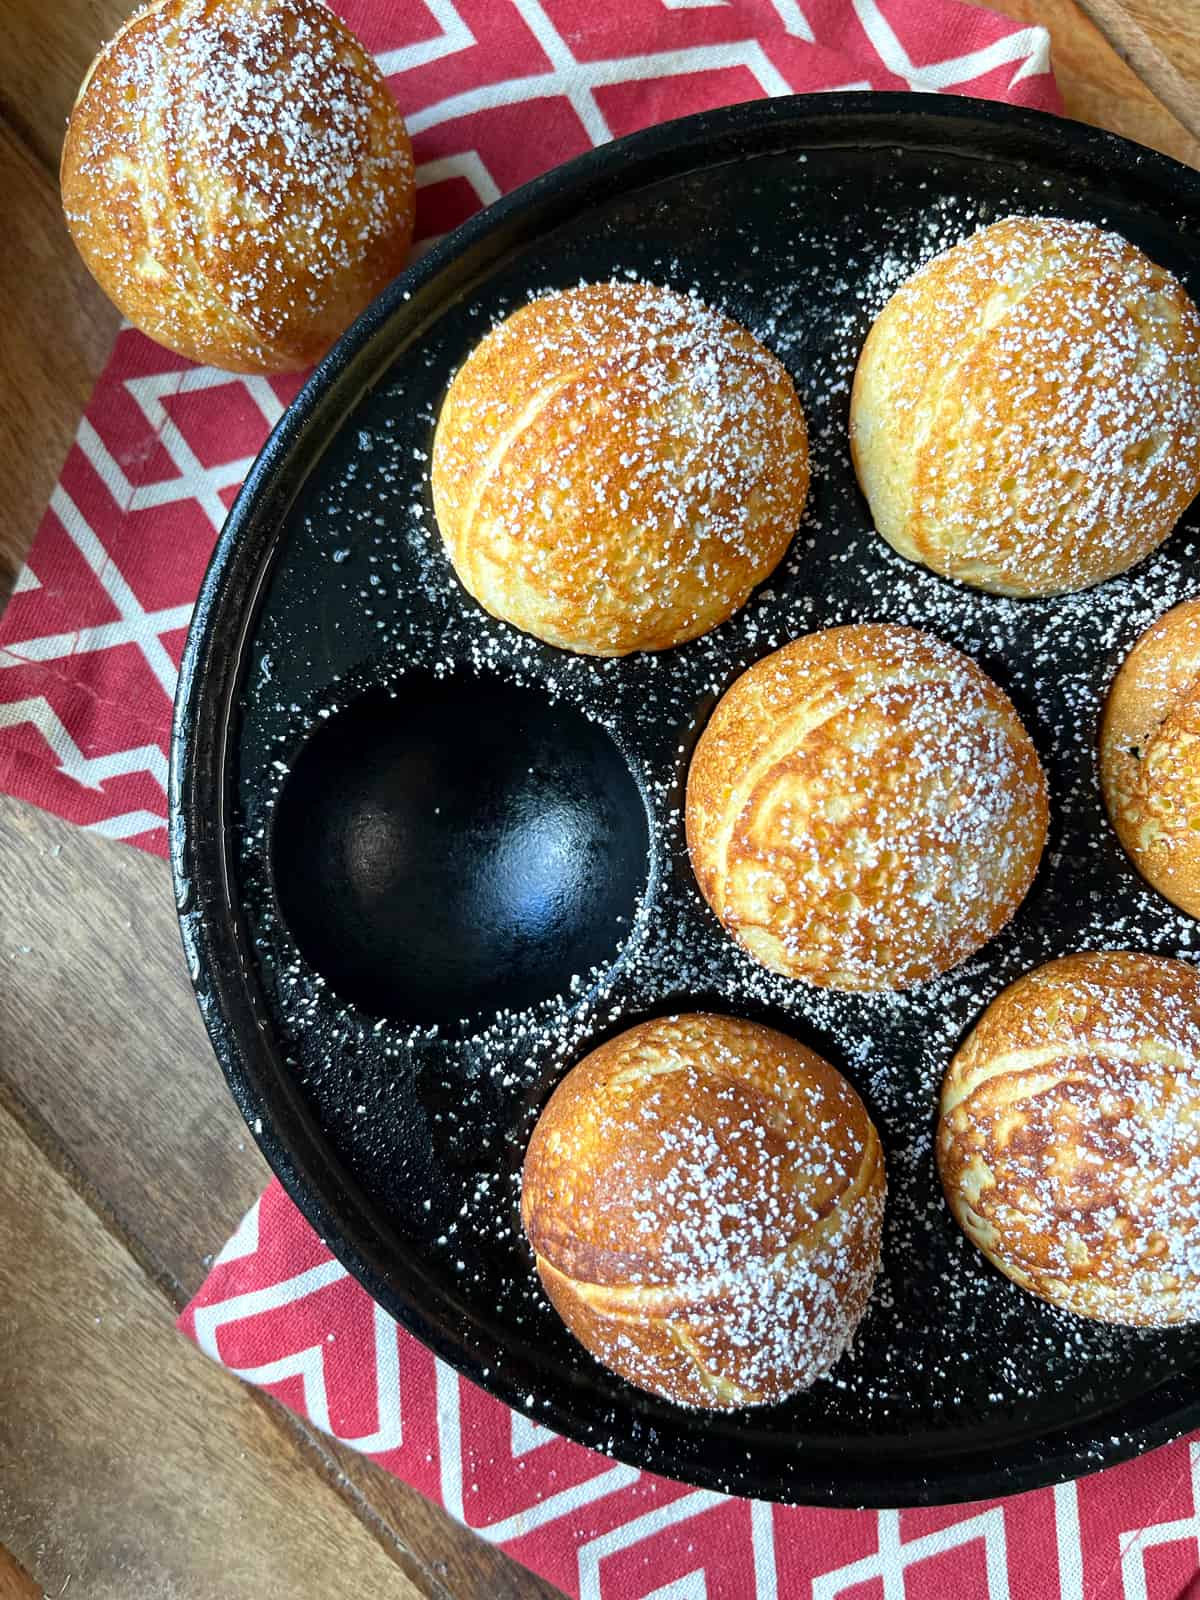
Serve the aebleskiver immediately while they’re hot. Place them in a bowl at the table, letting guests help themselves. To serve them like the Danish, each guest should have a small mound of powdered sugar and jam on their plates with more at the table for refills. The aebleskiver are eaten with your fingers, first dipped in the jam followed by the powdered sugar (the jam helps it to adhere).
How to Serve Aebleskiver Like a Dane
Aebleskiver themselves are not sweet, they derive their sweetness from being dipped in jam and sugar. They are not served with utensils, they are eaten with your fingers. Pile the hot aebleskiver in a bowl or on a platter set in the middle of the table. Pass out individual plates and place a small pile of powdered sugar (some also include a pile of granulated sugar) and a scoop of fruit jam (often more than one variety) on each plate. Everyone helps themselves to the communal bowl of aebleskiver (commonly three on a plate at a time) and use their fingers to dip the aebelskiver first into some jam and then in the sugar (the jam helps the sugar to stick). Have extra sugar and jam on the table for guests to refill.
Common jams in Denmark include strawberry, raspberry, cherry, plum, and lingonberry. For some yummy homemade options try our Plum Jam, Blackberry Jam, Gooseberry Jam, Black Currant Jam, Red Currant Jelly, Plum Butter, Apple Butter, Strawberry Rhubarb Jam, and Blueberry Lemon Apricot Jam.
A Small Piece of Our Danish Family History
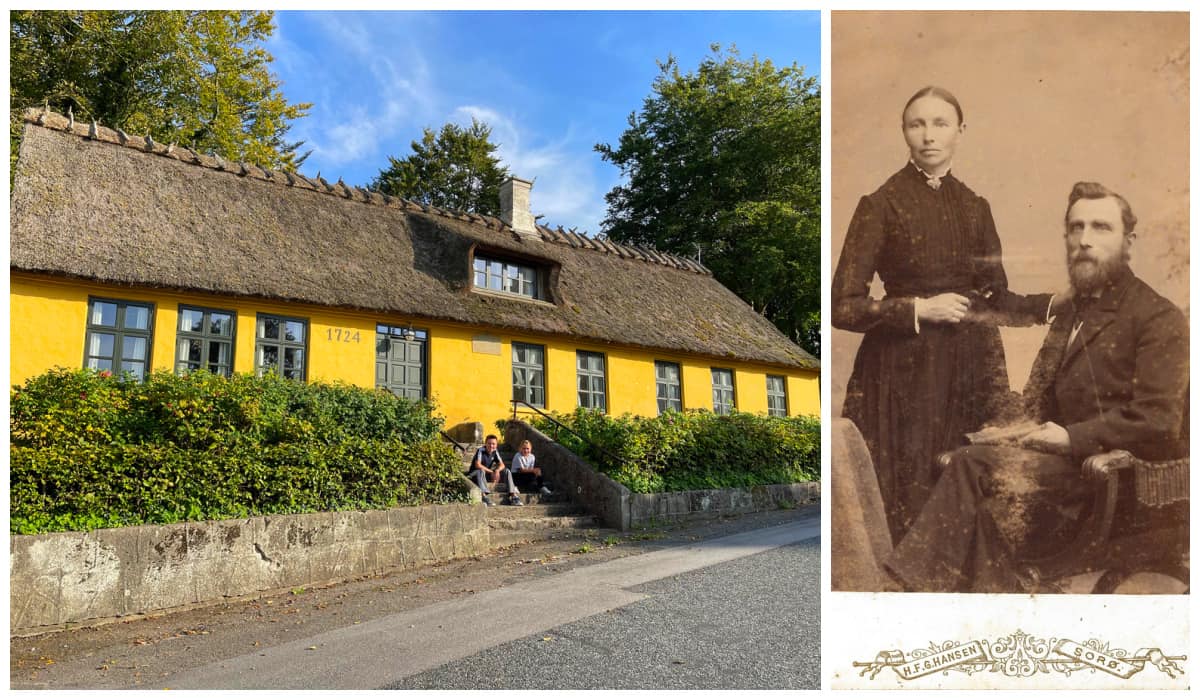
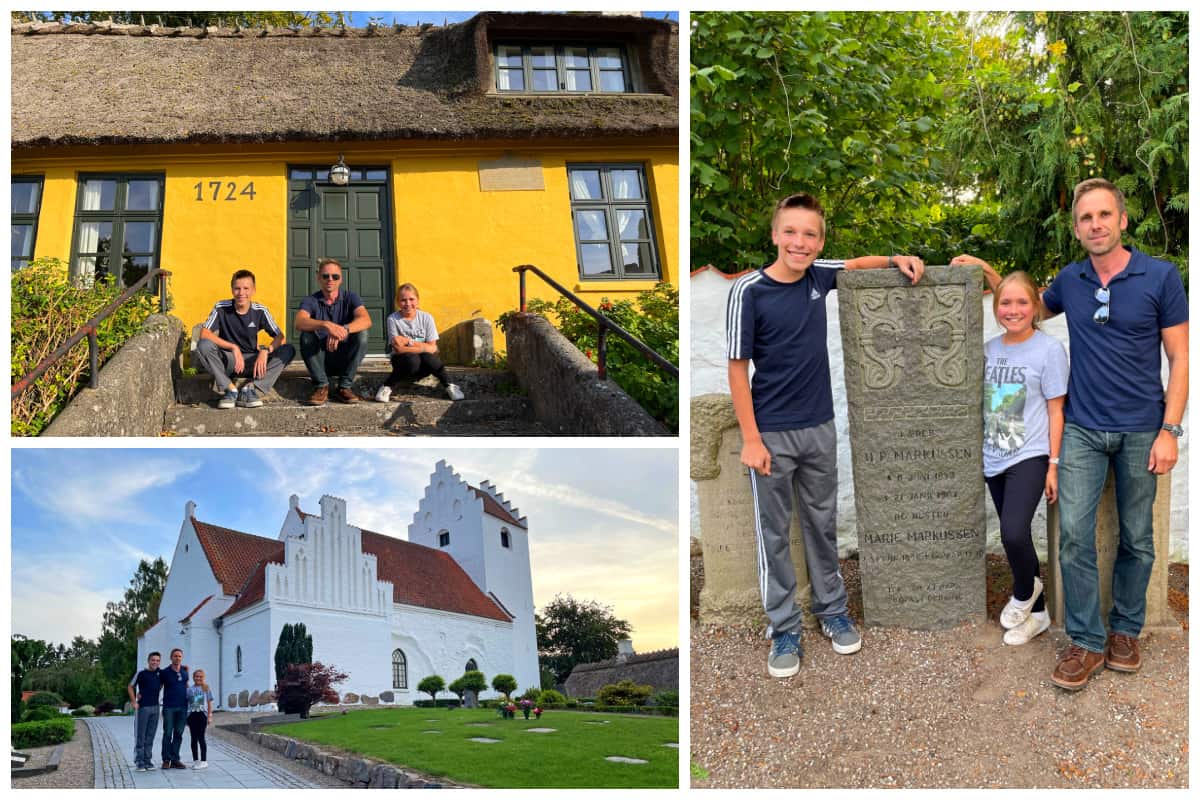
Our Danish heritage is significant for both my husband Todd and I. While my family on my mom’s side is all German, I’m very much a hodgepodge of cultures on my dad’s side: English, Welsh, Irish, Scottish, Norwegian, and Danish. Todd’s maternal grandmother is Danish and just a few weeks ago we took our kids to Denmark to visit the historic schoolhouse where Todd’s great-grandparents, Hans Peter Markussen and Mette Marie Nielsen, lived and where he was the teacher for their village. They are both buried in the church graveyard right across from the school. The schoolhouse, dating to the early 18th century, is still standing and is owned by a wonderful couple who have lovingly kept it up. They gave us a tour of the schoolhouse and then invited us to their home next door for some Danish hospitality.
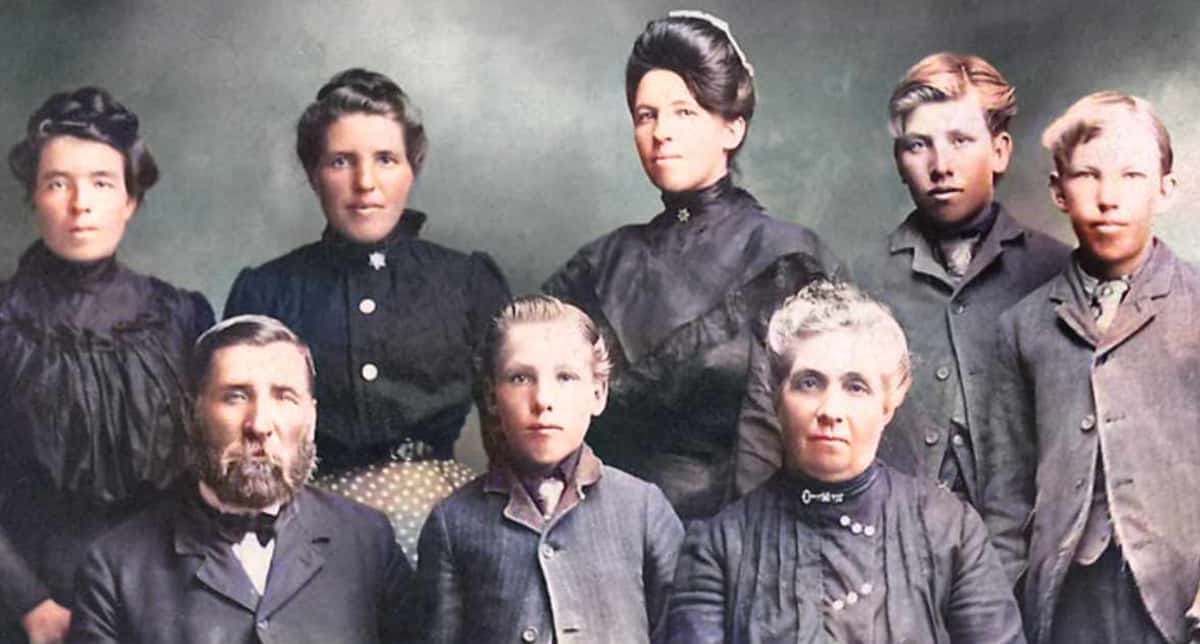
As for me, I have Danish lines on both my dad’s maternal and paternal grandparents’ side. This is my great-grandfather, Ole Nielsen Toft, born in Vejle, Denmark and later immigrated to the U.S., and my grandmother Laura Anna with their surviving children (8 out of 14 didn’t make it past infancy). My great-grandfather served as the first constable in their town and my grandmother ran a store and post office from their home. This family endured many hardships but from the looks in their eyes I think they had their happy moments too. I can easily imagine them sitting around the kitchen table enjoying freshly made aebleskiver while laughing and wiping jam from their mouths.
Neither Todd nor I had what would have been the amazing fortune of inheriting our great-grandparents’ aebleskiver pans, but we can share this traditional aebleskiver recipe with you, a small tribute to our Danish heritage. Velbekomme!
For more traditional Danish recipes be sure to try my:
- Risalamande (Danish Rice Pudding)
- Danish Rye Bread (Rugbrød)
- Brunede Kartofler (Danish Caramelized Potatoes)
Save This Recipe

Authentic Aebleskiver
Equipment
Ingredients
- 2 cups all-purpose flour , sifted (not necessary but will produce the fluffiest results)
- 1 tablespoon granulated sugar
- zest of one lemon
- 1 teaspoon ground cardamom
- 1 teaspooon baking soda
- 1/4 teaspoon salt
- 1 teaspoon pure vanilla extract or vanilla bean paste , or 1 vanilla pod scraped
- 1 3/4 cups buttermilk (recommended for the best flavor; alternatively use milk with 1 1/2 tablespoons white vinegar stirred in and left to sit for 5-10 minutes)
- 4 tablespoons butter , melted and let cool a few minutes
- 3 large eggs , yolks and whites separated
Instructions
- Get the pan heating over medium-low to medium heat.In a large mixing bowl, stir together the flour, sugar, baking soda, cardamom and salt. Add the egg yolks, lemon zest, vanilla, and buttermilk and mix until smooth. Add the melted butter (not super hot) and mix until combined.In a separate bowl, beat the egg whites until stiff peaks form. Fold the egg whites into the batter. Gently break up any large lumps but it's fine if a few small ones remain.
- Place a little butter into each of the hollows of the pan. Butter produces the best flavor but you can use oil instead.Once hot pour the batter into each well, filling them nearly full. Let the batter cook until it begins to bubble around the edges. Use a wooden or metal skewer (the traditional tool is a knitting needle) to push against the side of each well and gently turn each aebleskive 90 degrees. As you do this the batter will spill into the bottom of the well.Once the batter begins to bubble around the edges, give it another 90 degree turn. Repeat this step again, giving the aebleksiver another turn.At this point you can then finish the aebleskiver with one final turn or you can first "top off" the aebleskiver by piping or spooning a little extra batter into the center before making the final turn. This will ensure that the very bottom of the ball is sealed.Give the aeblekisver the final turn to complete the full sphere. If your aebleskiver are not quite as browned as you like, you can continue to rotate them until they're browned to your liking.
- Serve the aebleskiver immediately while they're hot. Place them in a bowl at the table, letting guests help themselves. To serve them like the Danish, each guest should have a small mound of powdered sugar and jam on their plates with more at the table for refills. The aebleskiver are eaten with your fingers, first dipped in the jam followed by the powdered sugar (the jam helps it to adhere).
Notes
Nutrition
Originally published on The Daring Gourmet December 3, 2023

Hi, I’m Kimberly Killebrew and welcome to Daring Gourmet where you'll find delicious originals, revitalized classics, and simply downright good eats from around the world! Originally from Germany, later raised in England, world-traveled, and now living in the U.S., from my globally-influenced kitchen I invite you to tour the world through your taste buds!


Thank you for the detailed explanation of how to make these and the rest of your recipes like the different types of jams and rye bread etc. Looking forward to make the different types of jams. Without any doubt will make those danish pancakes!!❤️❤️❤️
You’re welcome, Michelle, I’m happy it was helpful! Happy cooking and I hope you enjoy the recipes! <3
I recently bought an Aebleskiver pan! I made these for the first time today! They turned out perfect and were absolutely delicious!! These will be made again, I love your recipe!
Oh that’s so exciting! I’m thrilled that you enjoyed them and I appreciate the kind words, thank you, Kim! <3
Very good recipe but mine did not poof they are more like pancakes. All my ingredients are fresh. I don’t know what I did wrong.
Thank you for this well-presented recipe for delicious aebleskivers. We had a wonderful New Year’s morning breakfast accompanied by tayberry syrup and our own wild harvested huckleberry lemon sauce. There are plenty of recipes out there and many of them will produce fine results. Your presentation for a classic version with its cardamom and emphasis on the table gathering and hands on eating is delightful. So, too, is the simple reminder to readers that we should expect the first batch to be a bit wobbly. As with bake, it takes practice and simple adjustments. Have a great 2026!
Thank you so much, Tom, I really appreciate that and so glad you enjoyed it! <3 Your syrup and sauce sound fabulous! Happy New Year!