Authentic German Springerle Cookies
This post may contain affiliate links. See my disclosure policy.
Springerle are German anise-flavored cookies that go back at least 700 years in their rich tradition as special gifts during the holidays and other celebrations. Delicately crispy-crunchy and a slightly chewy center, they’re made with simple ingredients and are easy to make but absolutely require that you follow some key steps to achieving the right look, texture and flavor. This authentic Springerle cookies recipe goes back to the Swabia region of Germany where these famous cookies originated.

What Are Springlere Cookies?
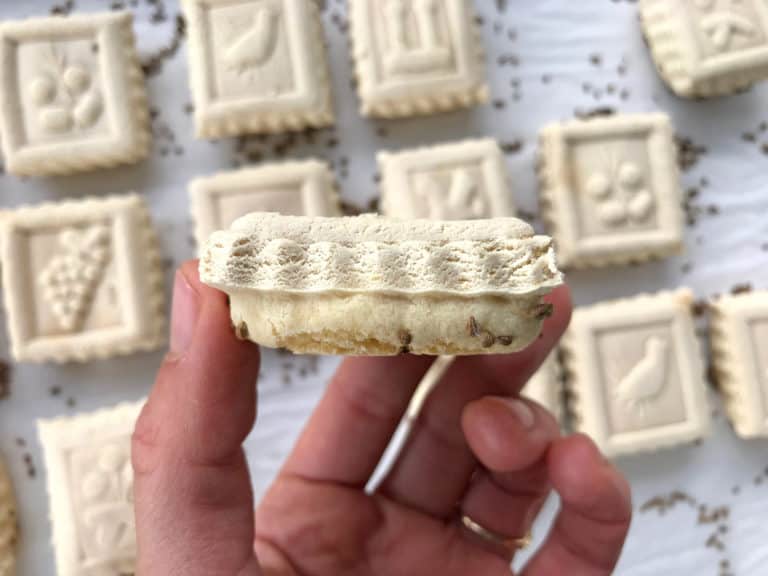
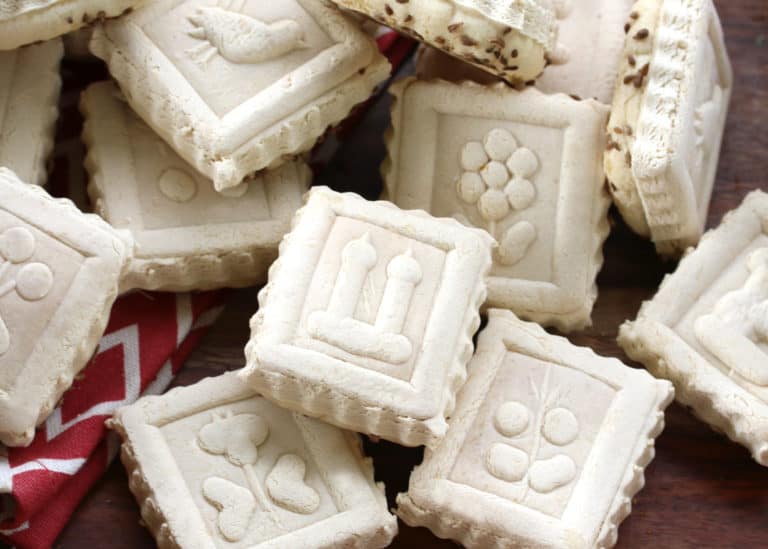
Springerle are traditional German cookies with a very long, very rich history and tradition and come from the Swabia region of southern Germany where I’m from. They’re delicately flavored with anise and are embossed with a variety of designs. Historically made for religious holidays and other special occasions, today they are most commonly made during the Christmas season and for New Year’s though Springerle with flowers, landscapes and other everyday designs remain popular throughout the year. The name “Springerle” translates from German as “little jumpers” because of their behavior of rising or “jumping up” while they’re baking.
Authentic Springerle are made with eggs, sugar, flour, baker’s ammonia, salt and anise. They’re a very low-moisture cookie that are made without any fat. Springerle are very hard cookies that are stored long-term to undergo a period of “ripening” for several weeks as their flavor and texture develops. Over time they develop a delicately crispy-crunchy, shattering exterior and a slightly chewy center. They are traditionally eaten with and dunked in a hot beverage.
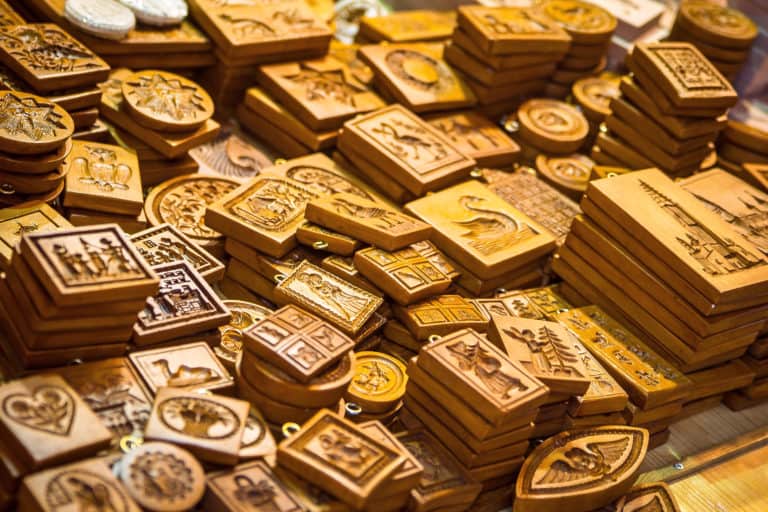
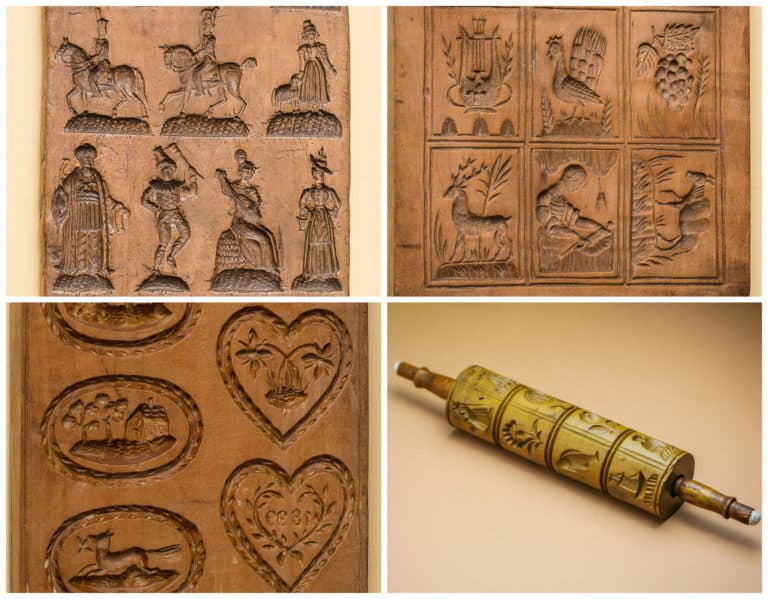
The hallmark of Springerle lies in the beauty of their presentation created by special molds used to emboss designs on their surface. Springerle were traditionally made as gifts, as charms for happiness, to give to friends and loved ones on special occasions such as births, weddings, betrothals, during the Christmas season and on New Year’s.
A Brief History of Springerle Cookies
These renowned cookies can be traced back to at least the 1300’s to the Swabia region of southern Germany where they were regarded as charms for good luck, happiness and religious observance. Historically Springerle molds were a German baker’s opportunity to show off his woodcarving skills. At that time baking apprentices in Swabia Germany not only had to demonstrate their ability to bake, they also had to carve their own Springerle molds as a kind of rite of passage to becoming a full-fledged, bona fide baker. The more intricate and detailed the mold, the more heralded the baker. These molds were passed down from generation to generation as treasured family heirlooms.
In fact, so prized were these family heirlooms that Germans immigrating to the United States in the 17th and 18th centuries would make space in their luggage just for their Springerle molds.
The themes of the Springerle molds changed throughout the centuries, transitioning from the earlier religious symbols in the 15th century to scenes of gallantry with knights on horseback, then on to the more romantic and highly detailed images of the 19th century with flowers, landscapes, and symbols of love, marriage and friendship. In the 20th century designs included things like Santa Claus, reindeer, and Christmas trees.
You can still buy both simple and elaborate wood-carved Springerle molds in Germany and you can also find antique ones that usually command a hefty price, especially the very detailed ones.
Special Equipment: Springerle Molds
Trying to find Springerle molds outside of Germany and other European countries that make cookies using molds (eg, Belgium and the Netherlands’ well-known speculoos/speculaas cookies), is very challenging. You can buy antique molds on eBay at a premium price or you can just use whatever you have that’s available. For example, you can use cookie stamps. There are a number of inexpensive ones on the market as well as high quality ones like these cookie stamps from Nordic Ware that are built to last and whose designs are cut deep enough to make a good impression on the cookie (Nordic Ware has multiple designs to choose from). I have three different sets of Nordic Ware cookie stamps.
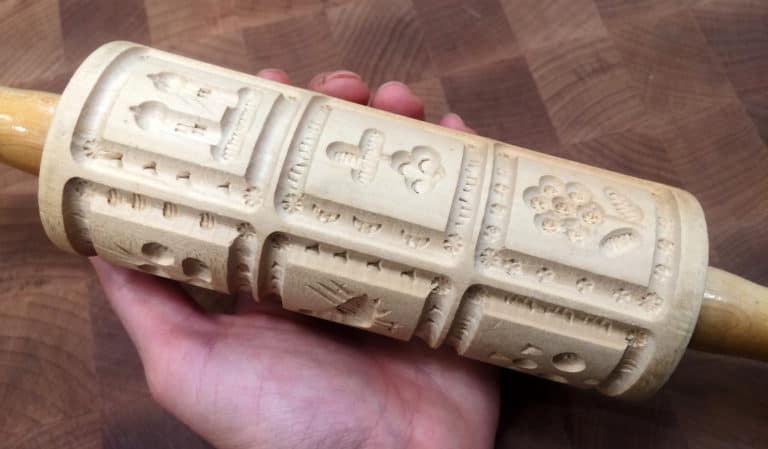
Pictured below is my Springerle rolling pin that I brought with me from Stuttgart, Germany before I moved to the U.S.. This is the mold that I used in the pictures for this recipe. A Springerle rolling pin is easy to use and you can crank out a ton of Springerle very quickly. Amazon has a hand-carved Springerle rolling pin that looks similar to mine.
How to Make Authentic Springerle Cookies
I’m going to share 5 keys with you – 5 essential elements – for making authentic German Springerle:
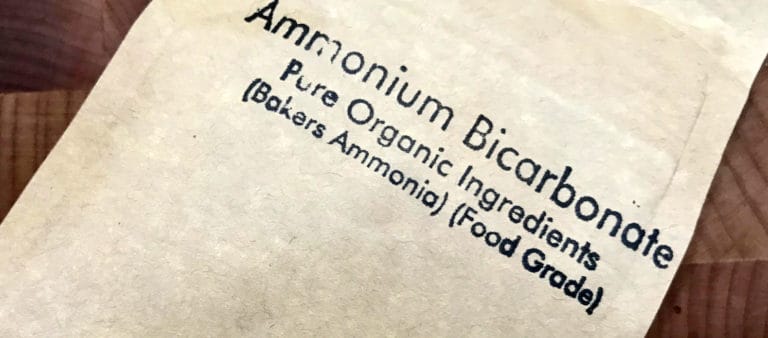
Key #1: Use Baker’s Ammonia
Ammonium bicarbonate, known as baker’s ammonia, or Hirschhornsalz in German, is an old-fashioned leavening agent that was commonly used until the 19th century when baking soda and baking powder came onto the scene. If you look through very old cookbooks you’ll find baker’s ammonia in the list of ingredients for specific kinds of baked goods. And while baking powder and baking soda largely replaced and perform a similar function to baker’s ammonia, they are not one and the same. In Europe and the Middle East, for example, some recipes for low-moisture things like crackers and crispy cookies still call for baker’s ammonia because of its unique qualities that baking powder or baking soda cannot replicate. It’s also used (either that or potash) for other types of “flat” baked goods such as German Lebkuchen, Honigkuchen and a German pastry known as Amerikaner, to “loosen” the texture of their crumb.
Springerle are the perfect example of a baked good that really requires the use of baker’s ammonia to get the right results and that’s traditionally what they were always made with.
It doesn’t matter which brand you use, but select one that’s food grade. I’ve been using organic food grade Baker’s Ammonia from Pure Organics.
*Just a note of warning: Baker’s ammonia smells BAD. Really bad. But don’t worry, the smell dissipates during baking.
Baker’s Ammonia vs. Baking Powder vs. Baking Soda
Besides having different chemical compositions, they perform differently. While all three are leavening agents, baker’s ammonia creates an effect that baking powder and soda cannot replicate. As the cracker or cookie is baking, the tiny crystals in the ammonium bicarbonate break down and leave tiny air pockets behind in the crumb. The best way to describe the effect is that baker’s ammonia creates a unique honey-combed, porous crumb so that hard baked goods like crackers and cookies/biscuits have a more delicate, crispier, crunchier texture. Baker’s ammonia also contributes to a more even spread of the cookies.
Baker’s ammonia does have a very strong, very unpleasant odor but don’t be put off by that – the odor and taste will dissipate during baking.
In contrast what you normally get with a baked good that has virtually no moisture in it is something you could break your tooth on or could serve as a door stopper. (Think military hard tack from generations ago. Soldiers had to dip it in their coffee in order to make it edible.)
THAT is what you get if you make Springerle without baker’s ammonia: Rock hard, tooth-breaking, door-stopping cookies.
But let’s also be clear on something: Springerle are meant to be hard. And they’re traditionally eaten with a hot beverage for dipping. But the difference is that the baker’s ammonia creates that honey-combing effect that makes them less dense and gives them a more delicate and crunchy crumb.
In addition to the texture advantage of using baker’s ammonia for low-moisture, crispy goods, it also doesn’t leave behind the characteristic soapy flavor that baking powder or soda does.
Cook’s Illustrated’s verdict: “[Baker’s ammonia] works so well, we’d be tempted to use it for crisp baked goods all the time if it were more readily available.” The good news is that it’s readily available online.
Key #2: Authentic Springerle DO NOT Use Butter or Fat of Any Kind. ZERO.
What about the fact that most of the recipes out there on the web don’t call for baker’s ammonia? How do they try to get around the hard-as-a-rock, tooth-breaking factor? They add butter. They add fat in their workaround to soften it up a bit. The result? Shortbread, not Springerle. Different flavor, different texture.
So use the butter to make Scottish Shortbread. But if you want Springerle leave the butter in the fridge. There is no place for butter in traditional Springerle.
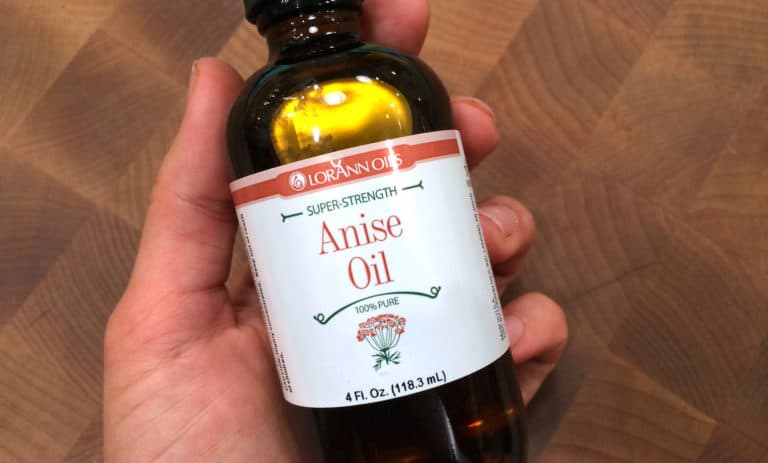
Key #3: Fresh Anise Seeds and Quality Pure Anise Oil
Next let’s talk about the flavor of traditional Springerle. Being made with nothing but eggs, flour and sugar they really have very little flavor. That’s where the anise comes in. There’s also the addition of the lemon zest which is optional but which I recommend because it contributes a lovely bright contrast and balance to the anise.
Traditionally whole anise seeds are always used. They’re dry roasted in a pan to release their oils and maximize flavor, then they’re strewn across the baking sheet before the Springerle are set on top of them. In addition to the anise seeds many German bakers will also add a few drops of pure anise oil for an added boost in flavor. We also recommend it.
The quality of your anise oil matters. It needs to taste real and it needs to be potent enough so that you only need to add a tiny bit of the oily liquid to achieve the flavor effect. So be sure to use quality 100% pure anise oil. I use and recommend Lorann’s 100% Pure Anise Oil. It’s very potent and a few drops go a long way.
Key #4: Let the Springerle Air Dry For 24 Hours Before Baking Them
The whole purpose of Springerle are to be able to showcase their beautiful embossed designs and if you bake them right away the designs will not hold their shape or form.
In order for the embossed designs to stay in place during baking you need a dough that is super low-moisture to start and then the cookies need to be left to further dry out and develop a hardened crust on the exterior. This way the designs remain stable and unaltered during baking.
Key #5: Moisten the Bottom of Each Air-Dried Springerle Before Baking
The purpose of this step hearkens back to the meaning of their name, Springerle, which means “little jumpers.” Springerle rise in a particular way, creating their characteristic platform on the bottom or “feet” as they call it in Germany. In other words, they “spring up” on their “feet” while baking.
There is an important functional purpose for lightly moistening the bottom of the cookies. Once the cookies have dried for 24 hours they can have uneven moisture spots throughout. This can result in the Springerle rising more quickly on one side than the other, resulting in slanted or lop-sided cookies. To prevent that we lightly and evenly moisten the bottoms by gently pressing the cookie down on a damp cloth. That’s the key for enabling an even-leveled rise.
Authentic Springerle Cookies Recipe
Let’s get started!
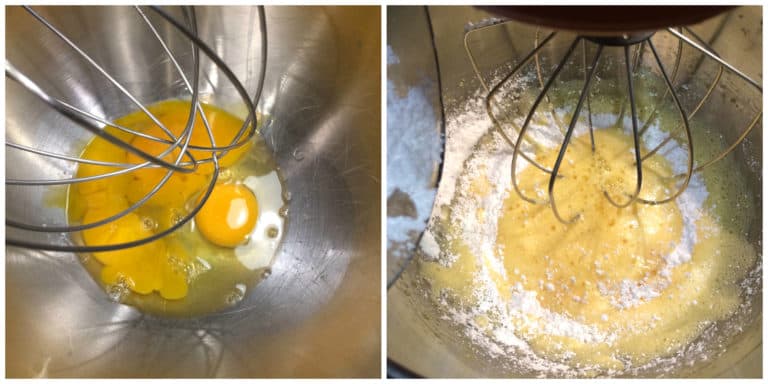
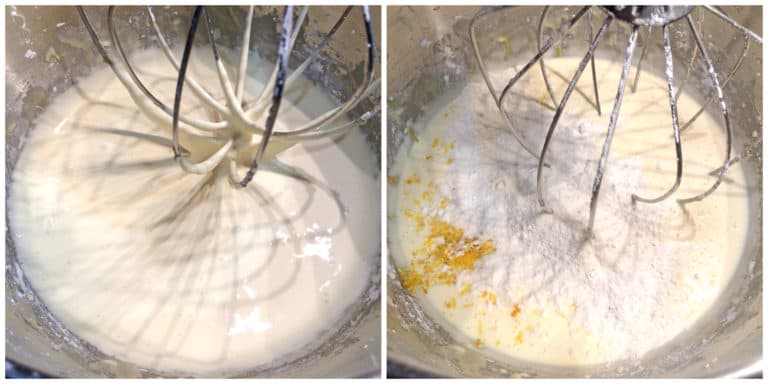
Place the eggs in a stand mixer with the whisk attachment in place. Beat the eggs until foamy. Add the powdered sugar, a little at a time along with the vanilla sugar (or extract), anise oil and lemon zest (if using).
Once all the powdered sugar has been added continue to beat the mixture for 10 minutes. Yes, that’s 10 full minutes. The batter needs to be very loose and airy. Note: Follow the instructions on your stand mixer to give your machine a rest after the suggested amount of time so as not to overwork your mixer.
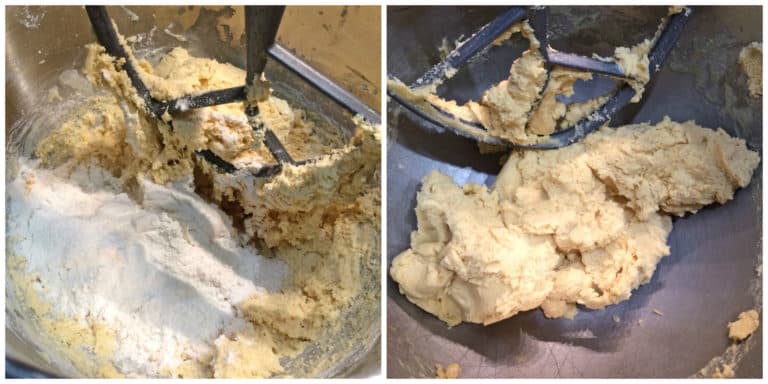
Combine the flour, baker’s ammonia and salt in a bowl. Add HALF of the flour mixture to the wet mixture along with the and beat it for a full 15 minutes.
Attach the paddle attachment now. Add the remaining flour and beat for another 5 minutes.
The dough should be very soft but not wet and sticky.
Form the dough into a ball, flatten it to an inch-thick disk, wrap it in plastic wrap and refrigerate for at least an hour or overnight.
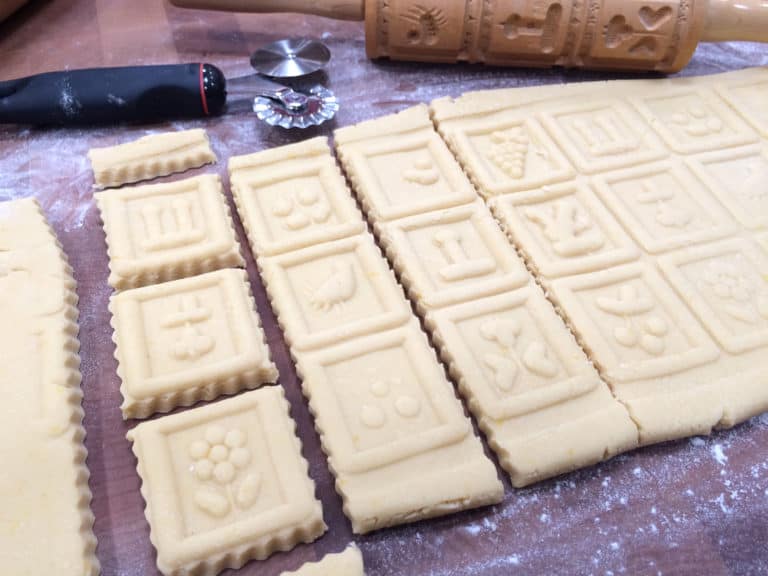
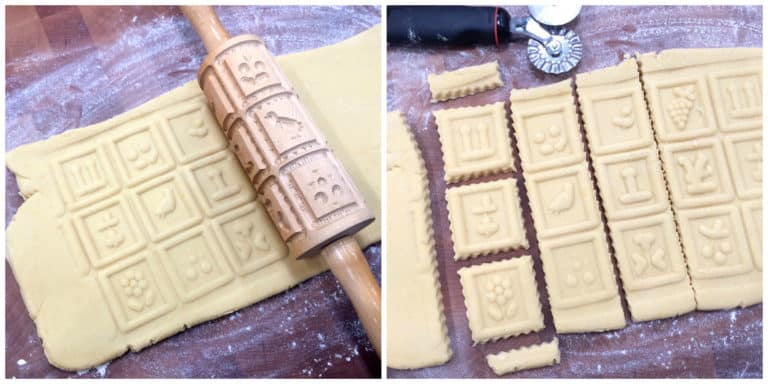
The next day roll out the cold dough to about 1/3 inch thick (1 cm) on a floured work surface.
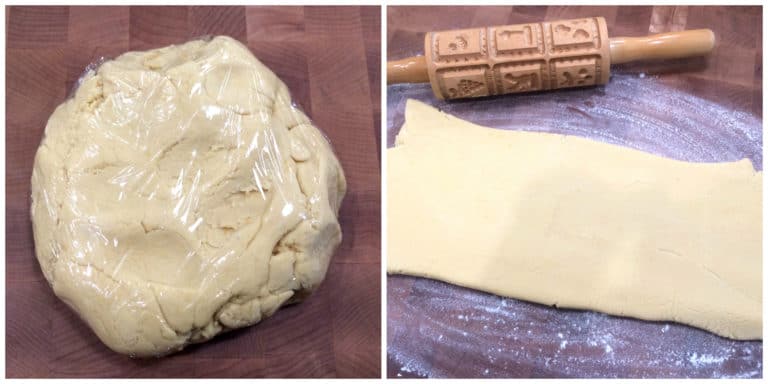
Use your molds or rolling pin to make the shapes and cut them out with sharp knife or pastry cutter. If you’re using molds lightly dust them with flour to prevent the dough from sticking.
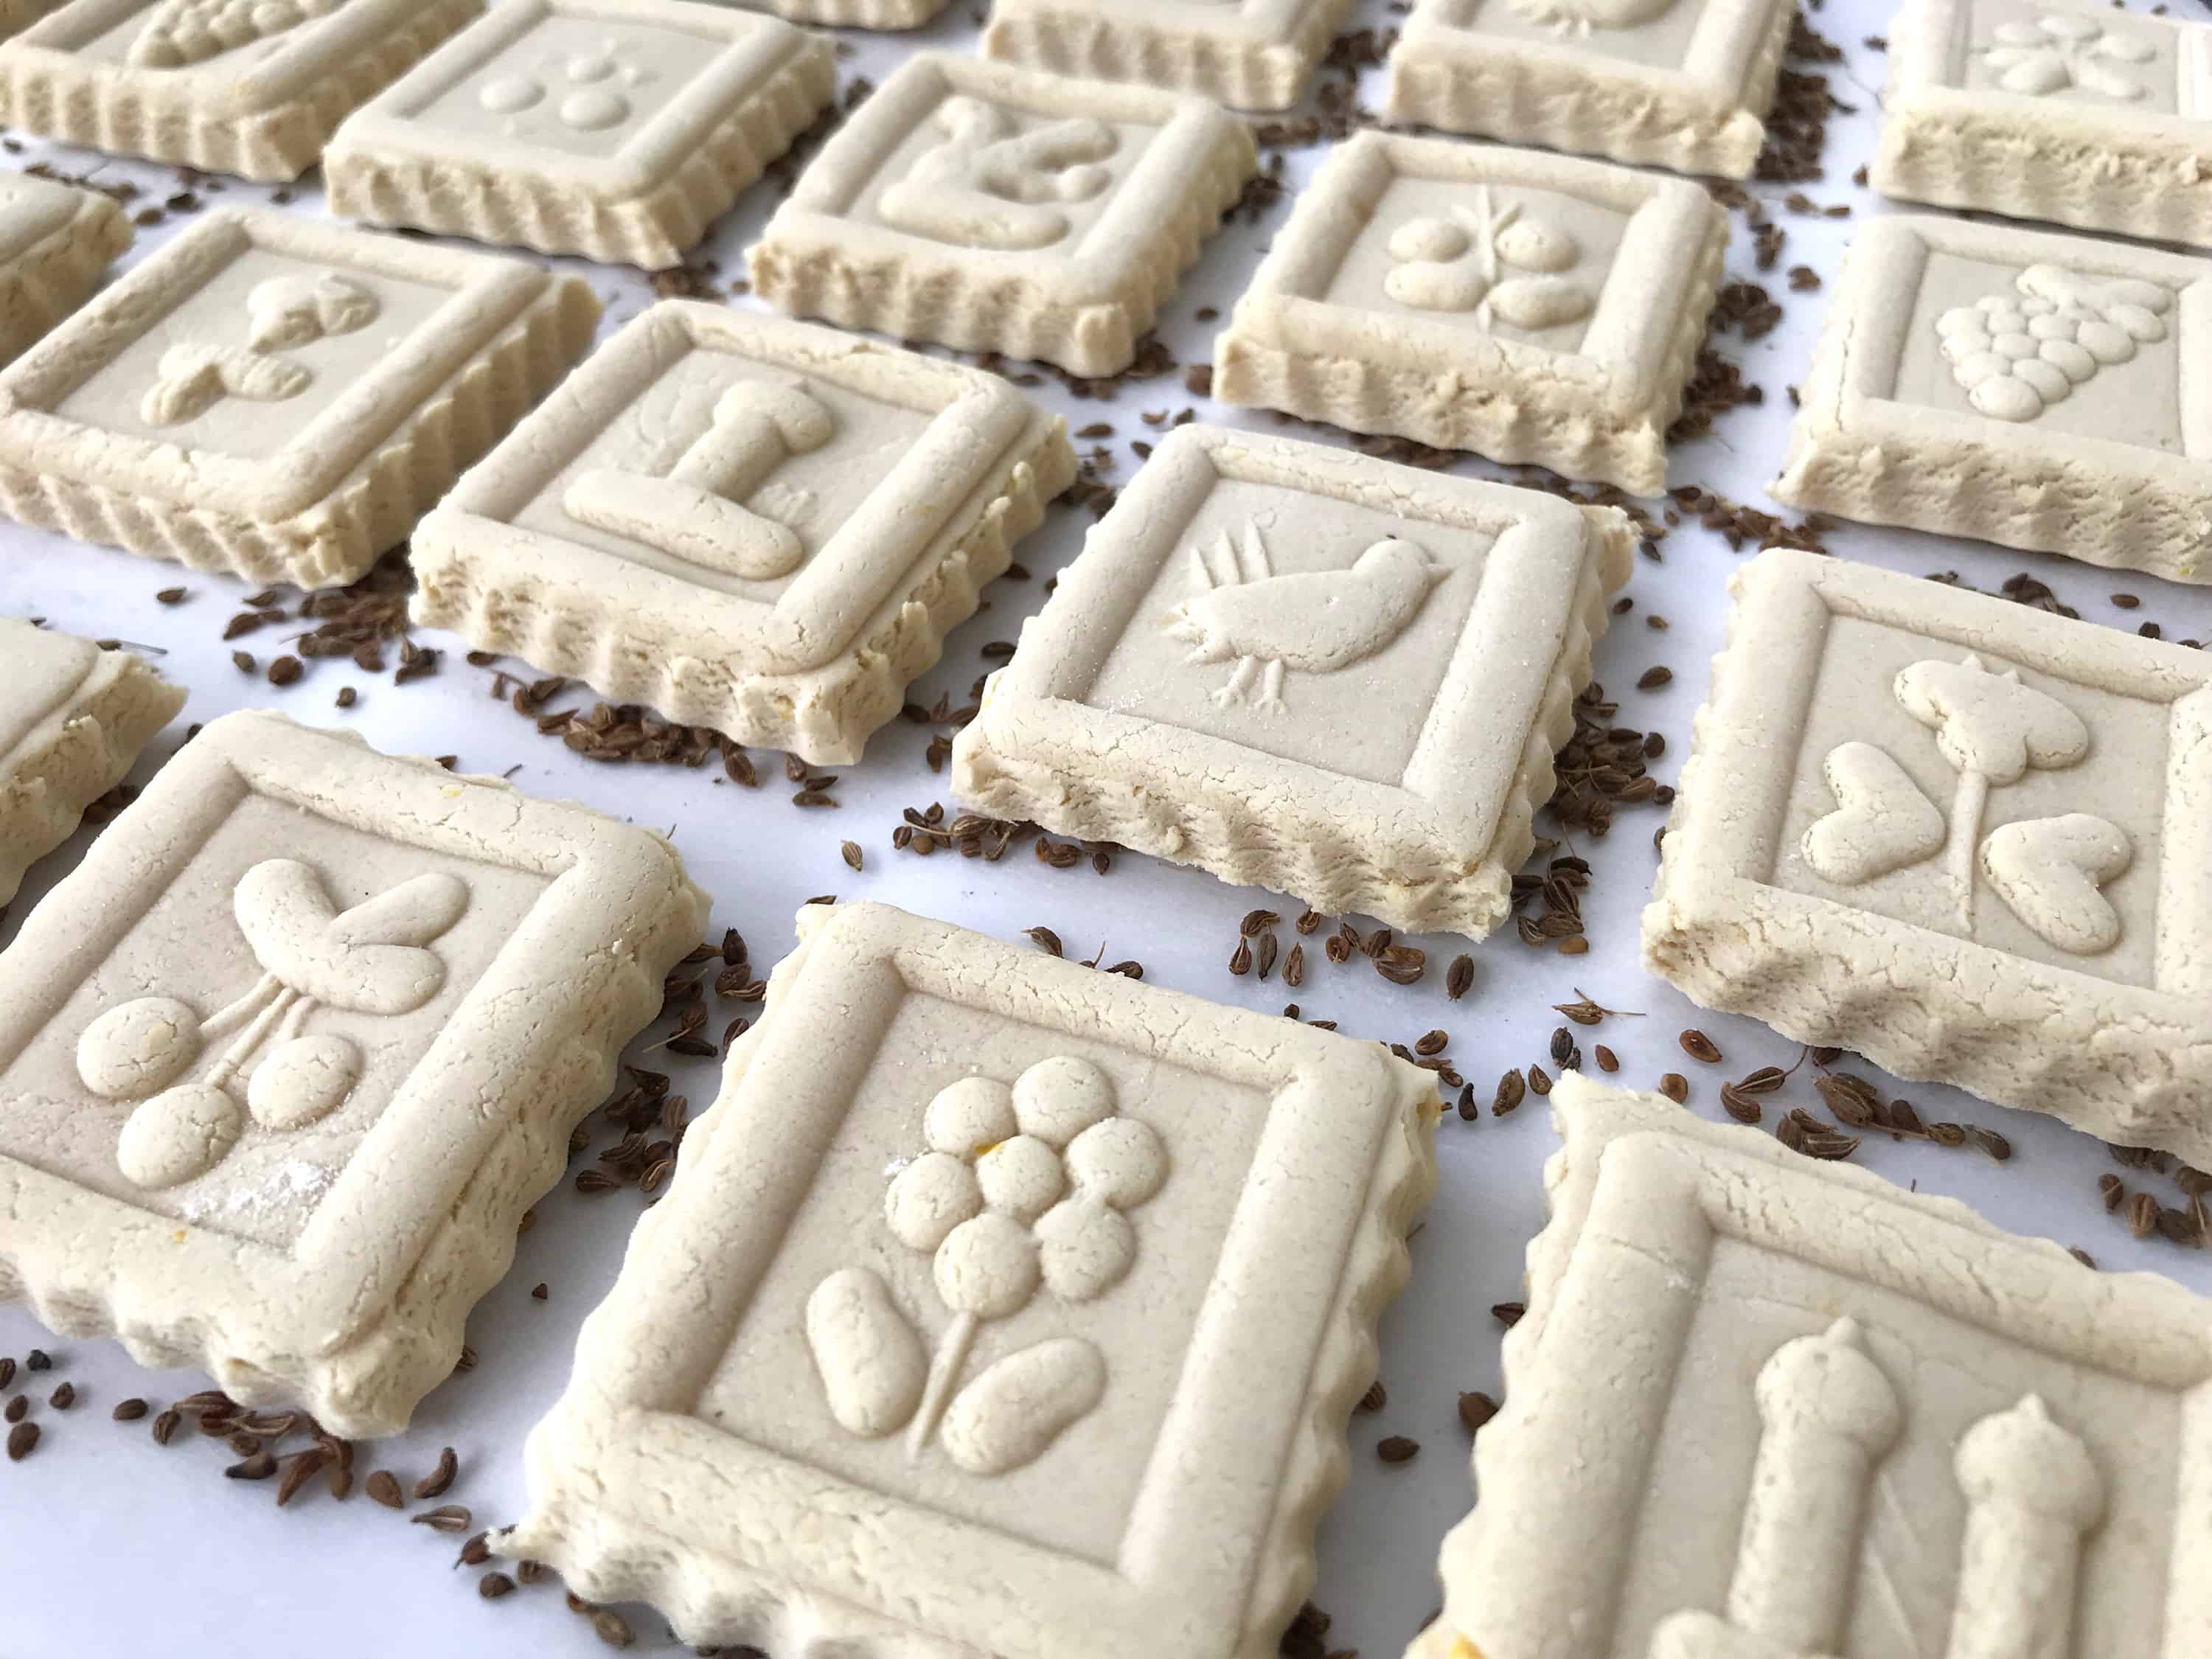
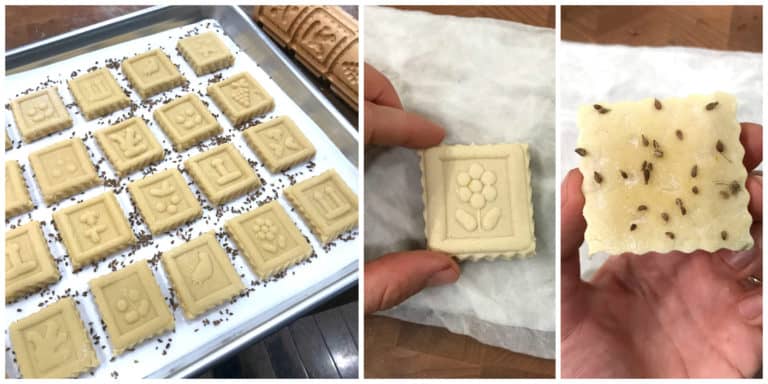
Toast the whole anise seeds in a dry pan over medium-high heat until aromatic, being careful not to let them scorch. Place the anise seeds on a lined cookie sheet, spreading them out evenly.

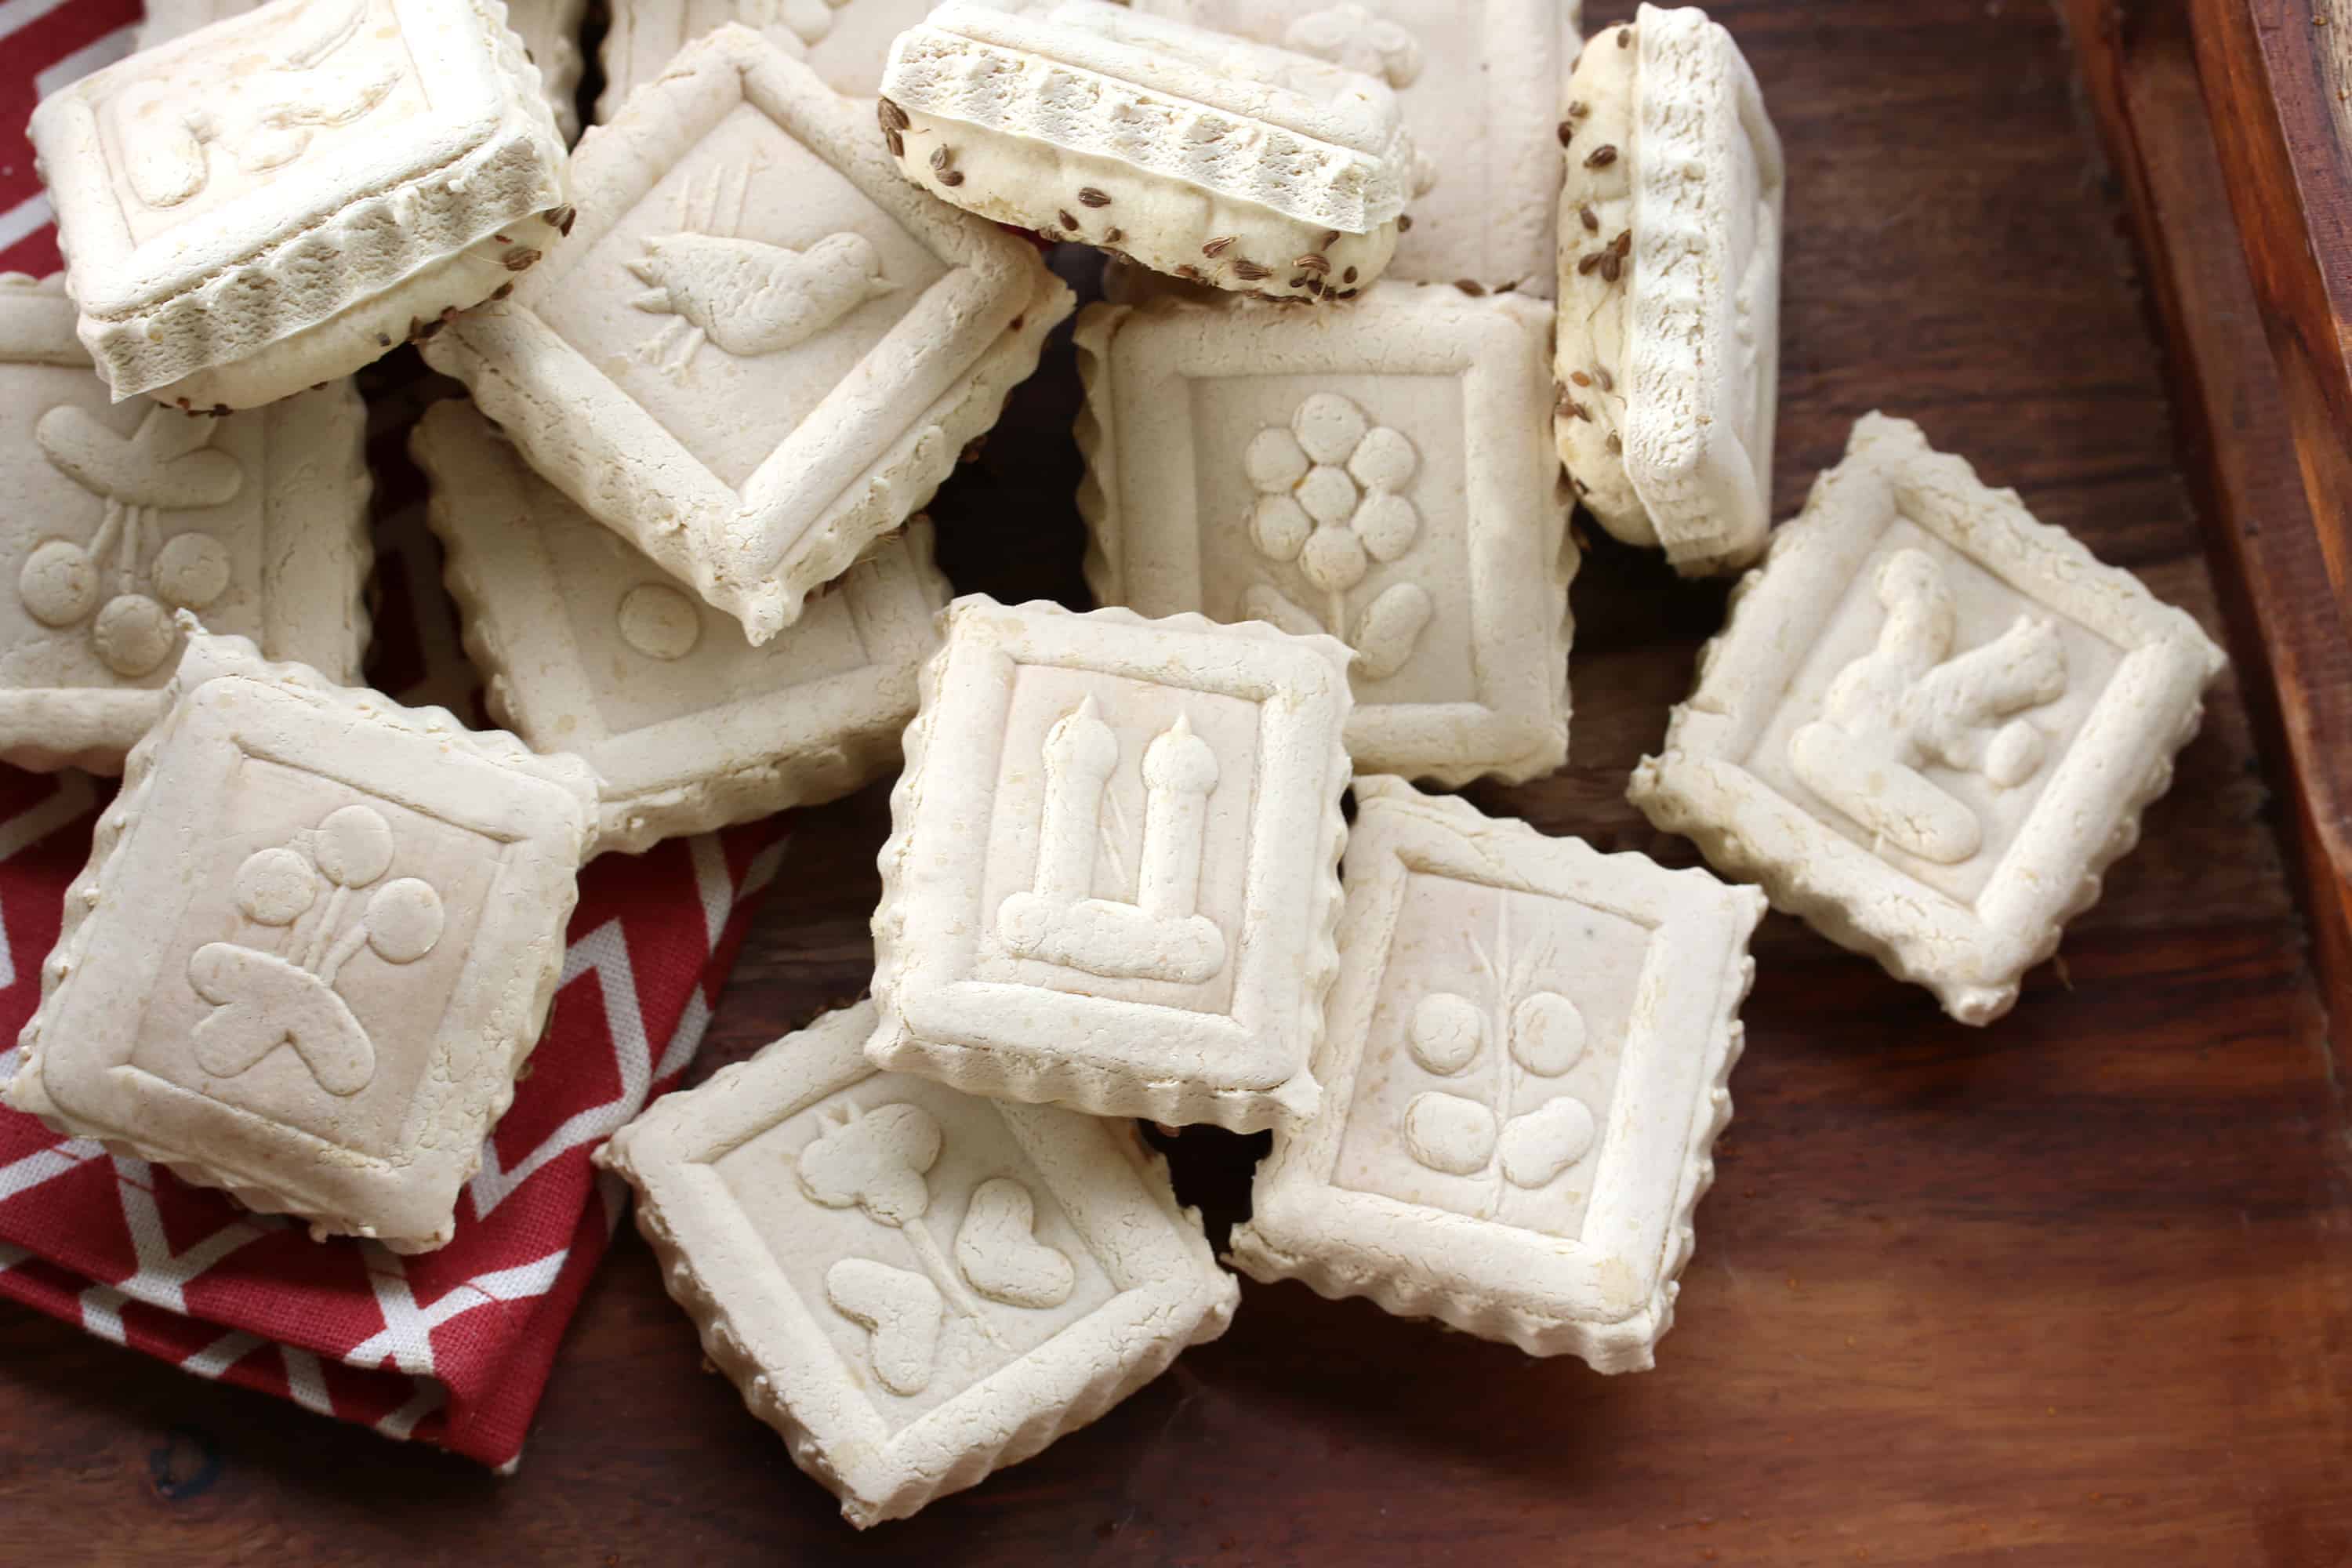
Lay the Springerle on top of the anise seeds on the baking sheet. Let them dry at room temperature for a full 24 hours, longer if you’re in a place with high humidity. The outside of the Springerle should be dry.
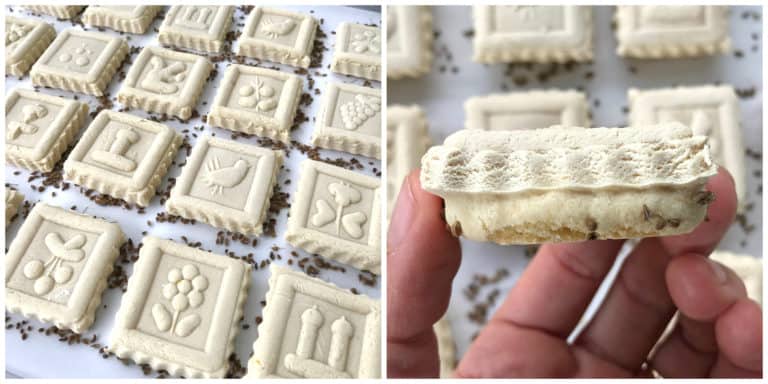
Lay a damp towel on the counter and gently press the Springerle down onto it to very lightly and evenly moisten the bottoms. Return the Springerle back to the cookie sheet.
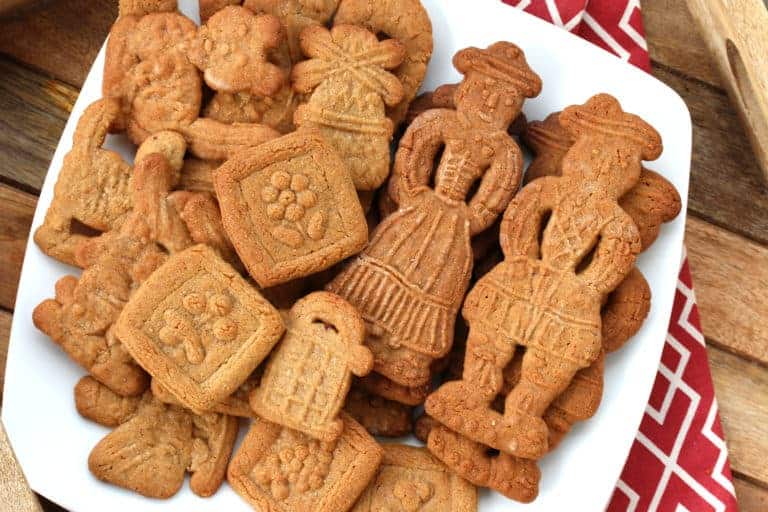
In an oven preheated to 300 degrees F with the rack positioned in the middle, bake the cookies for 20-30 minutes. Do not let the cookies turn golden, they’re supposed to stay very pale, basically the same color as when you put them in the oven.
The Springerle should have risen evenly to create their characteristic “feet” or platform underneath. Let the cookies cool off completely. They will become very hard as they cool.
Springerle are traditionally stored in airtight containers with half of an apple next to them inside the container to create a little bit of moisture to gradually soften the cookies over time. Periodically change out the apple. Once the Springerle have slightly softened up you can remove the apple and then continue storing them in the airtight container waiting for the flavor to develop.
One of the nice things about Springerle is that they’re supposed to be made far in advance. So you can make them weeks before Christmas, set them aside and forget about them, and continue on with your other Christmas preparations.
Most Springerle bakers agree that waiting 3-4 weeks before eating them is best to allow the flavor and texture to develop.Enjoy these Springerle on their own or, as is tradition, enjoy them with a hot beverage and dip them.
Enjoy!
To put your molds and mold rolling pins to further use, be sure to try my traditional Speculoos cookies!
Be sure to check out ALL of my favorite traditional German Christmas Cookies!
For more traditional German Christmas recipes try my:
- Stollen
- Zimtsterne
- Pfeffernüsse
- Lebkuchen
- Marzipan
- Bethmännchen
- Spitzbuben
- Heidesand
- Engelsaugen
- Magenbrot
- Aachener Printen
- Berliner Brot
- Kokosmakronen
- Marzipankartoffeln
- Haselnussmakronen
- Kinderpunsch
- Vanillekipferl
Save This Recipe
Authentic German Springerle Cookies
Equipment
Ingredients
- 3 large eggs , room temperature (the eggs must be large; if you are using medium add an additional egg)
- 3 cups powdered sugar (confectioner's sugar)
- 1 teaspoon quality pure vanilla extract (or 2 packets of vanilla sugar)
- 1/4 to 1/2 teaspoon quality 100% pure anise oil (not extract), how much you use depends on how strong of an anise flavor you want.
- 3 cups pastry flour , in Germany it's Type 405 flour, (if measuring in cups start with slightly less flour, 2-3 tablespoons less, and add the rest as needed if the dough is too soft/sticky)
- 1/4 teaspoon baker's ammonia *slightly less than 1/4 teaspoon (see blog post for explanation about baker's ammonia)
- 1/4 teaspoon salt
- zest of one lemon
- 2 tablespoons whole anise seeds
Instructions
- Place the eggs in a stand mixer with the whisk attachment in place. Beat the eggs until foamy. Add the powdered sugar, a little at a time along with the vanilla extract and anise oil.Once all the powdered sugar has been added continue to beat the mixture for 10 minutes. Yes, that's 10 full minutes, do not reduce the time. The batter needs to be very loose and airy. Note: Follow the instructions on your stand mixer to give your machine a rest after the suggested amount of time so as not to overwork your mixer.
- Combine the flour, baker's ammonia and salt in a bowl. Add HALF of the flour mixture to the wet mixture along with the lemon zest and beat it for a full 15 minutes, do not reduce the time (if the mixture is too dry for your whisk attachment, use the paddle attachment).Attach the paddle attachment, add the remaining flour and beat for another 5 minutes.The dough should be very soft but not wet and sticky. If the dough is too dry or stiff mix in a little more lightly beaten egg.Form the dough into a ball, flatten it to an inch-thick disk, wrap it in plastic wrap and refrigerate for at least an hour or overnight.
- The next day roll out the cold dough to about 1/3 inch thick (1 cm) on a floured work surface (if the dough chilled for several hours and is very firm, let it sit at room temperature until soft enough to work with). Use your molds or rolling pin to make the shapes and cut them out with sharp knife or pastry cutter. If you're using molds lightly dust them with flour to prevent the dough from sticking.Toast the whole anise seeds in a dry pan over medium-high heat until aromatic, being careful not to let them scorch. Place the anise seeds on a lined cookie sheet, spreading them out evenly.Lay the Springerle on top of the anise seeds on the baking sheet. Let them dry at room temperature for a full 24 hours, longer if you're in a place with high humidity. The outside of the Springerle should be dry.
- After the cookies have dried for at least 24 hours, lay a damp towel on the counter and gently press the Springerle down onto it to very lightly and evenly moisten the bottoms. Return the Springerle back to the cookie sheet.In an oven preheated to 300 degrees F with the rack positioned in the middle, bake the cookies for 20-30 minutes. Do not let the cookies turn golden, they're supposed to stay very pale, basically the same color as when you put them in the oven.
- The Springerle should have risen evenly to create their characteristic "feet" or platform underneath. Let the cookies cool off completely. They will become very hard as they cool. Springerle are traditionally stored in airtight containers with half of an apple next to them inside the container to create a little bit of moisture to gradually soften the cookies over time. Periodically change out the apple. Once the Springerle have slightly softened you can remove the apple and then continue storing them in the airtight container waiting for the flavor to develop.
Most Springerle bakers agree that waiting 3-4 weeks before eating them is best to allow the texture and flavor to develop.Enjoy these Springerle on their own or, as is tradition, enjoy them with a hot beverage and dip them.Makes about 34 Springerle depending on their size.
Notes
Originally published on The Daring Gourmet November 17, 2019

Hi, I’m Kimberly Killebrew and welcome to Daring Gourmet where you'll find delicious originals, revitalized classics, and simply downright good eats from around the world! Originally from Germany, later raised in England, world-traveled, and now living in the U.S., from my globally-influenced kitchen I invite you to tour the world through your taste buds!


Warning: if you don’t have a stand mixer, such as a KitchenAid (mine’s still packed, location unknown), borrow one to make this. My hand mixer had the odor of burning oil/motor on the second mix of 15 min—it was one hard slog, even at the lowest speed. My belle-mère suggested a hand beater, which would burn *my muscles* out.
I don’t know if using GF flour had anything to do with it, as this is my first attempt at springerle. We use Jumbo eggs. No double yolks with the ones I used.
Current learning experiences: if you’re going to put your limpa bread in a ceramic pan, instead of on a baking pan lined with parchment paper, either grease the pan for the final rising, or line the bottom with parchment paper.
Pay better attention to the flour volume in the stollen dough: too much and you’ll have baked rocks. Had to toss the first dough, blast it.
Yes, I had to wait for my hartshorn, which came a week later than the last minute order of a pastry cutter, but I used the volume-measured ingredients. I live in the SF Bay Area, moderate humidity. I have a lovely downright frigid garage for the air drying of the cookies, atop the washer, lightly covered.
The dough certainly looked like a smooth cookie batter. I am about to take it from the fridge, where it has chilled for two days (don’t ask), to roll out and cut.
I still have to make a double batch with wheat flour, so borrow I must a stand mixer. I may use 5, instead of 6, jumbo eggs, given the size, depending on results of this batch.
My family has been making these for hundreds of years and I am proudly the current home to a mold that my great great great grandfather made for my ggg grandmother! My great grandmother (from the Black Forest region) had a recipe card that included a choice between making them with brown sugar or with confectioners sugar. My mother can’t ever remember anyone in the family making them with brown sugar though. I really enjoyed your post! My family recipes (Great Grandmother and Grandma’s) both call for the anise seed to be mixed into the dough (1-2 t.). I’m looking forward to trying the roasting/pan method! Also, I’ve never placed them on a damp towel but they rarely have trouble being crispy on top and chewy on the bottom. Maybe because I use baking stones? Grandma and Mom used metal pans and often had rock hard cookies. Another difference is we use 4 of the eggs,flour…as opposed to 3 and we bake at 325 degrees.
THANK YOU!!! Being mostly of German heritage, and fully intrigued by a springerle rolling pin about 45 years ago, I bought it and have been making these “dunkers” the wrong way ever since. Hard as rocks. NOW I finally understand and will make a batch the proper way. Not a single recipe of the 6 I have, calls for ammonia (I just checked) and yet it is an ingredient in other recipes in several old cookbooks on my shelf and I know it’s readily available at the grocery store – I have even used it! I could not be more excited about reading this post, Kimberly. You have given me a grand Christmas gift and I can hardly wait to try these the way they are meant to be. Your blog has become a true favourite spot. Your explanations and the history behind the recipes is interesting, well written, easily understood and totally enlightening. Bravo! And, thanks again.
Thank you so much, Peggy! <3 Keep in mind that Springerle are still meant to be very hard, even with the baker's ammonia. Following the step to include the piece of apple in the cookie tin is key too. But they're still "dunkers" even so :) Thanks again for your kind words, Peggy, and Merry Christmas!
I grew up with these cookies and so decided to try making them for the first time. Of course I never watched my grandmother or mom making them as a kid. Last night I tried to make two different batches of dough, using my mother’s recipe and your recipe that are both very similar with just a few differences in amounts. Both times I ended up with just a bowlful of dry crumbs that wouldn’t stick together no matter how much i kneaded them. Is it possible there is too much flour? Or am I doing something wrong? When you beat the eggs at the start about how long do you beat them for? I’m following the steps in both recipes completely so not sure why I’m ending with a bowl full of crumbs and not a thick dough. Thanks! Your springerles look the way I remember my mom’s looking. I want mine to look like that.
Hi Bo, I’m perplexed. You tried both this recipe and your mom’s recipe with the same result of dry crumbs. With two recipes resulting in the same outcome there’s obviously something amiss but without being there in person to observe and see where things are going wrong I’m afraid I can’t offer much insight. Are you measuring the ingredients in cups or using a kitchen scale? If the latter, is it possible your scale is off?
I was so excited when I came across your recipe – it’s very similar to my Great Grandma’s who was an immigrant from Germany! But every time I made her recipe, I got a disaster upon baking! Huge lopsided blowout cookies. So I read your entire post… tried this recipe, with every ingredient you suggested. I poured my heart and love into it! And same thing!! Lopsided blowouts! The dough was SUPER HARD to roll out. I even didn’t add about 1/4 of the flour towards the end as the Kitchen Aid started smoking. I measured out everything meticulously… although I didn’t sift my flour?! But it didn’t really say to? Were they not dry enough? Surely you’ve had this happen before? What am I doing wrong? I live in Phoenix so humidity isn’t an issue… and I waited the full 24hrs for them to dry. Please help!!!! I want so badly for a batch to turn out!! I am sharing a photo in the website form box below. Would love any thoughts!
I am in the same boat. (ironically, also in phx) I added everything, to the letter. It is so dry and hard. Impossible to roll. It crumbles as i try to roll it. Eager to hear her response to your issue. Not that it helps me today, but i might be willing to try this recipe again, if it wasn’t impossible to roll and crumbling as I did it.
Interesting!!! It’s almost like we need to cut back on flour here or something. I didn’t have the cracking problem as much as they just looked awful when baking! I’m going to try to post a link: https://tinyurl.com/sns4b7h
She has to have an answer for us poor Phoenicians!!!
Hi Elke, this is the standard ratio of eggs to flour for Springerle but the eggs need to be “large” and the whites can’t be over-beaten or they get very dry. As I mentioned to Sarah L. the particularly dry climate might be playing a role here as well.
I live in Santa Barbara, where it is usually damp(ish) – my toffee has a tendency to get soft – and my dough seemed perfect going into the fridge but came out 24hours so hard, I lost about half of it because it wouldn’t stick back together after the first pass. I asked about what the dough should be like coming out of the fridge and got no reply. I measured meticulously, and except for my kitchen aid dying with 30 secs left on the timer, did everything per the directions. So, when removing the dough from fridge, let it come to room temp? Roll immediately? Please…
Hi Sarah, I’m sorry you’ve had such bad luck with Springerle! Sometimes “too” dry of climates can also pose a challenge and it’s “possible” that the cookies dried out too much before being baked. In any case though there was definitely something wrong with your dough – it should be soft not hard. Either the eggs you used weren’t truly “large” or you may have beat them too long.
I have a friend who has TooMuchFun with wheat & gluten (hence no 100% rye bread either). Do you know if Springerle has been more or less successfully made with GF flour? KAF or Bob’s Red Mill versions is what I would use.
I haven’t tried it, Marina, but perhaps some of our readers have and can chime in….
I made it tonight with Trader Joe’s all-purpose gluten-free flour, and they’ve turned out wonderfully, with even, little feet and a lovely texture!
I also mixed in a tablespoon of cardamom because I personally adore the flavour. (That was for 220g eggs, 500g sugar and 500g flour)
Wonderful, Sia, I’m so glad they were a success, thank you for the feedback!
Thanks for your answers–I’ll note those in my recipe file.
Forgot this question–if one chooses, for whatever reason, to use baking soda instead of hartshorn, is the amount used the same? if not, is there a conversion proportion?
Hi Marina, you would use baking powder and use the same amount.