BEST Giardiniera Recipe (Spicy or Mild)
This post may contain affiliate links. See my disclosure policy.
Not just for hot dogs and muffuletta sandwiches, add this homemade giardiniera to your burgers, nachos, pizzas, pasta salads and anything else your heart desires! This Italian giardiniera recipe is simply the BEST (just check out the rave reviews below). I promise, once you’ve tried this you’ll be hooked for life!
What is Giardiniera?
Giardiniera, pronounced “jar-din-air-ah”, is one condiment you don’t want to be without. It’s one of my favorites and once you’ve tried it I’m confident you’ll fall in love with it too. Originating in Italy, these pickled vegetables were introduced to Chicago in the late 19th century by Italian immigrants and took their place as arguably the city’s most popular condiment. It’s used on practically everything! You name it, giardiniera is just what you need to bring your hot dogs, burgers, sandwiches, nachos, antipasto platters and pasta salads to life. In Chicago you’ll even commonly find it served on pizzas and, of course, no Italian beef sandwich is complete without it. Have you been to New Orleans? Giardiniera is the magical ingredient in those mouthwatering muffuletta sandwiches. In short, giardiniera is the ultimate pickled vegetable relish!
The popularity of giardiniera has continued to grow in Chicago with more than a million pounds of it being sold annually. Still it remains relatively unknown outside of the Windy City except among those with strong Italian roots. So if you’ve never heard of or tried it before, now is your chance to make some absolutely delectable homemade giardiniera that will bring new life and flavor to your favorite foods!
Giardiniera Ingredients & Variations
This giardiniera recipe lends itself easily to any adjustments you’d like to make to suit your tastes, whether it’s adding or swapping vegetables or seasonings. Here’s what you’ll need to make this homemade giardiniera recipe:
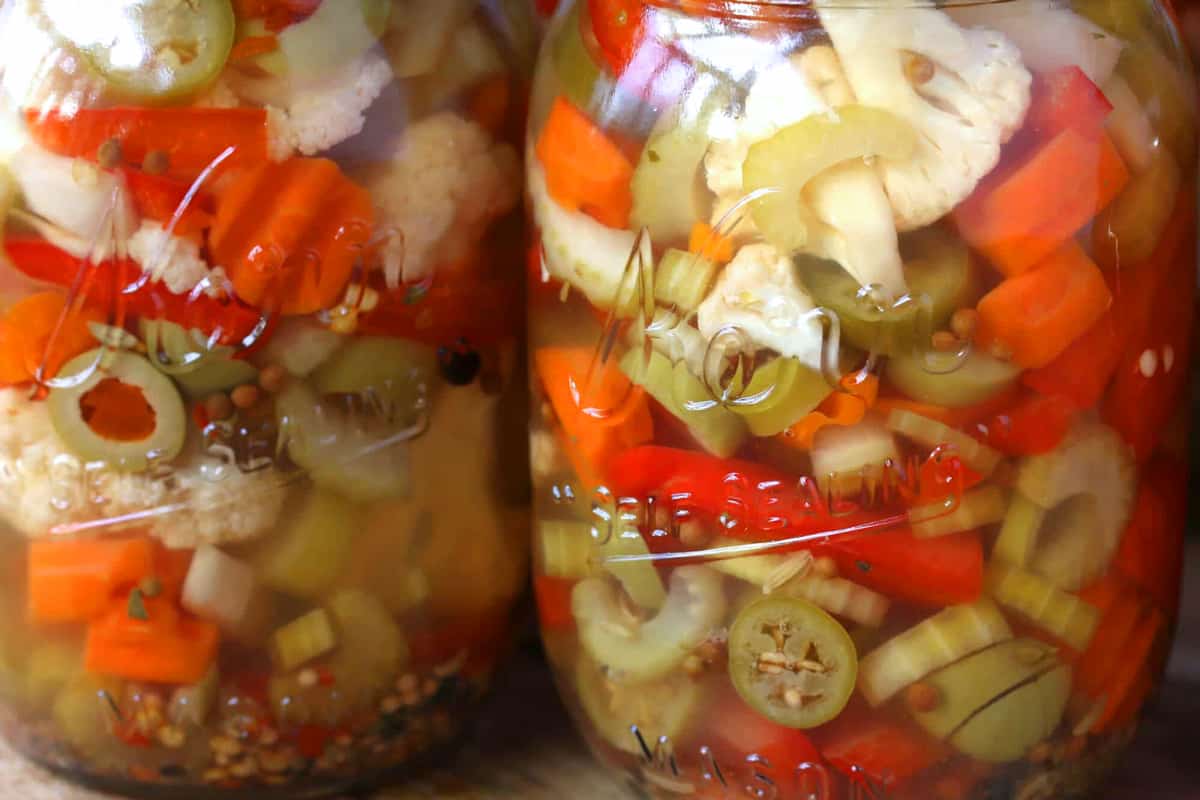
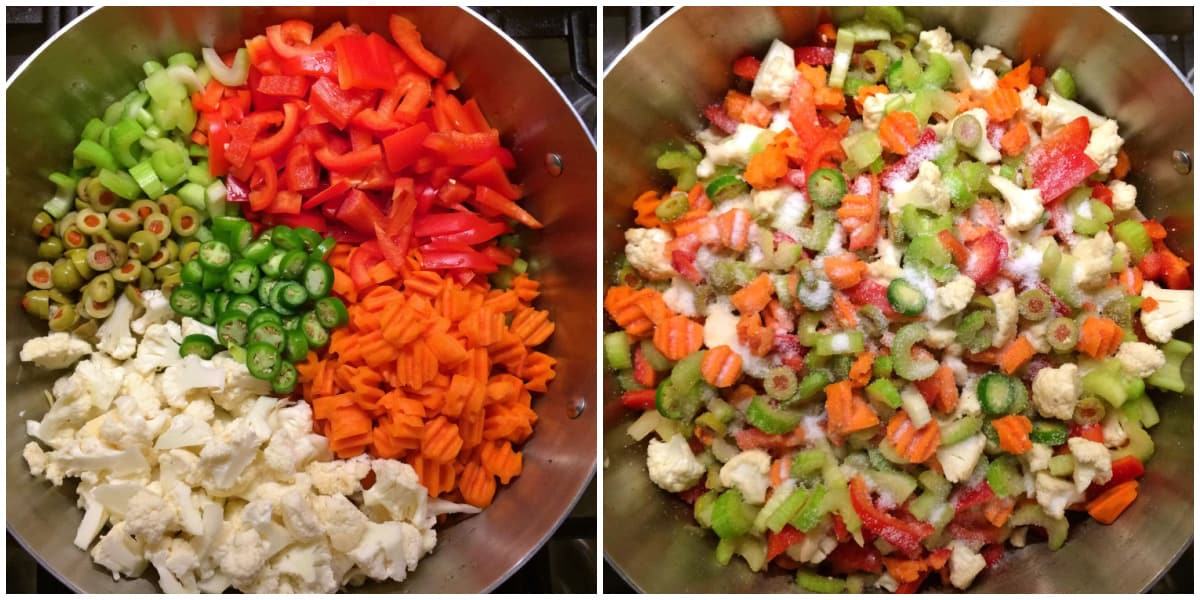
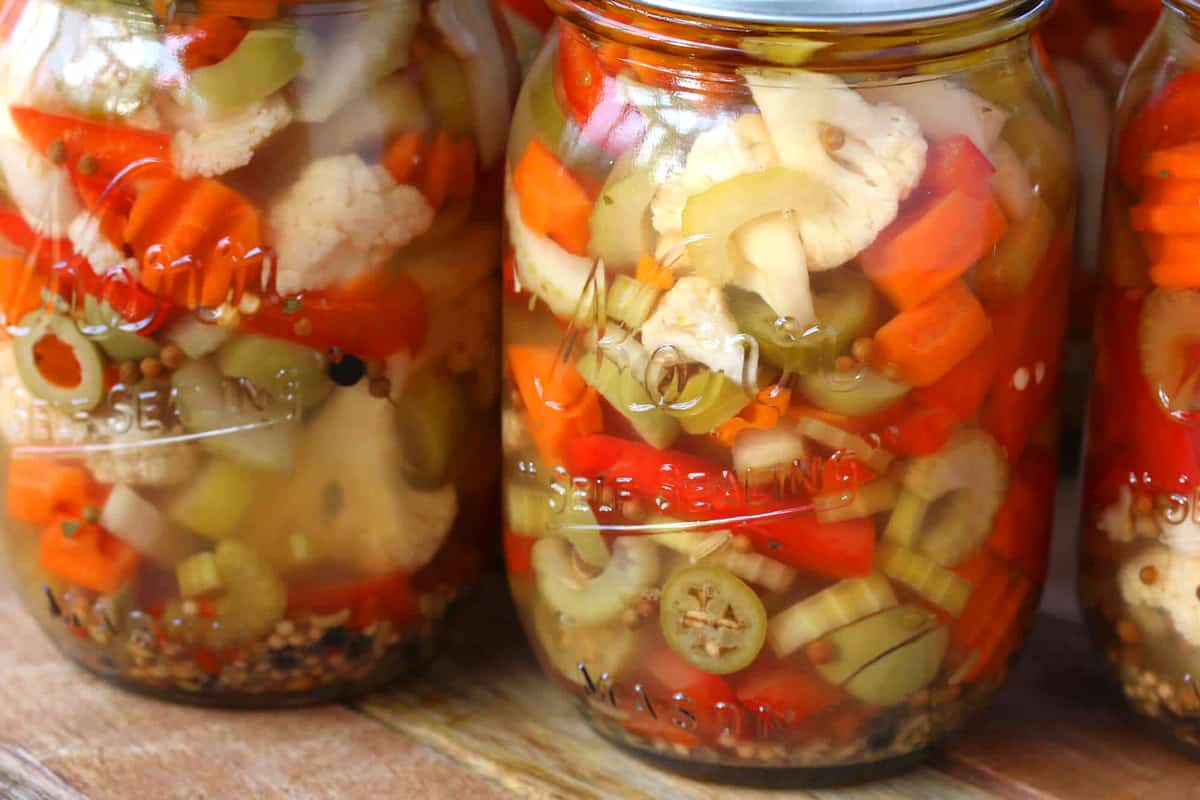
- Vegetables: I’m using serrano peppers in this but you can also use jalapenos. You can customize the heat level by adding more or less. We’re also adding a couple of red bell peppers to mix for sweetness and a pop of color. Other vegetables in classic giardiniera are cauliflower, carrots, celery, and some pitted green olives (I love the brininess they contribute). Feel free to add other vegetables if you like, for example pearl onions and green beans.
- Vinegar and Oil: We’re using an equal amount of white wine vinegar and water, which is the right ratio for making this giardiniera recipe safe for canning if you so choose. The white wine vinegar contributes a great flavor and isn’t as harsh as white vinegar. In addition we’re topping off the jars with a little olive oil. If you’re not canning the giardiniera you can add more.
- Seasonings: Garlic is a must. For the spices I really love the combination of oregano, coriander seeds, yellow mustards, fennel seeds, black peppercorns, red pepper flakes, celery seeds and bay leaf. Feel free to change up the ratios or experiment with other spices and herbs like cloves, allspice berries or juniper berries.
You can chop the veggies however large or small you prefer. In Italy the vegetables are usually left in fairly large pieces and that way it’s also more versatile. Left in larger pieces you have the flexibility of serving the giardiniera with your charctuerie/antipasto platters and when you want to use it for sandwiches, hot dogs, pasta salads, etc, you can simply diced up the finished giardiniera into smaller chunks. But left large or diced small, you are simply going to LOVE this giardiniera!
Giardiniera Recipe
Let’s get started!
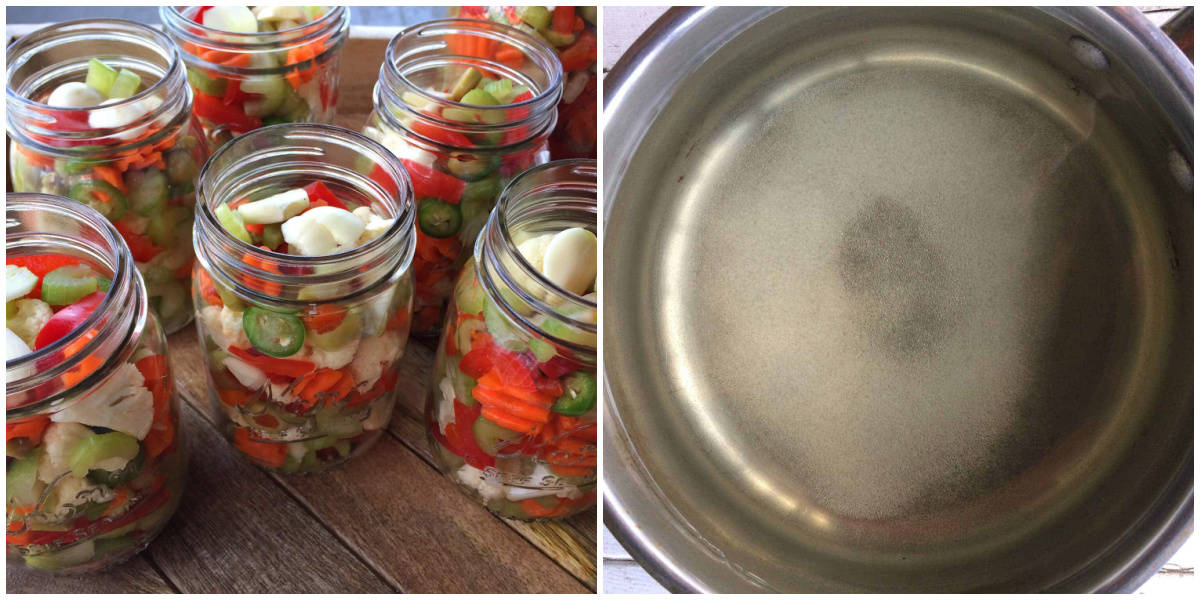
Chop up the veggies and place them in a large non-reactive pot or bowl. If you’re wondering how to get the crinkle-cut carrots, use a mandolin slicer that has that ability.
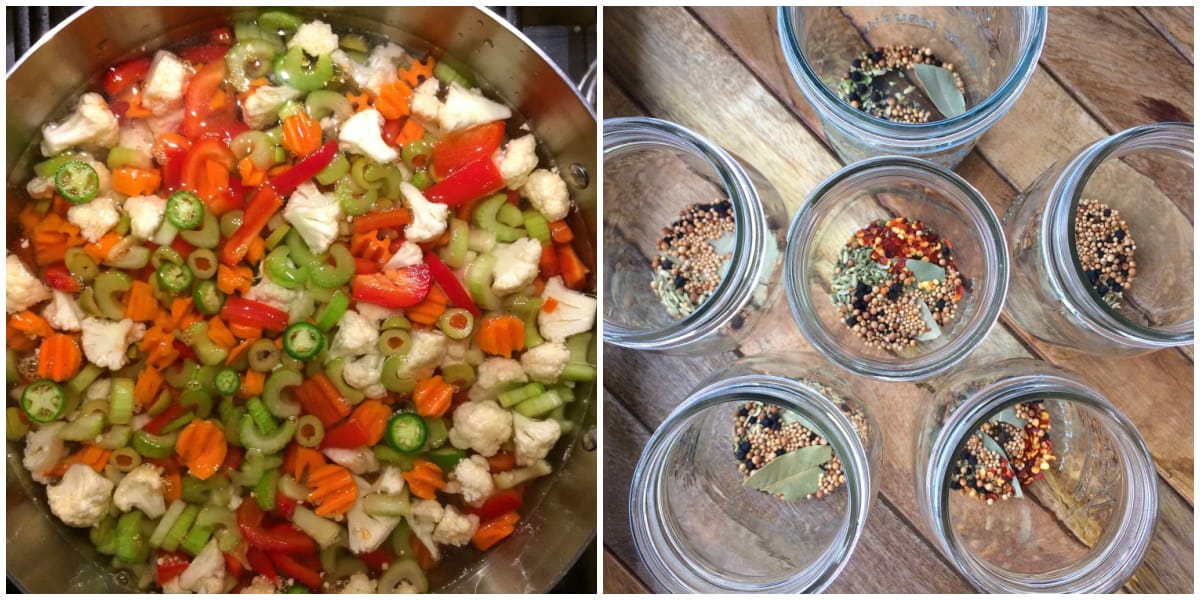
Pour 1/4 cup kosher salt over the vegetables.
Pour enough water over the vegetables to cover them. Let them soak in the salt water for at least 6 hours or overnight. This step is critical for drawing out excess water from the vegetables which would otherwise dilute the vinegar brine and lead to spoilage.
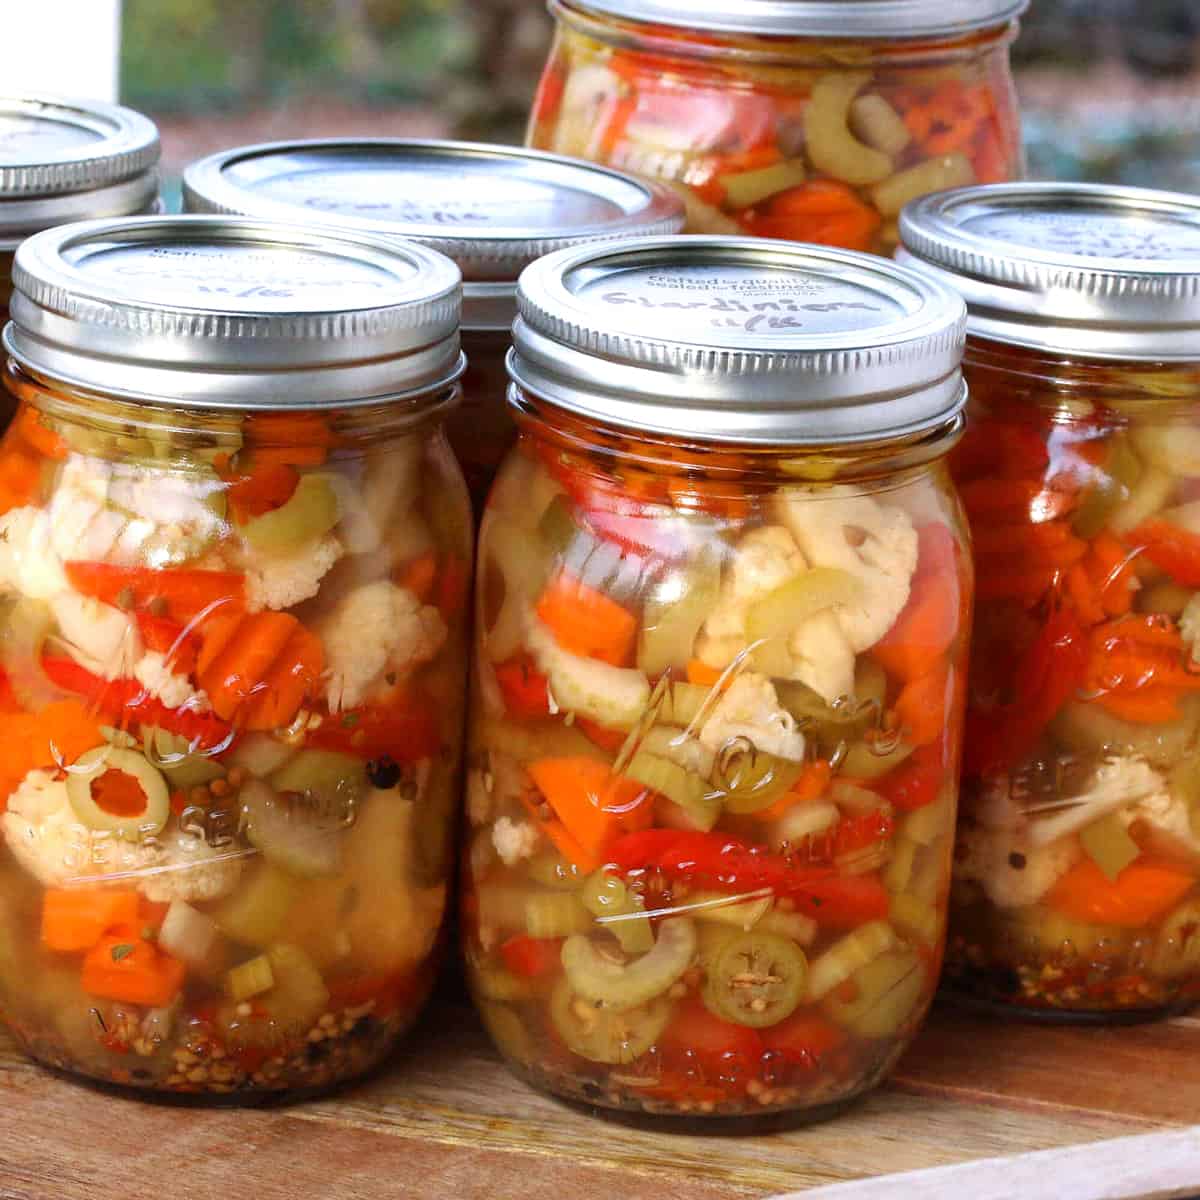
To prepare the jars, place the spices into each of the jars. I like to make some batches hot and some mild. Do that by using or omitting red chili flakes. For a true Chicago-style giardiniera you’ll want to make it hot!
Thoroughly rinse and drain the vegetables before dividing them up between the jars. Pack the vegetables in as tightly as you can. Place the garlic each jar.
Now we’re making a vinegar solution to pickle the vegetables. To play it safe Cooperative Extension Service sources recommend a 1:1 ratio of vinegar to water. Some other recipes may have a lighter vinegar brine but if you’re planning on storing your giardiniera for more than 2 weeks, we recommend this ratio to create enough acidity to prevent the risk of unwanted bacteria.
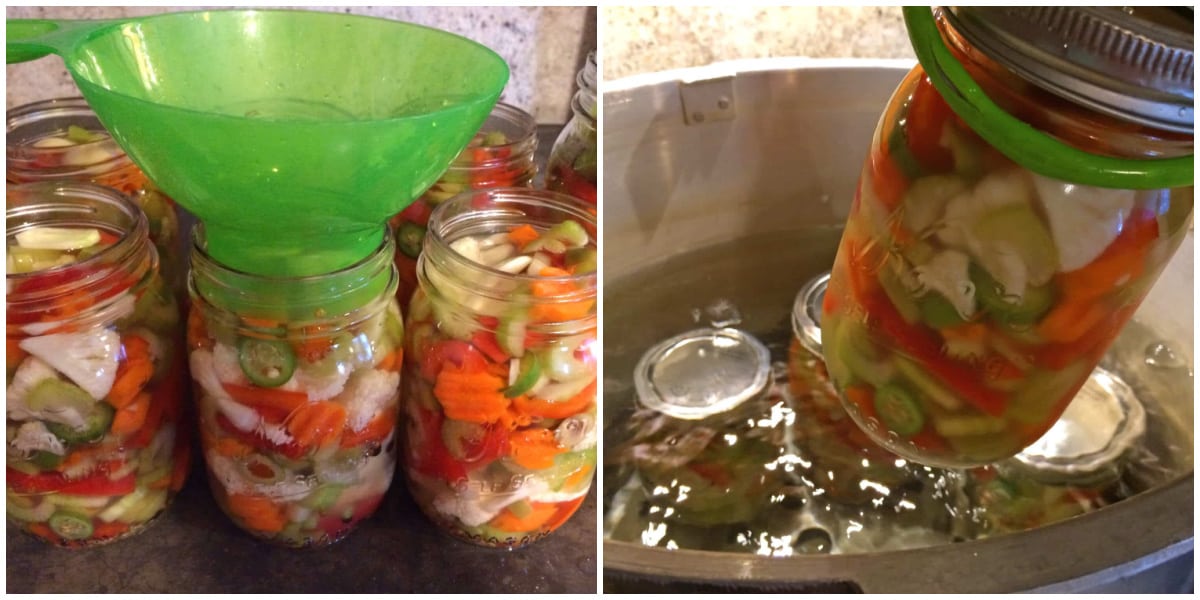
Bring the water, vinegar and salt to a boil.
Pour the boiling brine over the vegetables leaving a little more than 1/2 inch headspace from the top. Pour the olive oil over the top. **Omit the oil if you are proceeding with water bath canning the jars. Wipe the rims with a wet paper towel and seal the jars.
If you plan on using the giardiniera within two weeks let the jars sit at room temperature for a day or two and then transfer them to the fridge.
How to Can Giardiniera
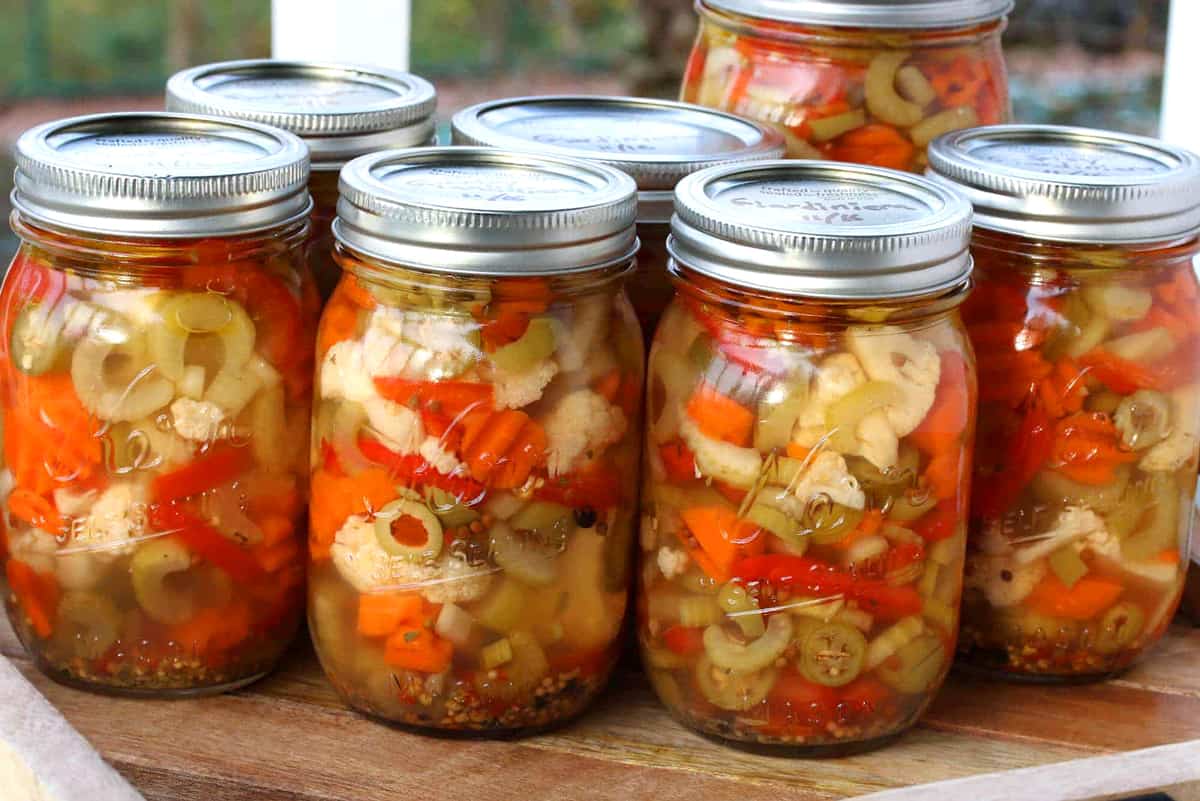
As with other pickled vegetables, giardiniera can be canned using the water bath canning method which will enable you to store it long-term to enjoy all year round. No need to pull out the pressure canner. If you’re canning the giardiniera for long-term storage, seal the jars with the lids and rims and prepare a boiling water bath. Boil the jars for 10 minutes. Carefully remove the jars and let them sit undisturbed for 24 hours before moving them.
Adjustments for high altitudes:
- At 1,001 to 6,000 feet (305 to 1,829 meters) above sea level: increase processing time by 5 minutes.
- Above 6,000 feet (1,829 meters) above sea level: increase processing time by 10 minutes.
If processed in the water bath, the giardiniera is best consumed within 6 months but will keep for up to a year.
This giardiniera is best eaten after a few days once the flavors have had time to meld. Once opened, store the jar in the fridge where it will keep for up to 2 weeks.
Enjoy!
Ways to Enjoy It
Giardiniera can be used in various ways to add a zesty and crunchy element to your dishes. And it’s delicious on its own straight out of the jar. Here are a just few ways you can incorporate giardiniera into your foods:
- Sandwiches and Wraps: It adds a nice crunchy texture and a burst of flavor to the mix. And of course it’s a MUST in your muffuletta sandwich!
- Salads: Toss giardiniera into salads to provide an extra flavor and crunch. Add some to your Macaroni Salad, Potato Salad, and leafy green salads.
- Pizza and Flatbreads: Sprinkle some over your pizza or flatbread before or after baking. It adds a nice bit of tang, richness, and texture.
- Antipasto Platter: Giardiniera is a classic component of antipasto platters. Arrange it alongside cured meats, cheeses, olives, and other pickled items as part of your cheese and charcuterie board.
- Hot Dogs and Sausages: Use it as a topping for hot dogs, brats and sausages. It’s a fun and tasty alternative to the more traditional toppings.
- Tuna or Chicken Salad: Mix it into tuna or Chicken Salad to give it a zesty kick of flavor and some contrasting texture.
- Omelets and Scrambled Eggs: Fold some into your omelet or scrambled eggs for flavor and crunch.
- Grains, Grain Bowls and Rice Dishes: Incorporate it into your grains, grain salads (like my Greek Wheat Berry Salad), grain bowls, and rice dishes for flavor, color and texture.
- Burgers: Top your burgers with it for a fun and tasty flavor twist.
For more great pickled veggie and relish recipes be sure to try my:
- Dill Pickle Relish
- Sweet Pickle Relish
- Sweet Corn Relish
- Sweet Pepper & Onion Relish
- English Pickled Onions
- Branston Pickle
- Pickled Okra
- Pickled Banana Peppers
- Pickled Pepperoncini Peppers
- Pickled Green Beans
- Pickled Carrots
- Pickled Jalapenos
- Pickled Beets
Save This Recipe

BEST Giardiniera Recipe (Spicy or Mild)
Ingredients
- 1/2 head cauliflower, chopped into small florets
- 10 ribs celery , diced
- 5 carrots , diced
- 2 large red bell peppers , seeded and chopped
- 1 cup sliced green pitted olives
- 4 serrano peppers (or more according to heat preference) , sliced
- Spices/Ingredients for EACH pint jar:
- 1/2 teaspoon dried oregano
- 1/2 teaspoon coriander seeds
- 1/4 teaspoon yellow mustard seeds
- 1/4 teaspoon fennel seeds
- 1/4 teaspoon black peppercorns
- 1/4 teaspoon red chili flakes (optional, for hot giardiniera)
- 1/8 teaspoon celery seeds
- 1 bay leaf
- 1 clove garlic, cut in half
- 1 tablespoon extra virgin olive oil
- For the Brine:
- 4 cups white wine vinegar
- 4 cups water
- 2 tablespoons kosher salt
Instructions
- Place the chopped veggies a large non-reactive pot or bowl. Pour 1/4 cup kosher salt over the vegetables and enough water to cover them. Let the vegetables soak in the salt water for at least 6 hours or overnight.
- To prepare the jars, place the spices into each of the jars, reserving the garlic and olive oil until after the brine is added. (I like to make some jars hot and some mild by adding/omitting the red chili flakes).
- Thoroughly rinse and drain the vegetables before dividing them up between 6 pint-sized jars. Pack the vegetables in as tightly as you can. Place a clove of garlic (cut in half) in each jar.
- To make the brine: Bring the water, vinegar and salt to a boil. Pour the boiling brine over the vegetables leaving a little more than 1/2 inch headspace from the top. Pour a tablespoon of olive oil over the top in each jar (omit the oil if water bath canning). Thoroughly wipe the rims with a wet paper towel, ensuring no oil or other residue is on them, and seal the jars.
- If you plan on using the giardiniera within two weeks let the jars sit at room temperature for a day or two and then transfer them to the fridge. The flavor only gets better with time so wait at least 2-3 days before eating it. Will keep refrigerated for 2 weeks.
- If you're canning the giardiniera for long-term storage, seal the jars with the lids and rims and prepare a boiling water bath. Boil the jars for 10 minutes. Carefully remove the jars and let them sit undisturbed for 24 hours before moving them.If processed in the water bath, the giardiniera is best consumed within 6 months but will keep for up to a year.Note: If you're canning the jars for long-term storage you can add the oil later to your giardiniera when you open the jar.Makes roughly 6 pints.
Notes
- At 1,001 to 6,000 feet (305 to 1,829 meters) above sea level: increase processing time by 5 minutes.
- Above 6,000 feet (1,829 meters) above sea level: increase processing time by 10 minutes.
Nutrition
Originally published on The Daring Gourmet August 21, 2017

Hi, I’m Kimberly Killebrew and welcome to Daring Gourmet where you'll find delicious originals, revitalized classics, and simply downright good eats from around the world! Originally from Germany, later raised in England, world-traveled, and now living in the U.S., from my globally-influenced kitchen I invite you to tour the world through your taste buds!


Try adding some Thai chile if you want heat, even a bit of habanero. We like things spicy around here. Mushrooms, baby corn, cabbage, whole garlic cloves and more are great additions. I like to cure my own olives and will add some to the mix. Fun, fun, fun! Thanks!
I just made this yesterday for the first time and it is very easy. I can’t wait to try it. I used pint jars this time, as the recipe calls for. If I decided to make it in quart size jars instead, do I double the quantity of spices in the jar or leave it at the same level as it would be for pint jars?
Hi Beverly, yes, double the spices if you’re doing quarts. Happy eating! :)
Other than flavor, what does the olive oil add to the mix. I also thought of adding pepperoncini, your thoughts?
Hi Rick, the olive oil is also for texture/consistency, but you can omit it if you prefer. Pepperoncini would be a great addition. Happy canning!
In Chicago these are often found in jars where it seems that it’s 90% oil. Is there a way to replicate that? I like the oil as part of the real Chicago style flavor and texture.
Hi Marc, absolutely. The only reason you couldn’t use more oil is if you’re canning the jars for long-term storage. Otherwise, feel free to add more oil. To ensure the veggies soak up the flavors of the brine, let them sit in the brine until it’s fully cooled, perhaps even a little longer, before you put them in jars and pour over the oil. Be sure to include some of the brine to the oil mixture for more flavor.
Just a quick question. Does the processing time need to be adjusted for altitude? Thanks for sharing!
Hi William, depending on the altitude you can take the following precaution to increase the time:
At 1,001 to 6,000 feet (305 to 1,829 meters) above sea level: increase processing time by 5 minutes.
Above 6,000 feet (1,829 meters) above sea level: increase processing time by 10 minutes.
Happy canning!
Love this recipe! Made some since I wanted to try it on a cheesesteak, used purple cauliflower, romanesca, red and yellow peppers, and some amazing local smoked green olives. It was INSANE good, could see putting it on pizzas or rolling it in beef rolls with sunday gravy!
I made other recipes before, but this is so much better. Main points are the olive oil and spices are a must, and what other recipes were lacking.
Thanks for sharing this!!
Fantastic, John, I’m so glad you enjoyed it and appreciate the feedback, thank you! The smoked green olives are a great touch.
It was so good on a cheesesteak I cannot begin to explain. Just finished canning my 2nd batch and used the standard ingredients plus some red onion, but am going to try to add chard and beet stems next time for added color and texture, plus it’s something that always needs to get used somehow and I bet it would work :)
Fantastic, John! Yes, you can pickle almost anything and that’s a great way to make use up those items. Happy Canning! :)
Did you let the veggies soak in the fridge?
Hi Megan, I let them sit out at room temperature and keep them covered so no flies can get in. You can refrigerate them if you prefer though.
Why do you use white wine vinegar instead of regular distilled white vinegar?
I prefer the flavor.
I am just about to brine cure some cracked green oives , I remember growing up in an Italian family an my dad and uncle did the same , they took the cured olives and made and olive salad by adding garlic celery peppers (hot & mild and seasonings . They packed this all in quart mason jars with some wine vineger and some olive oil on top. I believed they processed them using a hot water bath like we did when putting up quarts of tomatoes.What I have read is olives are a low acid fruit and should only be processed in a pressure cooker. When cured olives are put up in white wine vinegar is it safe to use hot water bath canning??
Hi Gary, I don’t have any experience in the realm of curing and storing olives and don’t want to risk giving you any false information. Hopefully an online search will yield some helpful information for you. Good luck!