Traditional English Crumpets
This post may contain affiliate links. See my disclosure policy.
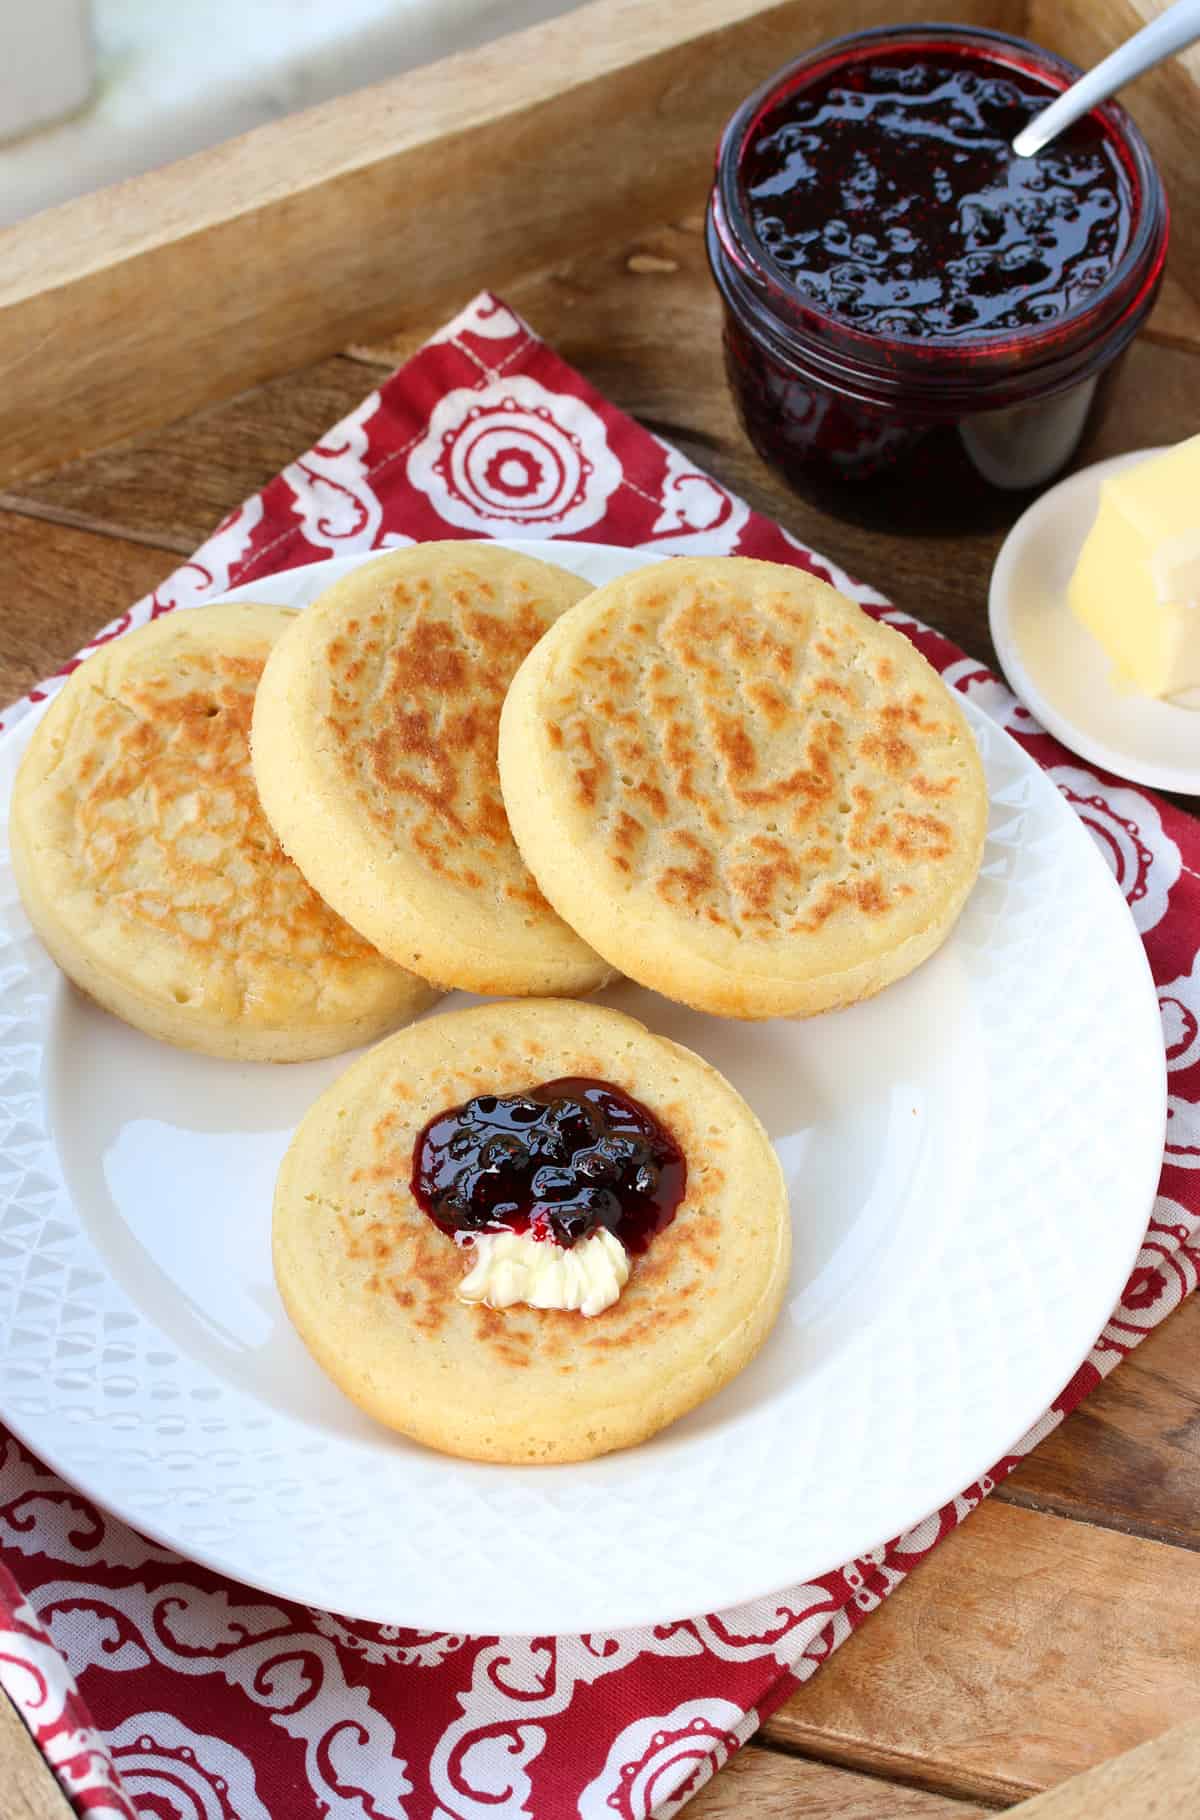
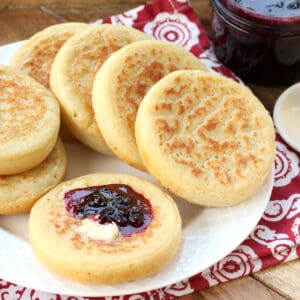
Crispy, chewy and delicately spongy in texture with a delicious depth of yeasty flavor, look no further for the best and most authentic crumpets recipe! Serve these homemade crumpets with fruit preserves, marmalade, honey, or just slather on the butter and you’re all set for enjoying one of Great Britain’s most iconic foods!
Homemade Crumpets
When I moved to England where I lived for 7 years, there were a number of quintessential British dishes I was eager to try. Crumpets was one of them. We had no sooner settled into our hotel room than we went grocery shopping at the local Tesco and I picked up a package of them for the following morning. We popped the them in the toaster, slathered them with butter and jam and took our first bite of English crumpets.
The verdict: The butter and jam were good. Excessively spongy in texture and bland in flavor, I wondered why, of all things, crumpets had earned such a prominent place on the British table. I swiftly wrote crumpets off as “tried them once and once was enough.”
….That is, until I ate some homemade crumpets at a friend’s house. My opinion of the famous crumpet made a 180 degree turn! Simultaneously crispy, chewy and delicately spongy in texture with a wonderful depth of yeasty flavor, I can promise you – homemade crumpets are everything they’re chalked up to be! Continue below to our crumpet recipe learn how to make the BEST homemade crumpets EVER!
What is a Crumpet?
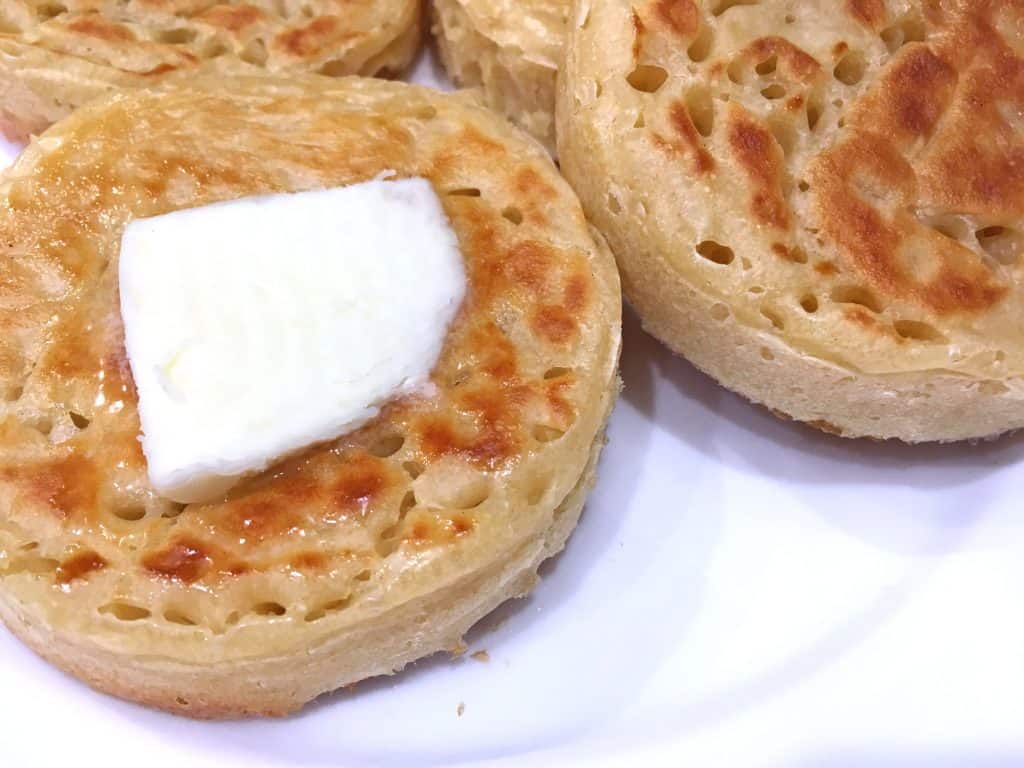
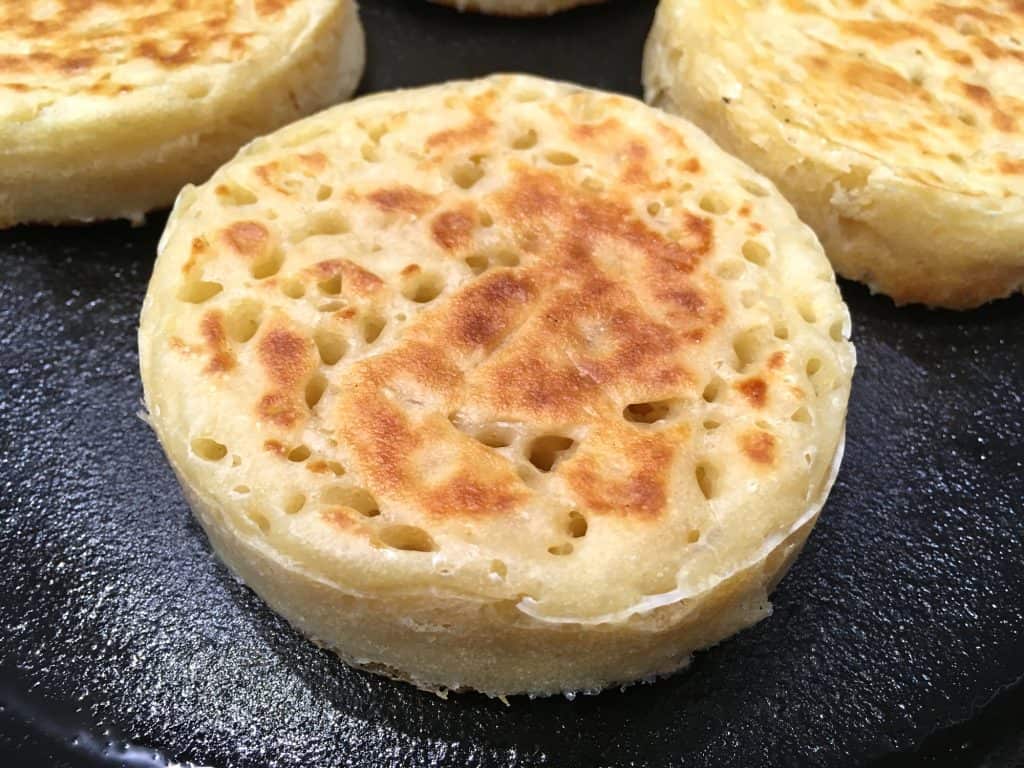
A crumpets is an English griddle cake made from flour, milk/water and yeast and is traditionally eaten for breakfast or with afternoon tea. Crumpets are soft and somewhat spongy in texture and their crowning feature are the dozens of tiny holes that dot the surface, allowing whatever you spread on them to soak down into them, making each and every bite an unforgettable one.
Where Did They Originate?
Crumpets originated in United Kingdom and one of the earliest mentions of “crumpet” came from the English Bible translator, John Wycliffe, who referred to them as “the crompid cake.” The name is thought to have either Old English origins (crompeht) or Celtic origins referring to a “thin, flat cake” (i.e., Breton: krampouezhl; Cornish: krampoeth; or Welsh: crempog or crempot, a type of pancake).
The crumpet has evolved over time. Centuries ago they were made without yeast and were flatter and harder, more like pancakes (what is also a Welsh variation, bara piglydd or pyglyd, known as pikelets, likewise enjoyed throughout Australia and New Zealand). During the Victorian era the yeast was introduced and crumpets have never been the same since – for the better.
Crumpet vs English Muffin
Crumpets and English muffins are sometimes confused and while it’s true that they’re both cooked on a griddle, they are distinctly different. English muffins are more like bread rolls; they’re doughy, heavier and bread-like. (Check out my recipe for Sourdough English Muffins.) English muffins are also cut in a half for serving.
Crumpets are lighter and spongier in texture both as a result of different ingredients/ratios as well as technique and the dual rising method that gives them a different texture, consistency and appearance (specifically the dozens of tiny holes that dot the top surface). Unlike English muffins, crumpets are not split in half for serving. Instead the butter, honey, jam, etc and spread right on top of the toasted crumpet.
How to Make Crumpets
Crumpets are pretty straightforward to make and because they’re made with yeast they share some similarities with bread-making like:
- Making the batter (dough)
- Letting it “rise” (in the case of crumpet batter it will get puffy and bubbly)
- “Baking” it (in this case cooking it on a griddle on in a skillet inside individual rings).
Before we get started there are a few important questions I frequently get asked that I want to address to help ensure that your crumpet-making experience is a success!
How Long Should Crumpet Batter Rest?
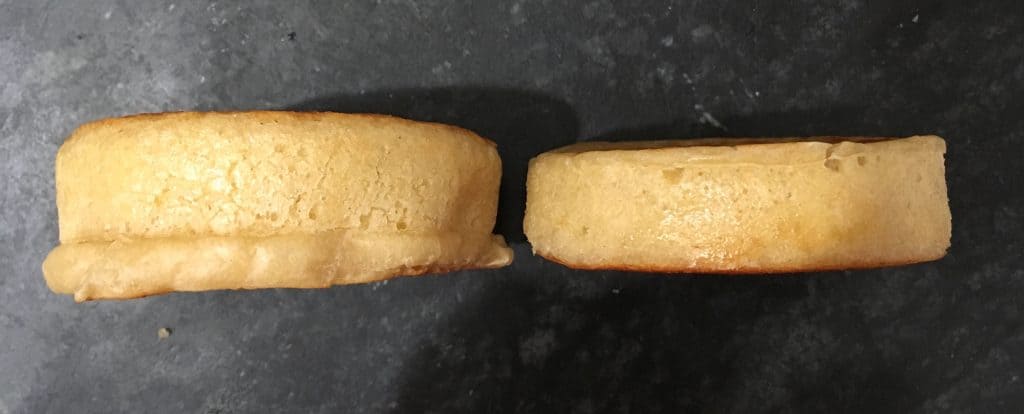
Different recipes recommend different times. The batter is ready after sitting for 30 minutes (crumpets in above pics were made after 30 min) but I have found that letting it rest a bit longer will give you an even higher rise and a lighter texture. In the pic below I let the batter sit for an additional 20 minutes. See the side-by-side pic for a comparison of height. Try both and see which you prefer. Both are excellent but I slightly prefer the higher rise for that lighter, airer texture.
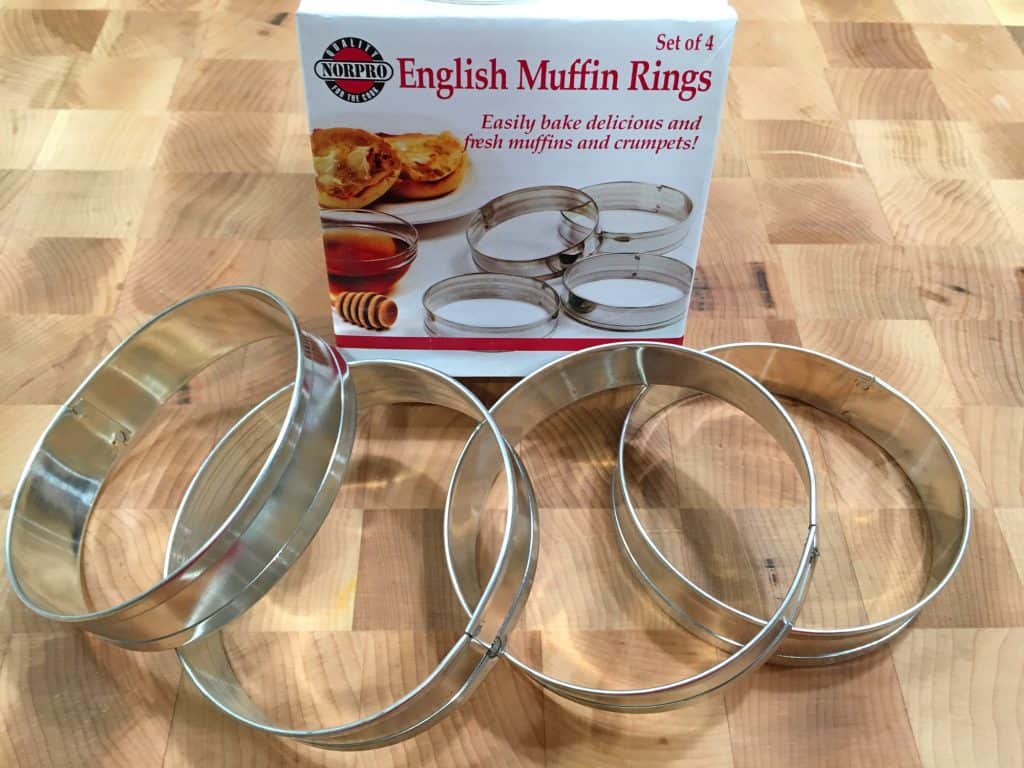
Equipment: Do I Need Crumpet Rings?
Yes. Crumpet batter is very loose and runny and the crumpets rings are what will shape and hold the batter while the crumpets are cooking.
I use Norpro’s English Muffin/Crumpet Rings. They do the job perfectly. Is there a substitute? Well, sort of. In a pinch I’ve had readers report success with using wide mouth jar canning bands but the bands have ridges which the batter will easily get stuck in, so just a heads up that it may result in frustration.
Crumpets Recipe
Let’s get started!
Stir the sugar and yeast into the warm milk and let it rest for 10 minutes until frothy. In a large mixing bowl or the bowl of a stand mixer combine the flour and salt.
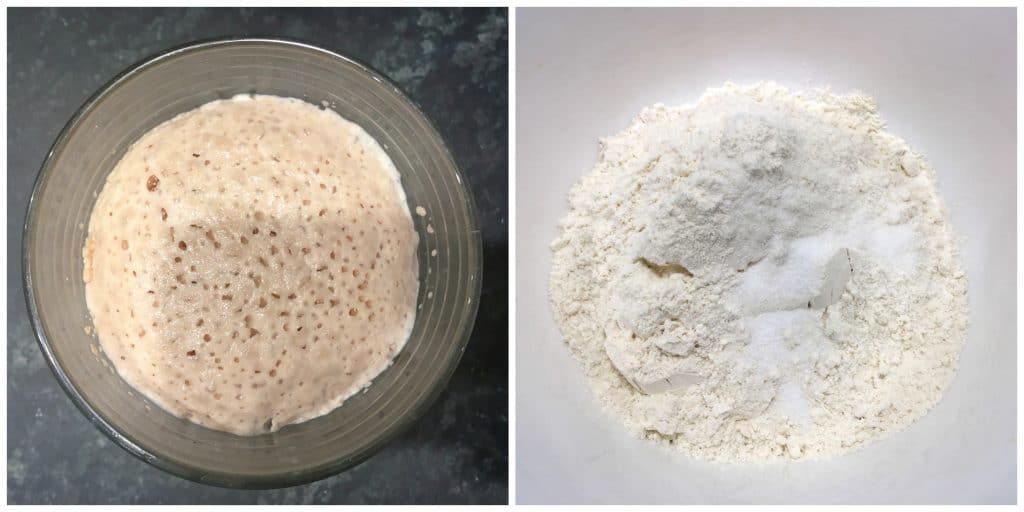
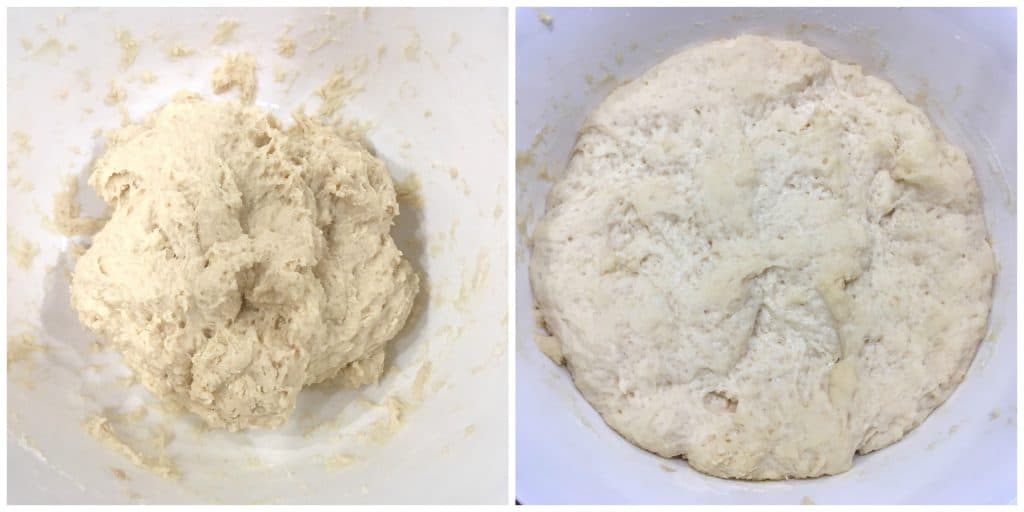
Add the liquid to the flour mixture and stir/knead until a thick dough forms. If using a stand mixer, use the paddle attachment and beat the mixture for about 3 minutes until a thick dough forms.
Cover the bowl loosely with plastic wrap and set it in a warm place to rise for at least an hour or up to two (it should nearly double in size). This stage is important for the formation of the bubbles that will later form the classic holes in the crumpets.
Dissolve the baking soda in the warm water and add it to the dough. In addition to the previous proving phase, the baking soda is also what helps aerate the crumpets to give them their classic pores. Those pores allow the butter later on to soak beautifully into the crumpet and gives them their famous sponge-like texture.
If using a stand mixer, beat the batter for a minute or two. Or use an electric mixer to beat the batter. If some small lumps remain that’s okay. Any remaining lumps will dissolve during the next resting stage.
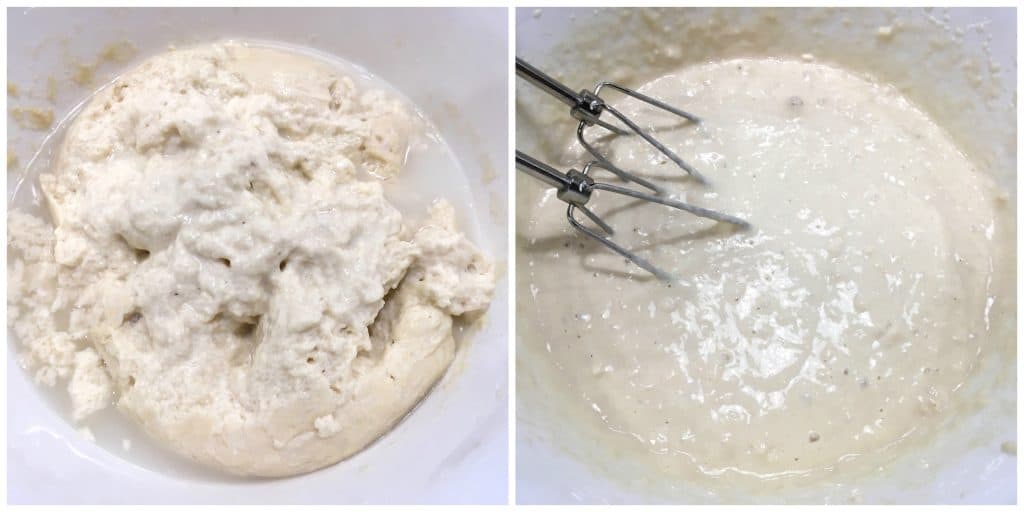
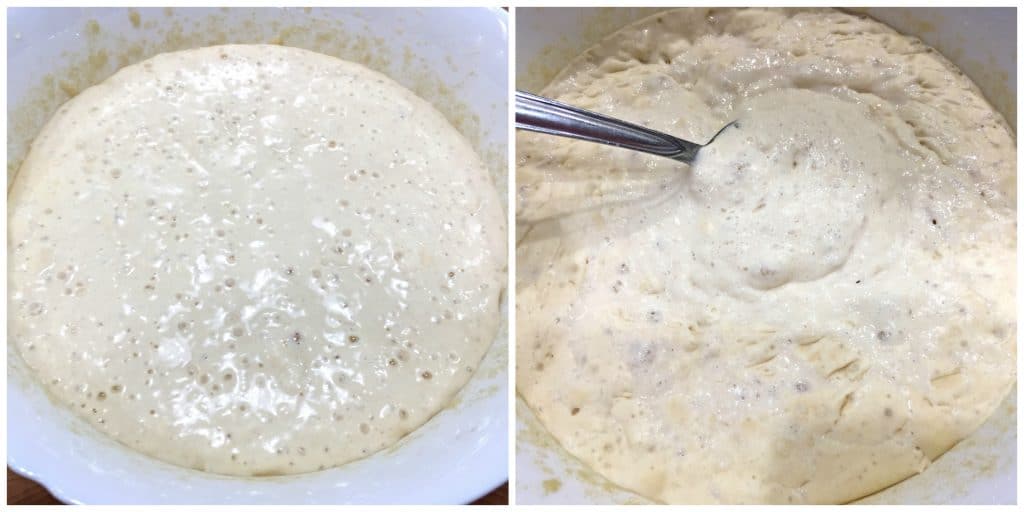
Cover the batter and let it rest in a warm place for at least 30 minutes (see note below comparing the rise of the crumpets depending on how long the batter sits).
After 30 minutes the batter should be nice and bubbly. When you stir it, it will bubble and froth nicely.
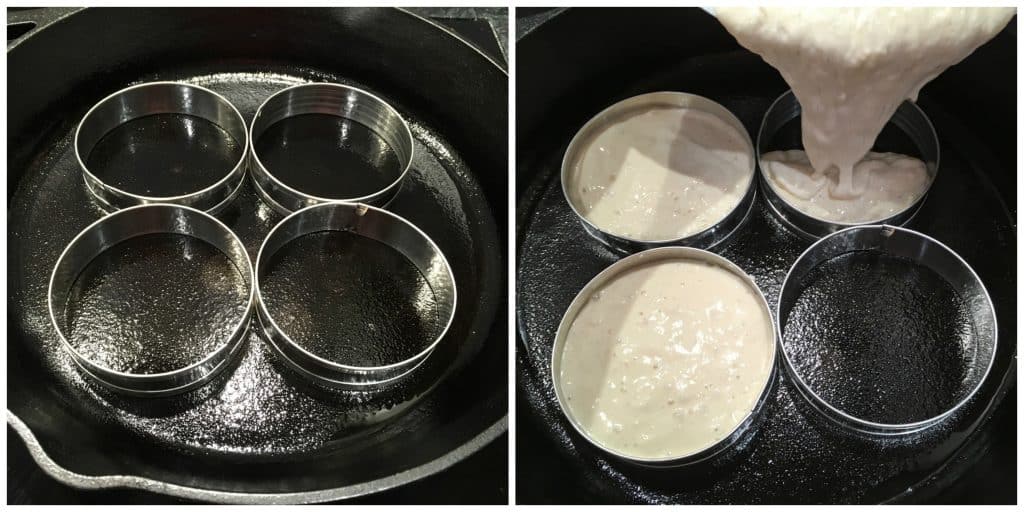
Prepare the crumpet rings: Oil the inside rims of the crumpet rings. Lightly oil the frying pan. You can use a regular skillet or a cast iron pan (my preference). I’m using my Lodge 12″ Cast Iron Pan.
Heat the pan and rings over medium-high heat. Once the rings are hot, pour the batter into each ring until it’s slightly more than half full.
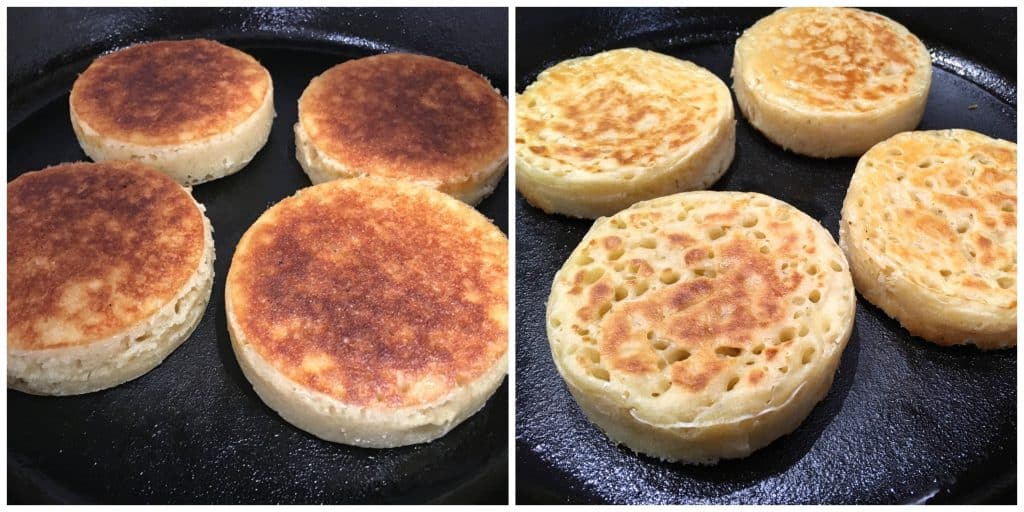
Cooking time will vary depending on your stovetop and frying pan but these will cook for approx 8-10 minutes (the time will vary according to the kind of cooktop and cookware you’re using. Just be sure to keep an eye on them to ensure they don’t burn on the bottom. Lower the temp as needed to finish off the cooking).
The batter will begin to rise and bubble on top.
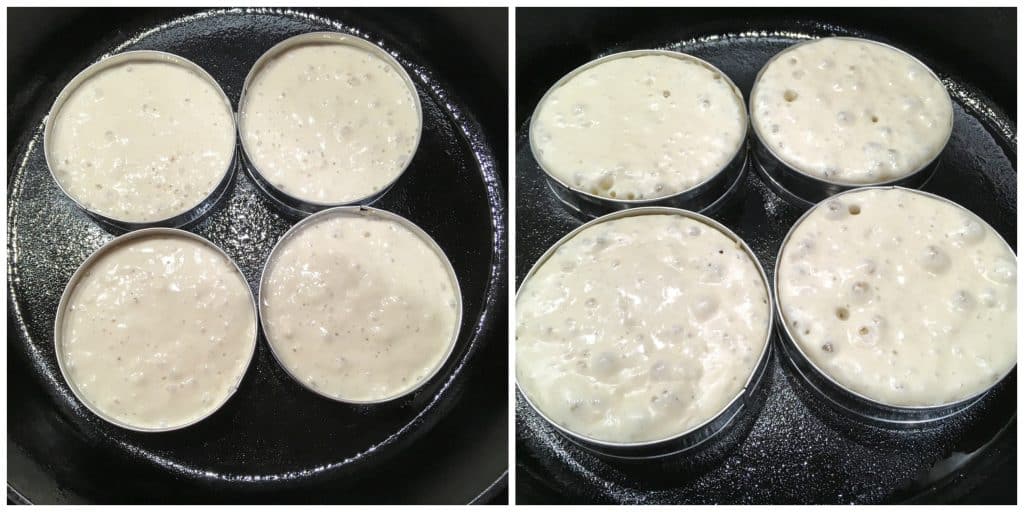
After several minutes when the tops are cooked and the classic pores/holes are present with the bottoms lightly browned, your crumpets are done and you can remove the rings.
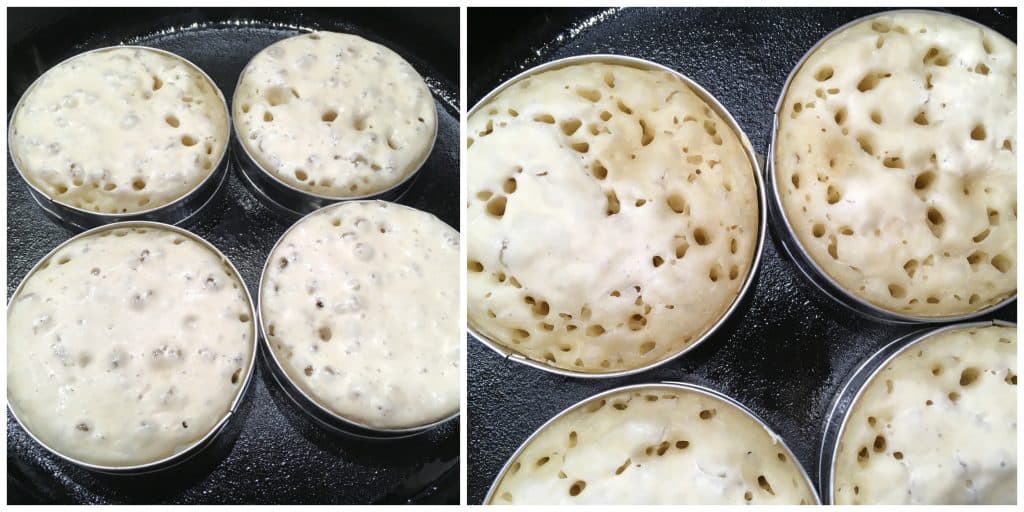
Traditionally crumpets are only cooked on one side only, not flipped over, and then toasted later. However, if you’re going to eat the crumpets immediately, I prefer to remove the rings and flip the crumpets over to cook an extra minute or two on the top side for a nice golden color and added layer of crispiness. If you flip them be careful not to move them so you don’t smear any uncooked batter and thereby cover over the pores.
If you’re keeping them for later or plan on freezing them, you have the option to flip or not flip – either way you’ll want to toast them to reheat them.
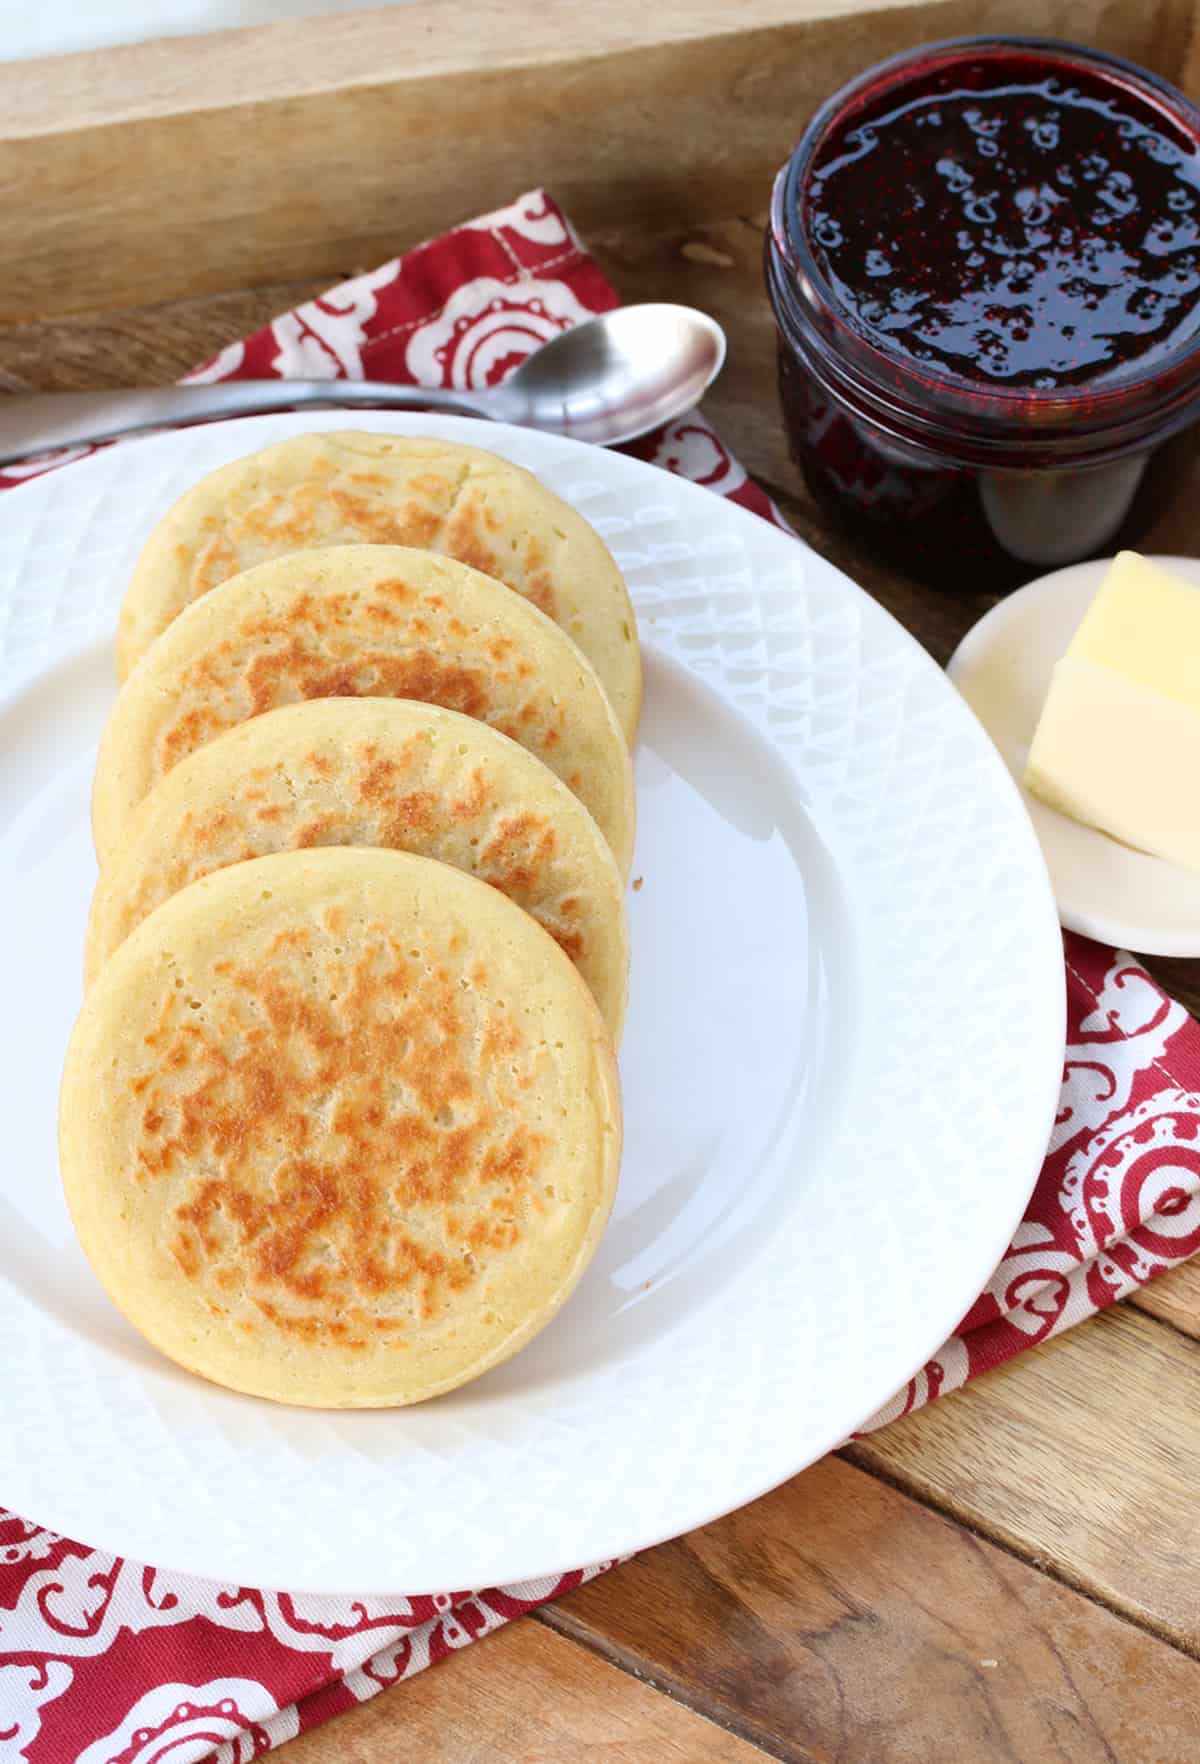
Your gorgeous, delicious homemade crumpets are ready to eat!
How to Eat Crumpets
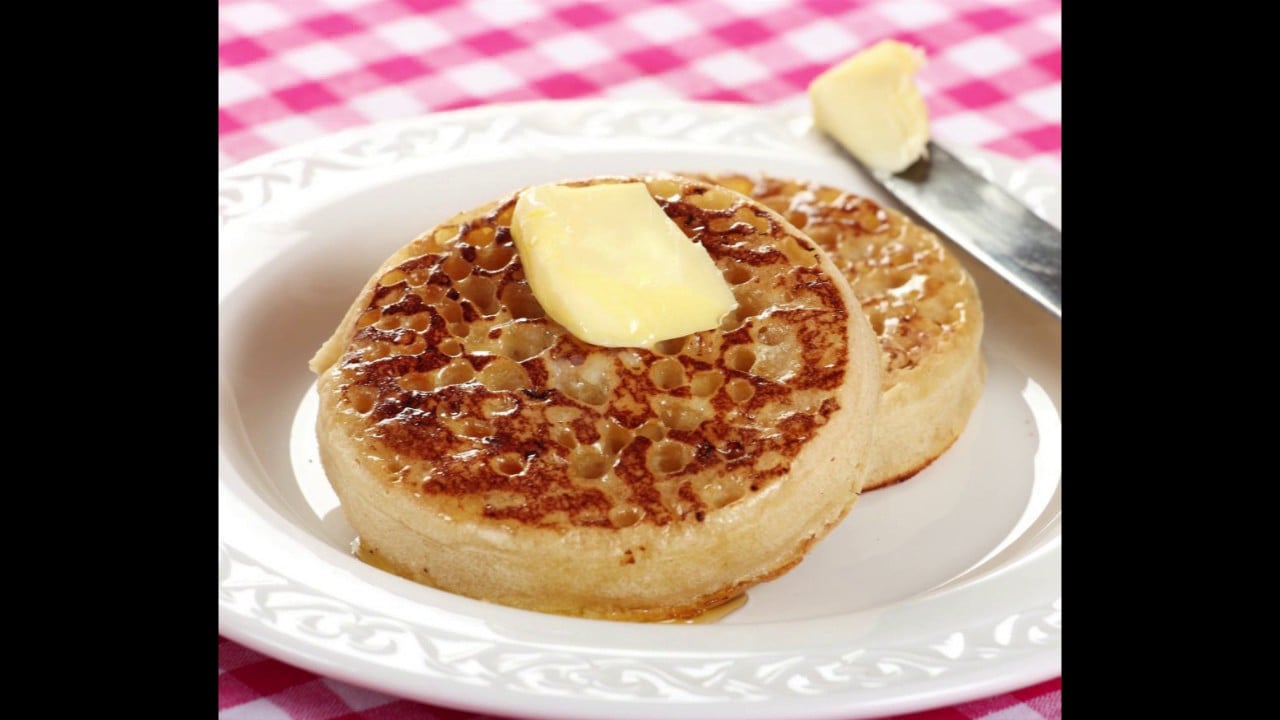
Store-bought crumpets are always toasted before eating them because they’ve become soft from sitting in the packaging. However homemade crumpets straight out of the frying pan will be wonderfully crispy on the outside so there is no need to toast them. If you’re not serving them immediately toast them just before serving. Note: Crumpets are eaten whole/open-faced and are not cut in half horizontally.
Serve the crumpets warm slathered with butter, jam, golden syrup, honey or topping of your choice. Check out my recipes for homemade Black Currant Jam, Strawberry Rhubarb Jam, Gooseberry Jam, Blackberry Jam, Plum Jam, Lemon Lime Marmalade and Lemon Curd.
Storage and Freezing
Store the crumpets in an airtight container in the fridge where they will keep for 4-5 days. They also freeze well for up to 3 months. To freeze them, let them cool completely, place them in a ziplock freezer bag or freezer safe container, and put them in the freezer. When you’re ready to eat them, let them thaw on the counter, in the microwave, or in the fridge overnight and then toast them.
Enjoy!

For more classic British recipes be sure to try my:
- Yorkshire Pudding
- Suet Dumplings
- Fish and Chips
- Mushy Peas
- Bangers and Mash
- Scotch Eggs
- Sticky Toffee Pudding
- Rock Cakes
- Chelsea Buns
- Victoria Sponge Cake
- Treacle Tart
- Lardy Cake
- Hot Cross Buns
- Eccles Cakes
- Spotted Dick
- Figgy Pudding
- Flapjacks
- Toad in the Hole
Save This Recipe
Traditional English Crumpets
Ingredients
- 2 cups all-purpose flour (can substitute half bread flour)
- 1 teaspoon salt
- 1 cup warm milk
- 2 teaspoons active dry yeast
- 1 teaspoon cane sugar
- 1 cup warm water
- 1/2 teaspoon baking soda
Instructions
- Stir the sugar and yeast into the warm milk and let it rest for 10 minutes until frothy. In a large mixing bowl or the bowl of a stand mixer combine the flour and salt.
- Add the liquid to the flour mixture and stir/knead until a thick dough forms. If using a stand mixer, use the paddle attachment and beat the mixture for about 3 minutes until a thick dough forms. Cover the bowl loosely with plastic wrap and set it in a warm place for at least an hour or up to two to let the dough rise (it should nearly double in size). This stage is important for the formation of the bubbles that will later form the classic holes in the crumpets.
- Dissolve the baking soda in the warm water and add it to the dough. If using a stand mixer, beat the batter for a minute or two. Or use an electric mixer to beat the batter. If some small lumps remain that’s okay. Any remaining lumps will dissolve during the next resting stage.Cover the batter and let it rest in a warm place for at least 30 minutes (see note below). After 30 minutes the batter should be nice and bubbly.
- Prepare the crumpet rings by greasing the inside of each rim. (I use and like Norpro's English Muffin/Crumpet Rings.) Lightly oil the frying pan. You can use a regular skillet or a cast iron pan (my preference). I use my Lodge 12" Cast Iron Pan.Place the rings in the frying pan over medium-high heat.
- Once the rings are hot, pour the batter into each ring until it's slightly more than half full. Cooking time will vary depending on your stovetop and frying pan but these will cook for approx. 10 minutes (**the time will vary according to the kind of cooktop and cookware you're using and may take longer. Just be sure to keep an eye on them to ensure they don't burn on the bottom. Lower the temp as needed to finish off the cooking). Turn the heat down as needed to prevent burning. The batter will begin to rise and bubble on top. After several minutes when the tops are cooked and the classic pores/holes are present with the bottoms lightly browned, your crumpets are done. Note: You can either remove the rings and flip the crumpets over to cook the other side for another minute or two until golden or remove them from the rings and toast the crumpets. (See blog post for more info on this.)
- Serve the crumpets immediately slathered with butter, jam, golden syrup or honey. To reheat later toast them in the toaster. Can also be frozen, thaw first before toasting. (Crumpets are eaten whole/open-faced and are not sliced in half horizontally.)
- NOTE: Regarding how long to let the batter sit before using: It’s ready after 30 minutes but letting it rest a bit longer will give you an even higher rise and a lighter texture (see blog post for side-by-side comparison pics). And more bubbles means more of those classic holes in your crumpets. Try both and see which you prefer. Both are excellent.
Video
Nutrition
Originally published on The Daring Gourmet October 17, 2019

Hi, I’m Kimberly Killebrew and welcome to Daring Gourmet where you'll find delicious originals, revitalized classics, and simply downright good eats from around the world! Originally from Germany, later raised in England, world-traveled, and now living in the U.S., from my globally-influenced kitchen I invite you to tour the world through your taste buds!


Dear Kimberly, I tried your recipe and I had success. I had two of my nieces with me and they thought they were so delicious. That night they were telling there mum ‘Crumpets are so yummy’. I live in New Zealand. I leave the crumpets to rise in our kitchen.
We are planning on taking them camping and frying them with a bit of butter on a pan on top of the fire and then eating them with golden syrup and also bacon and fresh tomato is also delicious. I have been mixing the crumpet batter in a mixing bowl with a beater and I also tried a whisk. A hand beater might not be strong enough. Do you think. What about putting a lid over the top of them so the top will cook faster ? Can you add more baking soda or yeast. What is the difference between using Baking Soda and using Baking Powder? Thankyou for taking the time to read this and answer theses questions. Kindest regards Caring.
Dear Kimberly, Iv been trying out your recipe and Iv found it quite good except I do have a few questions for you. When I mix them up the mixture is just like yours like a dough but mixing it up two hours later when I add the water it doesn’t seem to mix very well and it has really big lumps of mixture which doesn’t want to mix in properly. You said on the recipe that any remaining lumps would come out later but those big lumps don,t. Also I was wondering how you can get lots of holes in the top like the ones you would buy. Is there something you do. The bottoms seem to burn faster than them cooking through to the top but does flipping them make the holes on top not work. Iv made a few batches already but I would really like to get a really successful batch of crumpets with lots of holes on top as well. Thankyou for taking the time to read this. Hoping to hear from you. Kindest regards Caring
Hi Caring, are you using an electric mixer/beater to mix the batter? That should do the trick and just keep beating until the large lumps break down. During that initial resting phase before you add the water, is it possible your batter is in too warm/dry of a location? I don’t know where you’re located but it could be that the batter is drying out too much which could also explain why any large dry lumps aren’t breaking down well when you mix it. Cooking the crumpets will involve some trial and error until you find the right temperature for your particular skillet and cooktop. Also, while they’re cooking keep an eye on the bottoms and if they’re cooking too quickly turn the heat down and cook the crumpets on lower heat for the remaining time so they can cook through without the bottoms burning and without you having to flip them. Yes, flipping them and cooking the tops before the batter is cooked through at the top will cause the holes to close up. Lots of holes: I explain more about that in the blog post but it comes down to the proper amount of rising time and the addition of the baking soda.
Awesome recipe.I’ve made it twice now and they turned out perfect both times. They taste soooo good!!
I’ve been using your recipe for almost a year now and have been very delighted with the results! Thank you so much for your recipe.
I use cashew milk since we can’t have dairy (I add a bit of fat to the batter to account for the loss in fat from the milk) and I use 1 1/2 c white flour and 1/2c grain flour mix (rye, cracked wheat and flax) with perfect results. 😊
Fantastic, Leah, thanks so much for the feedback and info about your substitutions!
Hi ! I’m french and i’ve tested this recipe ! Amazing, thank you so much ! :)
Fantastic recipe which worked a treat for my first ever crumpet cooking. Thanks for this and the instructions.
The problem I did have, though, was the temperature setting as the first 4 burnt badly. Having oiled the 4 rings and non-stick pan I set the temp. on the induction hob to a ‘6’ (1-9max), searching for ‘medium high’. Despite reducing to 5, they’d caught and the bases were burnt
Batch#2, I set to 5. But this too was too high.
On Batch#3 at a 4 setting they cooked and browned at the base but did not burn. Downside was they did take 15 mins to cook.
Next time, I can follow these lower settings and leave them on a timer to free up my time for other duties.
How do you/others cook in a pan at a higher temp without burning? I do wonder.
Thanks anyway. They do taste delicious, very spongy and solo fresh.
Dennis
Hi Dennis, the temperature setting will vary from cooktop to cooktop as well as the particular frying pan you’re using so you just need to do exactly what you did in finding the right temperature point for your specific setup. I’m glad you enjoyed the crumpets and appreciate the feedback, thank you!
I’ve been to England several times but had never had crumpets. Likewise I bake, but had never tried crumpets. I had the afternoon off and made this recipe today. So delish. They inspired me to raid the cupboards and frig, making a nice international afternoon tea for myself with some Earl Grey, Irish butter, Kentucky ham, and Tennessee honey. Ahhhh
YES! That sounds absolutely perfect, Yvonne, and I’m so glad you enjoyed these crumpets, thank you!
I love crumpets but since I tried English muffins I’m addicted !